Workshop Manual


Volume I - Engine, 8 valves


DR. ING. h. c. F. PORSCHE Aktiengesellschaft
As webpage by http://www.uriarte.dk/porsche944
12.3.2018
WORKSHOP MANUAL 944


This Workshop Manual describes all of the important operations for which special instructions are required to assure proper completion. This manual is essential for shop foremen and mechanics, who need this information to keep the vehicles in safe operating condition. The basic safety rules, of course, also apply to repairs on vehicles without exception.


Only those repair jobs deviating from those of vehicle type 924 are described in the 944 Workshop Manual. Refer to the 924 Workshop Manual for all other information.


The information is grouped according to repair numbers which are identical to the first two digits of the warranty job codes.


The repair group index, list of contents and the register tabte are quick guides to find information in the manual. The layout drawings in this manual are numbered in the order of disassembling and, if necessary, also have information on assembly or installation and application of special tools.


Descriptions of design and function can be found in the service training course reference material.


This Workshop Manual will be kept up to date with Technical Information Bulletins, which will be made part of the manual from time to time. We recommend that these bulletins be filed in the standard type folder provided for this purpose.


Printed in Germany
List of Repair Groups 944

General Technical Data Page 0.1

Repair Groups   Group

  Maintenance, Self-diagnosis 03

Engine Engine, Crankcase
Engine, Crankshaft, Pistons
Engine, Cylinder Head and Valve Drive
Engine, Lubrication
Engine, Cooling
Fuel Supply
Air Flow Controlled Fuel Injection
Exhaust System/Emission Controls
Starter, Power Supply, Cruise Control
Ignition System
DME Diagnosis
10
13
15
17
19
20
24
26
27
28

Transmission Clutch, Controls
Torque Converter
Manual Transmission, Controis, Case
Manual Transmission, Gears, Shafts
Autornatic Transmission, Controls, Case
Automatic Transmission, Gears, Valve Body
Differential, Transaxle System
30
32
34
35
37
38
39

Chassis Front Wheel Suspension
Rear Wheel Suspension, Axle Shaft
Wheels, Tires, Alignment
Antiblock System
Brakes, Mechanical
Brakes, Hydraulics, Regulator, Booster
Steering
40
42
44
45
46
47
48

Body Body-Front Section
Body-Center Section
Body-Rear Section
Lids
Doors
Hardtop
Bumpers
Glasses, Window Control
Exterior Equipment
Interiør Equipment
Seats
Seat Covers
Airbag Diagnosis
50
51
53
55
57
61
63
64
66
68
72
74

Heating,
Ventilation,
Air Condition
Heater
Ventilation
Air Conditioner
80
85
87

Electrics Instruments, Fuel Gauge, Alarm System
Radio, Telephone
Windshield Wipers and Washer
Exterior Lights, Lamps, Switches
Interiør Lights
Wiring
90
91
92
94
96
97

Printed in Germany - XXI, 1989
  9 4 4


0 Blank Page
944 Table of contents volume I


General

Technical data


Engine, Crankcase

Tolerances and wear limits
Tightening torques for engine
Engine, removing and installing (manual transmission)
Hydraulic engine mounts, removing and installing
Checking hydraulic engine mounts
Installing new hydraulic engine mounts


Engine, Crankcase, Pistons

Checking and adjusting tension of Poly-rib belt for
alternator and compressor
Checking adjustment of compensating shaft
Checking and adjusting tension of the power pump belt
Calibrating Special Tool 9201
Checking and adjusting toothed belt tension - compensating shafts
Checking and adjusting toothed bert tension - compensating shafts (idler pulley with slot)
Installing toothed belt - compensating shaft
Application - assembly stand VW 540 and engine holders 9127 and 9197
Identification of engine number on crankcase
Identification code, crankcase engine number
Crankcase and crankshaft, disassembling and assembling
Installing cover for the centrifugal compartment
Checking crankshaft bearing play
Identification code - upper and lower crankcase sections and compensating shaft cover
Sealing crankcase - upper and lower sections
Installing upper and lower crankcase sections
Aligning upper and lower crankcase sections
Installing crankshaft seal (flywheel side)
Flywheel and grooved ball bearing, removing and installing
Refacing the flywheel
Replacing setscrew (reference mark sensor)
Setting crankshaft to TDC, cylinder 1
Crankshaft dimensions - standard and machined
Checking pistons and cylinder bore
Pistons, disassembling and assembling con rods
Installing pistons with con rods
Pistons, from Model 89 onwards
Installing pistons with con rods
Holding the flywheel for assembly work (with engine installed)
     Page


0.2 


10 - 01
10 - 03
10 -   1
10 -   7
10 - 10
10 - 11


13 - 1
13 - 2
13 - 2a
13 - 2b
13 - 3
13 - 6
13 - 11
13 - 13
13 - 14
13 - 14b
13 - 15
13 - 20 b
13 - 21
13 - 22
13 - 23
13 - 24
13 - 24 a
13 - 25
13 - 26
13 - 26a
13 - 27
13 - 28
13 - 29
13 - 31
13 - 32
13 - 34 a
13 - 34 b
13 - 35
13 - 37


Table of contents
Printed in Germany - XXIV, 1993
1
volume I Table of contents 944


Compensating shaft drive, disassembling and assembling
Installing bearing bridges for compensating shafts
Compensating shaft drive, disassembling and assembling
Compensating shaft drive sprockets, installing (Model 84 onwards)
Machining cylinder bores


Engine, Cylinder head, Valve drive

Camshaft belt tension, checking and adjusting
Installing camshaft belt and adjusting timing
Cylinder head, removing and installing
Tightening specifications for cylinder head
Valve drive, disassembling and assembling
Machining mating face, cylinder head
Replacing valve guides
Valve drive, disassembling and assembling
Machining valve seats, checking valve guides
Valve drive, disassembling and assembling (camshaft housing)
Camshaft drive, disassembling and assembling
Camshaft specifications
Adjusting camshaft belt with mechanical belt tensioner


Engine - Lubrication

Replacing engine oil and oil filter
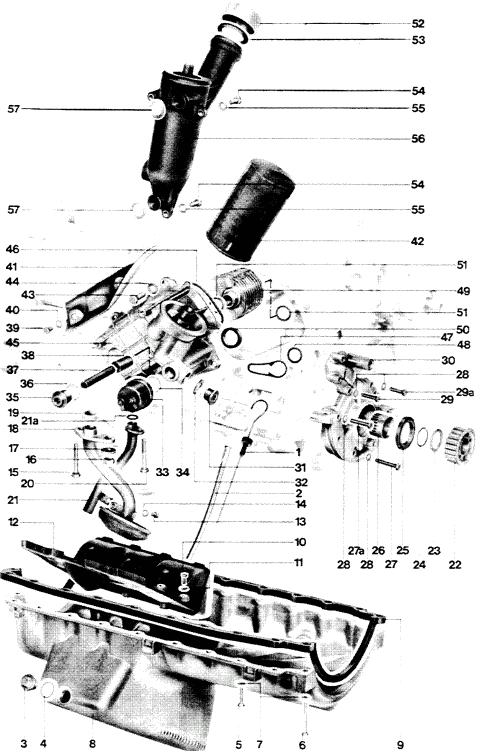
Parts of the lubrication system, removing and installing
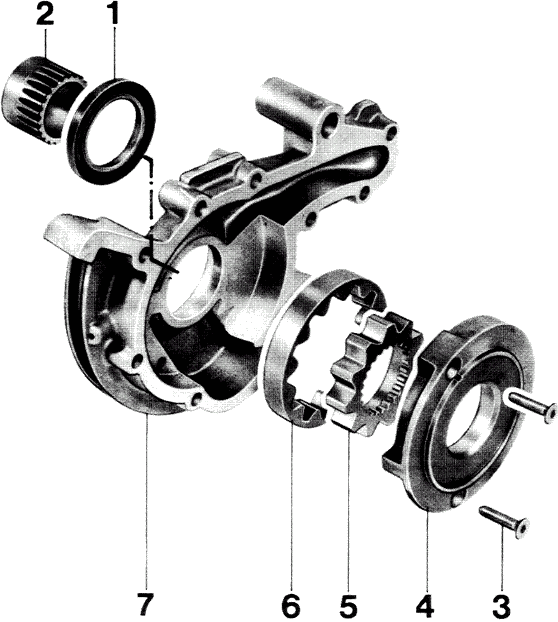
Oil pump, disassembling and assembling
Sleeve for oil-pressure relief valve, removing and installing
Tightening specifications for oil-pump fastening screws.
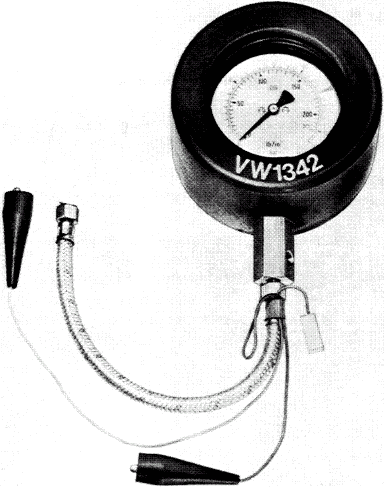
Checking oil pressure
Oil check valve in cylinder head, removing and installing
Cleaning the engine oil system
Cleaning the main oil channel in the crankcase
Pressure-reducing valve, removing and installing


Engine - Cooling

Replacing coolant and bleeding cooling system
Checking thermostat, checking system for leaks
Parts of the cooling system, removing and installing
Parts of the cooling system, removing and installing, Mod. 87 onwards
Radiator, removing and installing
Temperature switch, removing and installing - checking temperature switch
Cleaning cooling system after oil and water have been mixed
     Page


13 - 39
13 - 44 f
13 - 44 h
13 - 50
13 - 53


15 - 1
15 - 5
15 - 7
15 - 10 a
15 - 11
15 - 16 a
15 - 16 b
15 - 17
15 - 19
15 - 20
15 - 25
15 - 28
15 - 29


17 - 1
17 - 3
17 - 10
17 - 12
17 - 13
17 - 14
17 - 16
17 - 17
17 - 18
17 - 19


19 - 1
19 - 3
19 - 4
19 - 6 a
19 - 7
19 - 9
19 - 11


2 Table of contents
Printed in Germany - XXIV, 1993
944 Table of contents volume I


Temperature switch, removing and installing - checking temperature switch
Cleaning cooling system after oil and water have been mixed


Fuel supply

Replacing fuel filter, checking injection lines for leaks and tightness
Checking delivery rate of fuel pump
Fuel pump, removing and installing
Fuel tank, removing and installing
Line routing, fuel system
Active-carbon tank for pollution-free fuel-tank bleeding (layout)
Fuel expansion tank, removing and installing
Checking fuel expansion tank
Fuel-Ievel sensor, removing and installing


L-Jetronic fuel injection

Replacing air-filter cartridge
Testing and adjusting specifications
Testing and adjusting specifications for Model 85/2 onward and 924 S
Checking fuel pressure
Adjusting idle speed
Adjusting idle speed - USA vehicles
Correcting CO setting at air-flow sensor - USA vehicles
Injection valves, removing and installing
Checking intake system for leaks - troubleshooting
Adjusting idle speed for Model 85/2 onward and 924 S
Adjusting idle speed - USA and vehicles with catalytic convertor
from Model 85/2 onward and 924 S
Testing and adjusting specifications, Model 89 onward
Adjusting idle speed and CO for Model 89 onward
Equipment table for Model 89 onward


Exhaust system

Checking exhaust flanges for tightness
Replacing exhaust pipe or primary muffler/catalytic convertor


Starter, Power supply, Tempostat

Automatic cruise control (Tempostat)
Tempostat control unit, removing and installing
Tempostat operating switch (steering-column switch), removing and installing
Actuator, removing and installing
Tempostat bowden cable, removing and installing
     Page


19 - 9
19 - 11


20 - 1
20 - 2
20 - 3
20 - 4
20 - 7
20 - 8
20 - 9
20 - 10
20 - 11


24 - 1
24 - 3
24 - 4
24 - 5
24 - 7
24 - 9
24 - 12
24 - 13
24 - 15
24 - 17

24 - 20
24 - 25
24 - 26
24 - 27


26 - 1
26 - 2


27 - 1
27 - 5
27 - 6
27 - 7
27 - 8


Table of contents
Printed in Germany - XXV, 1992
3
volume I Table of contents 944


Tempostat bowden cable, removing and installing
Clutch switch, removing and installing
Troubleshooting-Tempostat
Checking multiple-pin connector of Tempostat control unit
Checking multiple-pin connector of Tempostat actuator
Automatic cruise control (Tempostat) from Model 85/2 onward
Tempostat control unit, removing and installing steering-column switch
from Model 85/2 onward
Actuator, removing and installing, from Model 85/2 onward
Clutch switch, removing and installing, from Model 85/2 onward
Troubleshooting - Tempostat - from Model 85/2 onward
Connector assignment, Tempostat control unit
Checking the multiple-pin connectors of the Tempostat control unit
from Model 85/2 onward
Alternator, removing and installing


Ignition system

Equipment table
Accident hazards in electronic ignition systems
Ignition-distributor cap, removing and installing
Replacing spark plugs
DEE
Speed and reference-mark sensors, removing and installing
Troubleshooting-DEE
Functional test-Lambda probe
Test - DEE control unit, test - Lambda probe
DEE control unit, removing and installing, from Model 85/2 onward
DEE control unit coding - 924 S from Model 86 onward
DEE control unit coding - 944, from Model 85/2 onward
DEE control unit coding - 944, 2.7 l
DEE control unit coding - 944 turbo, from Mod. 85 onward
DEE control unit coding - 924 S, from Model 88 onward
DEE control unit coding - 944, from Model 88 onward
Equipment table engine type M 44.09 to 12
     Page


27 - 8
27 - 9
27 - 10
27 - 11
27 - 12
27 - 13

27 - 17
27 - 19
27 - 20
27 - 21
27 - 22

27 - 23
27 - 25


28 - 1
28 - 3
28 - 5
28 - 7
28 - 10
28 - 14
28 - 16
28 - 37
28 - 38
28 - 39
28 - 41
28 - 42
28 - 42 a
28 - 43
28 - 45
28 - 46
28 - 47


4 Table of contents
Printed in Germany - XXV, 1992
944 G e n e r a l


Printed in Germany 0.1
G e n e r a l 944


TECHNICAL DATA

(adjusting values and wear limits appear in pertinent repair groups)
Note: USA values in brackets.
E n g i n e    M 44/01 manuals - M 44/03 automatics
(M 44/02 manuals - M 44/04 automatics)
 M 44/05 manuals - M 44/06 automatics
(M 44/07 manuals - M 44/08 automatics)

Number of cylinders

Bore

Stroke

Displacement (actual)

Displacement (tiscal)

Compression ratio

Max. engine power
to 80/1269/EC

Net power, SAE J 1349

At engine speed

Max. torque to 80/1269/EC      

Net torque, SAE J 1349

At engine speed

Max. specitic power output

Net power to SAE J 1349

Fuel grade


Engine speed limit

Engine weight (dry)


mm/in.

mm/in.

cm3/in.3

cm3


kW/HP


kW/HP

rpm

Nm/kpm

Nm/ft. Ibs.

rpm

kW I / HP I      

kW I / HP I


rpm

kg/Ibs.
4

100/3.94

78.9/3.11

2479/151.26

2449

10.6 : 1 (9.5: 1)

120/163 (110/150)


116/156 (105/143)

5800 (5500)

205/20.9 (192/19.6)

199/151.3 (186/137)

3000

48/66 (44.4/60.5)

48/63 (42.4/57.7)

96 RON
(91 RON - unleaded fuel only)

6500

166/366
E n g i n e   D e s i g n
Type


Crankcase

Crankshaft

Crankshaft bearings
 
Water-cooled, axial, 4 cylinder, 4 stroke,
in-line, internat combustion engine with
toothed belt driven overhead camshaft
and two compensating shafts

Two-piece, light alloy

Forged steel

Five


0.2 Technical Data V, 1985    Printed in Germany
944 G e n e r a l


Connecting rods

Conrod bearings

Piston pin bearings

Pistons

Piston pins

Piston rings

Cylinders

Cylinder head

Valve seat inserts (shrink-fit)

Valve guides

Valve arrangement

Exhaust valves

Valve springs

Valve timing


Camshaft

Camshaft bearings

Camshaft drive

Valve clearance

Timing with 1 mm lift
and zero valve clearance
  Forged steel/cast since February, 1984

Plain

Press-fit brass bushings

Cast fight alloy

Floating installation, secured with circlips

2 compression rings and 1 oil scraper ring

Light alloy

Light alloy

Intake: FCr 330      Exhaust: CoMo 75

Press-fit special brass

1 intake, 1 exhaust, overhead, in-line

With armored seat

2 coil springs per valve

By overhead camshaft and hydraulic cam
followers

Shell hard east

Camshaft runs in camshaft case without bearing shells

Toothed belt with tensioning roller

Automatie hydraulic adjustment

Intake opens 1° after
Intake closes 49° after
Exhaust opens 43° before
Exhaust closes 3° before   

TDC
BDC
BDC
TDC
E n g i n e   C o o t i n g   Closed cooling system, electric fan with
thermo switch, antifreeze for - 25° C

E n g i n e   L u b r i c a t i o n
System
  Pressure circulation with siekle-type pump,
oil filter and oil/water heat exchanger in
oil full flow and water bypass integrated in
crankcase

Oil pressure at 5,000 rpm
Oil pressure display
Max. oil temperature
Oil consumption


  ltr./1000 km     
Approx. 4 bar at operating temperature
Indicator lamp and pressure gage
140° C
Up to 1.5


Printed in Germany  -  V, 1985 Technical Data 0.3
G e n e r a l 944


E x h a u s t   S y s t e m   Manifold, single pipe up to primary
muffler, primary and final mufflers
(manifold, single pipe up to 3-way
catalytic converter, final muffler)

H e a t i n g   Warm water heater with heat exchanger
and blower

F u e l   S y s t e m

Fuel supply

Fuel grade

Fuel consumption to
80/1268/EC in


Also official specifications
for France and Great Britain
- ECE A 70 -


RON/MON        


ltr./100 km
DME (Digital Motor Eletronics

1 electric delivery pump

96/98 (91/82 unleaded)


at 90 km/h
at 120 km/h  
city cycle
Manuals  
6.4
8.0
11.5
Automatics
6.5
8.1
11.3
E l e c t r i c a l   S y s t e m        

Interference suppression

Battery voltage

Battery capacity

Battery capacity (M-eq.)

Alternator output

Ignition

Spark plug connectors

Firing order

Ignition timing control


V

Ah

Ah

A/W


ECE - R 10 and 72/245/EC or VDE 0879

12

50 (63)

63

90/1260, 115/1610 since 1985/2 models

Via DME

Without booster gap

1 - 3 - 4 - 2

Via DME
B o d y   T y p e   Coupe with integral steel body, 2 doors,
bolted front fenders, real window and
spoiler tailgate, concealed headlights;
removable hardtop roof as optional
ekstra equipment


0.4 Technical Data Printed in Germany
944 G e n e r a l

D i m e n s i o n s   (at DIN curb weight)
Length

Length with US bumpers
as optional equipment

Width

Height

Wheelbase (designed)

Front track


Rear track


Ground clearance
(at max. weight)

Bed clearance

Front overhang angle (limited by spoiler)

Rear overhang angle (Limited by exhaust)

mm/in.


mm/in.      

mm/in.

mm/in.

mm/in.

mm/in.


mm/in.


mm/in.


mm/in.
4200/165.354 (4290/168.898)


4290/168.898

1735/68.307

1275/50.197

2400/94.488

7J x 15/7J x 16
6J x 15/6J x 16    
5 1/2J x 15

7J x 15/7J x 16
6J x 15/6J x 16
5 1/2J x 15
1477/58.150
1452/57.165
1440/56.693

1451/57.126
1426/56.142
1414/55.669

125/4.921
120/4.72 since 1985/2 models

53/2.087

14°

15°
W e i g h t s   (to DIN 70020)
   
Curb weight


Curb weight axle force
Front
Rear


Max. total weight


Max. front axle load

Max. rear axle load

Payload

Max. roof load, incl.
roof carrier

Max. trailer load without brakes*
with brakes*
Max. car/trailer weight


Max. drawbar load
kg/Ibs


kg/Ibs
kg/Ibs


kg/Ibs


kg/Ibs

kg/Ibs

kg/Ibs

kg/Ibs


kg/Ibs
kg/Ibs
kg/Ibs


kg/Ibs
1180/2601 (1260/2779)
since 1985/2 models:
1210/2668 (1260/2779)

580/1279(620/1367)
600/1323 (640/1411)
since 1985/2 models:
630/1389 (640/1411)

1500/3307 (1550/3418)
since 1985/2 models:
1530/3373 (1550/3417)

720/1588

880/1940, 900/1984 since 1985/2 models

320/706 (290/639)

35/77 or 75/165 with roof
transporting system

500/1103
1200/2646
2700/5952 since 1985/2 models:
2730/6019 (2750/6063)

50/110

* Gradients up to 16%
Printed in Germany  -  V, 1985 Technical Data 0.5
G e n e r a l 944


F i l l i n g   C a p a c i t i e s

Engine oil (volume depends on
measurement with oil dipstick -
see Owner's Manual)

Engine oil volume

Engine coolant volume

Transmission with differential
volume


Fuel tank volume


Brake fluid volume

Washing fluid volume for
windshield and headlights

  brand name HD oil to API CI.
SE or SF - see Owner's Manual


approx. 6.0 ltr.

approx. 7.8 ltr.

approx. 2.0 ltr. of hypoid gear
lube SAE 80 to MIL-L 2105,
APl Classification GL 4

approx. 66 ltr., of which 9 ltr.
in reserve since 1985/2 models:
approx. 80 ltr., of which 8 ltr.
in reserve

approx. 0.2 ltr.


approx. 6.0 ltr.
P e r f o r m a n c e

Top speed

Acceleration from
0 to 100 km/h*
(0 to 60 mph)*
(1/4 mile)*

Kilometer from
standing start*


km/h / mph


sec
sec
sec


sec


220/137 (210/130)

Manuals
8.4 (9.3)
(8.3)
(16.2)


28.8(30.1)      
Automatics
9.6
(9.8)
(17.2)


30.5(31.4)
H i l l   C l i m b i n g


In % (slip limit)


1st gear
2nd gear
3rd gear
4th gear
5th gear


Manuals        

63
36 (34)
23 (21)
15 (14)
10 (8)
Automatics

55 (38.5)
25 (19)
15 (11)

* DIN curb weight + 1/2 of payload


0.6 Technical Data Printed in Germany
944 General


Technical Data

Type 944 - Model 88


(Adjusting values and wear limits appear in pertinent repair groups)
Note: USA values in brackets.


Engine

Engine type


Bore

Stroke

Displacement (actual)

Displacement (fiscal)

Compression ratio

Max. engine power
to 80/1269/EC
Net Power, SAE J 1349)
at engine speed

max. torque
to 80/1269/EC
(Net Torque, SAE J 1349)
at engine speed

max. liter output
DIN 70020
(SAE J 1349)

Speed governed by
fuel shutoff at

Engine weight (dry)


mm/in.

mm/in.

cm3/in3.

cm3


KW/PS
KW/HP
1/min


Nm/kpm
Nm/lb ft
1/min


KW/I (PS/I)
KW/I (HP/I)


1/min

kg bs)
M 44/09 (manuals)
M 44/10 (automatics)

100 (3.94)

78,9 (3.11)

2479 (151)

2449

10.2: 1


118 (160)
118 (158)
5900


210 (21.4)
210 (155)
4500


47.6 (64.5)
47.6 (63.7)


6640

169 (373)


Technical Data
Printed in Germany - XXII, 1988
0.6a
G e n e r a l 9 4 4


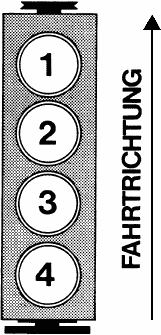
DESIGNATION OF CYLINDERS


0.7 Technical Data Printed in Germany
9 4 4 E n g i n e / C r a n k c a s e 10


TOLERANCES AND WEAR LlMITS


C o o l i n g   S y s t e m

  New Part Wear Limit
Thermostat


Radiator cap
High pressure valve


Low pressure valve
Opening temperature


Opening pressure


Opening pressure
81 - 85 °C
(178 - 185 °F)

1   + 0.15
- 0.10
  bar

(14,5   + 2.1
- 1.5
  psi)

0.1 bar
(1 .5 psi)


O i l   C i r c u i t

     
Oil consumption


Oil pressure at 80° C (176° F)
oil temperature and at 5000 rpm

Oil dipstiek
Upper mark
Lower mark
ltr./1000 km
(600 mi./US qt)

Pressure


Capacity
Capacity


approx. 4 bar
(58 psi)


5.5 ltr. (5.8 US qt)
4.2 ltr. (4.4 US qt)
approx. 1.5


V a l v e   T i m i n g

     
Camshaft bore


Camshaft


Camshaft

Cam follower bore in camshaft
housing

Cam follower


Camshaft
Inside dia.


Diameter


End play


Inside dia.


Diameter

Runout
60.5   + 0.03
- 0

60.5   - 0.04
+ 0.055

0.10 - 0.18

38   + 0.027
+ 0.007

38   - 0.018
- 0.034

0.02


Printed in Germany - I, 1982 Tolerences and Wear Limits 10 - 01
10 E n g i n e / C r a n k c a s e 9 4 4


TOLERANCES AND WEAR LlMITS


C y l i n d e r   H e a d   a n d   V a l v e s          

New Part Wear limit
Mating surface

Valve seat:

Intake

Exhaust

Intake

Exhaust

Outer correction angle

Inner correction angle

Valve guides:

Intake and exhaust

Valve stem:

Intake

Exhaust

Valve guide/valve stem

Intake

Exhaust

Compression
Distortion


Width

Width

Seat angle

Seat angle


Inside dia.


Diameter

Diameter

Clearance


Pressure


1.7

2.0

45°

45°

30°

60°


9 + 0.015


8.97 - 0.012

8.95 - 0.012


0.8

0.8

10 bar (145 psi)    
or more
max. 0.08


10 - 02 Tolerences and Wear Limits Printed in Germany
9 4 4 E n g i n e / C r a n k c a s e 10


TOLERANCES AND WEAR LlMITS


P i s t o n s   a n d   C o n n e c t i n g   R o d s

New Part Wear Limit
Cylinder/piston


Piston rings
Clearance


Side clearance


Groove 1

Groove 2

Groove 3


0.008 - 0.032


Mahle KS
0.05 -
0.082
0.04 -
0.072
0.023 -     
0.137
0.05 -
0.082
0.05 -
0.082
0.023 -
0.137

approx. 0.080
Piston rings


Connecting rod bushing


Piston pin

Connecting rod bushing/
piston pin
End gap


Diameter


Diameter


Radial play
Groove 1 =
Groove 2 =
Groove 3 =
0.20 - 0.45
0.20 - 0.45
0.38 - 1.40

24    + 0.018
+ 0.028

24 - 0.004


0.018 - 0.032


C r a n k s h a f t   a n d   E n g i n e   B l o c k

Crankshaft

Connecting rod bearing journal

Connecting rod bearing/
crankshaft

Crankshaft bearing journal

Crankshaft bearing/crankshaft


Cylinder bore

Bore for balance shaft
bearing shells in crankcase
and balance shaft cover

Bore for bushing in bearing
housing

Balance shaft
Runout

Diameter

Radial play
End play

Diameter

Radial play
End play

Out-of-round


Diameter


Diameter

Diameter
0.04 - 0.06

51.971 - 51.990

0.034 - 0.092
0.100 - 0.400

69.971 - 69.990

0.020 - 0.098
0.110 - 0.312

0.010


35.000 - 35.019


34.000 - 34.019

30.975 - 30.991
max. 0.08


0.40

0.020


Printed in Germany - I, 1982 Tolerences and Wear Limits 10 - 02a
10   9 4 4


10 - 02b   Blank Page
944 Engine, Crankcase 10


Tightening torques for engine

Location Thread Tightening torque Nm (ftlb)
Crankshaft/
Crankcase


Bolts - upper and lower
crankcase sections (studs)


Rotary body on

compensating shaft


M 12 x 1.5        

M 10

M 8
M 6

M 6


30(22)
60° torque angle
20(15)
50(37)
20(15)
10(7.5)

10(7.5) secured
with Loctite
270


1st stage
2nd stage
1st stage
2nd stage
MODEL 82 - 85
Cover for compensating
shaft housing to upper
crankcase section

Hexagon head screw


Stud
M 6


M 8


M 8
8(6)


15(11)
20(15)


15(11)
30(22)


1st stage
2nd stage


1st stage
2nd stage
MODEL 85 ONWARD
Compensating shafts with
separate bearing bridges:

Bearing bridges (nuts) of
compensating shafts to
upper crankcase section

Cover for
compensating-shaft
housing to upper
crankcase section
Hexagon head screw


M 8


M 6


M 8 x 55


15(11)
33(24)


10(7.5)


15(11)
20(15)


1st stage
2nd stage


1st stage
2nd stage
MODEL 87 ONWARD
Hexagon head screw
(bearing bridge) for
compensating-shaft
housing to upper
crankcase section

Bearing housing left and
right to upper crankcase
section
M 8 x 58


M 8
15(11)
33(24)


20(15)
1st stage
2nd stage


Tightening torques for engine
Printed in Germany - XIX, 1989
10 - 03
10 Engine/Crankcase 944


Location Thread Tightening torque Nm (ftlb)
Con rod bolt Verbusrip
nut

Con rod bolt with smooth
contact surface

Water drain plug in upper
crankcase section

Oil pan to crankcase


Oil pan insert to oil pan

Oil drain plug

Engine supports left +
right to crankcase

Flywheel to crankshaft

Sensor holder to
crankcase

Toothed gear to
crankshaft

Sensor to holder

Pulley to toothed gear


Toothed gear to
compensating shaft

Tension pulley to bearing
Housing

Water pump to crankcase         

Idler pulley to
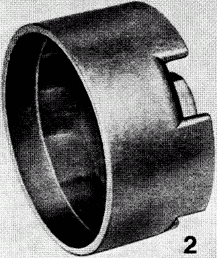
water-pump housing

Tensioning pulley to
oil-pump housing

Oil pump to crankcase


Belt tensioner to
Crankcase
M 10 x 1.25


M 10 x 1.25


M 8


M 6


M 5

M 20 x 1.5

M 10


M 10 x 1.25

M 8


M 16 x 1.5


M 6

M 6 x 25
Tensile strength            
10.9

M 10


M 10


M 6

M 10


M 10


M 6
M 10

M 8
75(55) + 5(4)


57(42) + 5(4)


20(15)


hand tight            
4(3)
10(7.5)
1st stage
2nd stage
3rd stage

6(4.5) secured with Loctite 270

50(37)

48(35)


90(66)

20(15)


210(155)


8(6)

13(9.5)


45(33)


45(33)


8(6) secured with Loctite 270

45(33)


45(33)


8(6)
45(33)

20(15)


10 - 04 Tightening torques for engine
Printed in Germany - XIX, 1989
944 Engine/Crankcase 10


Location Thread Tightening torque Nm (ftlb)
Tensioning pulley to belt
Tensioner

Fastening - belt cover

Console for generator to
Crankcase

Remote thermometer
Sensor

Temperature sensor
(NTC II)

Oil pressure sensor

Housing insert in
oil-pump housing

Cooler
housing/thermostat
housing to crankcase

Sealing plug to
oil/water-cooler housing

Coolant bleeder screw

Pressure-relief valve
Oil filter

Oil separator to crankcase
Cylinder head

Cylinder head fastening
to upper crankcase
Section

Intake tube to cylinder
head

Inlet connectors - heating
to cylinder head

Connector for water pipe

Camshaft housing to
cylinder head

Aluminium sealing plugs
to camshaft housing

Camshaft bearing to
camshaft housing
M 10


M 6

M 10


M 10 x 1


M 12 x 1.5


M 18 x 1.5

M 6


M 8


M 18 x 1.5


M 8 x 1

M 20 x 1.5


M 8


M 8


M 8


M 8

M 8


M 18 x 1.5


M 6
45(33)


8(6)

45(33)


35(26)


15(11)


35(26)

8(6) mating surface sealed
with Loctite 574

20(15)


35(26)


12(9) + 3(2)

45(33)
20(15)

20(15)


Refer to Page 15 - 10 a


20(15)


20(15)


20(15)

20(15)


40(29.5)


8(6)


Tightening torques for engine
Printed in Germany - XIX, 1989
10 - 05
10 Engine/Crankcase 944


Location Thread Tightening torque Nm (ftlb)
Camshaft pulley to
camshaft   Allen screw
Screw with internall
serrations

Console to camshaft
bearing

Connector to driver

Distributor rotor to
connector

Transport strap to
Cylinder head

Spark plugs


Fuel system

Fastening - diaphragm
damper and pressure
regulator to fuel
collection pipe

Cap nut to fuel collection
pipe


Exhaust system

Sealing nut to catalytic
convertor

All other screws and nuts:


M 10
M 10

M 6


M 5

M 4


M 6


M 14 x 1.25


M 16 x 1.5


M 12 x 1.5


M 14x 1.5


M 6
M 8
M 10


45(33)
65(48) - 70(52)

8(6)


5(4) secured with Loctite 221

4(3) selt-locking


8(6)


25(18) - 30(22)


30(22)


12(9)


30(22)


8(6) + 2(1.5)
20(15) + 2(1.5)
40(29) + 5(4)


10 - 06 Tightening torques for engine
Printed in Germany - XIX, 1989
9 4 4 E n g i n e / C r a n k c a s e 10


TOOLS


No. Description Special Tool Remarks
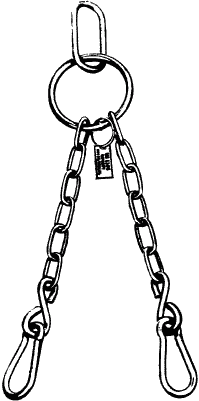
1 Chain sling US 1105  


Printed in Germany Removing and Installing Engine 10 - 1
10 E n g i n e / C r a n k c a s e 9 4 4


REMOVING AND INSTALLlNG ENGINE
( M a n u a l   T r a n s m i s s i o n )

E n g i n e   r e m o v e d   f r o m   u n d e r n e a t h .

Clutch bell housing remains on engine.


R e m o v i n g

1.  Set up hoist and lift car on the pick-up points.

2. Use fender covers.

3. Remove front wheels.

4. Disconnect battery ground cable.

5. Disconnect battery positive cable and push
through splash wall with the rubber grommet.


6.  Disconnect two plugs for engine wire harness.
Remove wire clamps.

     
7.  Pull off wire plugs on control unit (in area of
steering column).


8.  Push wires and plugs through splash wall. Detach bracket with sensor wire on intake pipe to make engine removal easier.


9.  Disconnect throttle operating cable. Disconnect and pull off vacuum hose on brake booster.


10 - 2 Removing and Installing Engine Printed in Germany
9 4 4 E n g i n e / C r a n k c a s e 10


10.  Disconnect air cleaner with air flow sensor on body and on coolant hose, and lay aside.


11.  Remove distributor cap, distributor rotor and
dust cap (to avoid damage).

12.  Disconnect ground wire on splash wall.


13.  Pinch fuel return line with a standard hose clamp. Unscrew fuel feed line while counterholding.


      14. Unscrew fuel return line.


15.  Attach Special Tool VW 10-222 on front
transport bracket of engine hold hold engine
tight in installed position.


16.  Open heater regu!ating valve. Remove cap on coolant expansion tank.

17.  Remove splash shield.

18.  Remove exhaust assembly, by unscrewing flange, exhaust manifold/exhaust pipe connections and suspension points.
USA cars:
Also disconnect oxygen sensor plug and wire in metal lug on firewall.


Printed in Germany   -   III, 1983 Removing and Installing Engine 10 - 3
10 E n g i n e / C r a n k c a s e 9 4 4


19. Disconnect electric wires for starter.
Unscrew and remove starter.

20.  Unscrew clutch line clamp on engine.

21. Unscrew clutch slave cylinder on clutch
housing (line remains connected).

     
22.  Unscrew stabilizer on body and control arms,
and remove.

23. Unscrew shield for right engine mount on front axle cross member.

24. Unscrew universal joint on steering gear, tie rods on steering arms, upper hydraulic engine mount on engine braces, left and right control arms on front axle cross member, and remove front axle cross member with steering from underneath.


25.  Cars with Air Conditioner:
Unscrew poly-rib belt tensioner and take off
belt.

26. Unscrew compressor on console (don't disconnect refrigerant hoses). Suspend compressor from the spring strut with a pjece
of wire.


27.  Drain coolant through drain plug bore in
radiator or the coolant hose and catch coolant.


10 - 4 Removing and Installing Engine Printed in Germany
9 4 4 E n g i n e / C r a n k c a s e 10


28. Remove coolant hose on bottom of radiator.

29. Remove upper central tube mounting bolts.

30. Lower car.

31. Remove coolant hose on heater valve.

32. Remove coolant return hose for heater.


33. Remove coolant feed hoses on expansion tank.

34. Remove A/C fast idle hose.

35. Remove charcoal venting hose.

36.  Remove vacuum line to vent valve and vacuum
line to thermo valve at back of engine.

37. Remove upper radiator hose.

38. Remove radiator vent hose.

39.  Remove wiring to temperature switch and both
cooling fans.

40. Remove top radiator brackets and lift out
radiator with cooling fans.
     

41.  Attach Special Tool US 1105 on engine
(shorter end towards rear of engine).

42. Lift engine slightly and remove VW 10-222.

43. Remove lower central tube mounting bolts.

44. Lower engine. pull forward and remove from
underneath.


Printed in Germany Removing and Installing Engine 10 - 5
10 E n g i n e / C r a n k c a s e 9 4 4


I n s t a l l i n g

Note the following for installation.

1. First insert transaxle/clutch housing mounting
bolts, but do not tighten.


N o t e


Only tighten mounting bolts to final torque after
Hydraulic engine mount and front axle cross member
have been mounted.
Torque for mounting bolts: 42 Nm (30 ft lb).

Front wheel alignment need not be checked after
removal and installation of engine.

2. Make sure radiator fits correctly in rubber mounts.
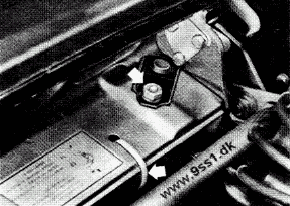
3.  Secure coolant hose (between radiator and
expansion tank) on lock carrier with two straps.


4. Tighten bolts and nuts to specified torque.

5. Fill and bleed cooling system (see page 19-1).


10 - 6 Removing and Installing Engine Printed in Germany
9 4 4 E n g i n e / C r a n k c a s e 10


REMOVING AND INSTALLlNG HYDRAULIC ENGINE MOUNTS


R e m o v i n g


1. Disconnect battery ground lead.


2.  Suspend engine from front transport
bracket with Special Tool VW 10 - 222
or VW 10 - 222 A and hold firmly in
installed position.

Pull off plug on air flow sensor and
vent hose on air cleaner to have access to
the transport bracket.


3. Remove splash guard.


4.  Remove stabilizer after unscrewing
stabilizer mounts on control arms and
stabilizer suspension on side members.
     
5.  Unscrew shield for right engine mount on
front axle cross member.


6. Unscrew hydraulic engine mount on front
axle cross member.


7.  Cars with power steering:
Disconnect return line of hydraulic
steering system on side member.
In cars prior to 1984 models first
unclip brake pad wear indicator wire
and remove clip on bolt.


Printed in Germany   -   III, 1983
Removing and Installing Hydraulic
Engine Mounts
10 - 7
10 E n g i n e / C r a n k c a s e 9 4 4


8.   Unscrew universal joint on steering gear,
hydraulic engine mount on engine brackets
and front axle cross member on side
members.


N o t e

Mark installed position of universal joint to
steering gear.
Do not unscrew control arm mounting bolts,
since otherwise front wheel alignment would
have to be checked and adjusted.


9.   Pull down front axle cross member and
remove universal joint (drive shaft) on
steering gear.


N o t e :

Only pull down front axle cross member far
enough to permit removal of the hydraulic
engine mount.


10.  Move top of hydraulic engine mount out
of front axle cross member (see arrow).


11.  Remove hydraulic engine mount toward
front. If necessary because of limited
space first turn mount 180°.


I n s t a l l i n g


1.   Insert hydraulic engine mount that twist
lock (arrow) is positioned on the stop
(stop is at rear on the right- hand side).
With hydraulic engine mount in this
position press top of it into front axle
cross member (see point 10 of removing).


10 - 8 Removing and Installing Hydraulic
Engine Mounts
Printed in Germany
9 4 4 E n g i n e / C r a n k c a s e 10


2.  Push correctly positioned universal joint
(drive shaft) on to steering gear (steering
pinion).
Mount front axle cross member.
Center front axle cross member before
tightening mounting bolts to 85 Nm.


N o t e :

Lift front axle cross member with an
universal transmission jack, e. g. Hahn
Metallbau GmbH, Ringstr. 12 -18,
7012 Fellbach, or same other suitable lifting
fixture to be able to insert the bolts.


3.  Install mounting nuts and bolts for
hydraulic engine mounts, but do not
tighten.


4. Remove Special Tool VW 10 - 222 or
VW 10 - 222 A.
Connect plug on air flow sensor and vent
hose on air cleaner.
     
5.  Tighten self-Iocking mounting nuts in the order given below.
Hydraulic engine mount to front axle cross member.
Hydraulic engine mount to engine brackets.
Universal joint to steering gear.
Use new self-locking nuts and torque to 30 Nm.


6. Cars with power steering:
Secure return line and, if applicable,
brake pad wear indicator wire on side
member.


7. Mount right engine mount shield, stabilizer
and splash guard.
Tightening torque for stabilizer to body
and control arms: 23 Nm.
Connect ground lead on battery.


Printed in Germany   -   III, 1983
Removing and Installing Hydraulic
Engine Mounts
10 - 9
10 Engine/Crankcase 944


CHECKING HYDRAULIC ENGINE BELTS


G e n e r a l   I n f o r m a t i o n

Hydraulic engine mounts cannot be tested 100% with conventional workshop equipment. However, the test procedures listed below can be used to determine whether hydraulic engine mounts are defective or seriously impaired in effectiveness.
Of the two hydraulic engine mounts, the one on the right is subjected to greater thermal loading and thus more likely to give cause for complaint.


C h e c k i n g

Symptoms indicating a damaged engine mount:
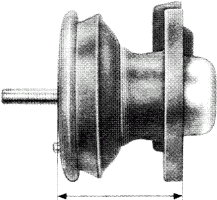
-   Clearly-discernible knocking or vibration while starting and/or turning off the engine.

- severe engine vibration in idle (with engine in perfect condition and balance shafts adjusted correctly).

- no or insufficient spring travel when pulling down on engine. Specification: 2 - 3 mm. (Do not check left and right hydraulic engine mounts together. Use exhaust pipes for leverage).

- Visual inspection shows leaks (mounts are filled with a damping fluid), rubber peeling off, cracks, or notching.

- Height of removed and de-tensioned hydraulic engine mount is less than 65 mm (new 70 +- l mm) measured between bearing surfaces.

(Height af installed hydraulic engine mount not less than 62-2 mm).


10 - 10 Checking Hydraulic Mounts VII, 1986 Printed in Germany
944 Engine, Crankshaft, Pistons 10


Installing new hydraulic engine mounts

Vehicle type 924 S - 944 - 944 S - 944 S2 - 944 turbo

Note


The old hydraulic engine mount that was fitted
using 4 mm spacers has been discontinued
and is therefore no longer available.

Modifications of the new hydraulic engine
mounts:

- Changed design

-    Installation height of the engine mounts
was increased by 4 mm, rendering the
4 mm spacers obsolete.

- The hydraulic engine mount is fitted to the
engine support using 2 bolts.
Old hydraulic engine mount:
2 bolts with washers and nuts.


725/10
     
1. The new hydraulic engine mount may be ret-
rofitted to all vehicles as of Model Year '82.
Combined use of new and old hydraulic
engine mounts is permissible.

2.  Use only M 8x38 or M 8x42 bolts without
washers. Pay attention to flange dimension
X of left-hand engine support.
X = 21 + 1 mm: Bolt M 8 x 38
X = 25 + 1 mm: Bolt M 8 x 42
For the right-hand engine mount, use only
the M 8 x 38 bolt without washer.
Tightening torque 23 Nm (17 ftlb)


726/10

Stocks of the old engine mount may be used
up. In this case, also note engine support
flange dimension X.

X = 21 + 1 mm: Hydraulic engine mount
with spacers

X = 25 + 1 mm:  Hydraulic engine mount
without spacers


Installing new hydraulic engine mounts
Printed in Germany - XXIV, 1991
10 - 11
13 944


13 - 00 Blank Page
944 Engine / Crankshaft, Pistons 13


Polyrib drive belt for alternator or a/c compressor

5-rib poly-rib belt


Checking


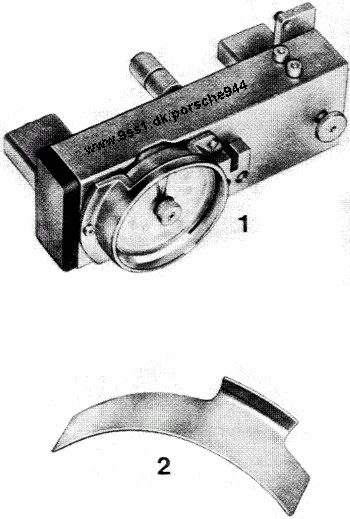
1. Prepare Special Tool 9202 for checking. Pull
out lockpin on special tool and slide out tes-
ting pin opposite the lockpin completely.
Place drag needle on indicator needle.

2.  Slide special tool on to the drive belt Push
in testing point (arrow) slowly until the lock-
pin is felt to engage, and read the displayed
value from the dial gage.
Adjusting value: 9,5 +- 0,3 scale units.
Correct belt tightness if necessary.


Note

The slides must have complete contact on the
belt surface.
The special tool must not be turned or moved
on the beIt while checking.
      Adjusting

1. Loosen hexagon head bolts of connecting
rod slightly

2.  Loosen rock nuts of connecting rod and turn
connecting rod accordingly until the correct
belt tightness is reached.


6-rib poly-rib belt

Adjusting


1. Loosen hexagon head bolts of connectrod
slightly. Loosen lock nuts of connecting rod
and tum back connecting rod one turn
(reduces tension).

2.  Prepare Special Tool 9201 for checking.

Adjustment value without air conditioning
Turm connecting rod until a value of 9.5 on the
scale is reached.

Adjustment value with air conditioning
Adjustment value 9.5 on the scale, then turn
connecting rod 1 more revolution (to increase
tension)


Polyrib drive belt for alternator or a/c compressor
Printed In Germany - XXII, 1990
13 - 1
13 E n g i n e / C r a n k c a s e, P i s t o n s 9 4 4


CHECKING ADJUSTMENT OF BALANCE SHAFTS


1. Remove splash shield.

2.  Turn crankshaft clockwise until TDC mark on camshaft sprocket is aligned with cast mark in mount for ignition cap.
TDC marks on flywheel and cast clutch housing must also be aligned.

3. Take off upper drive belt cover.


4.  Mark on upper balance shaft sprocket mult be aligned with mark of rear drive belt cover.


5.  Remove end cap in lower drive belt cover.
Check position of mark on lower balance shaft
sprocket through this hole.
Mark on sprocket must be aligned with mark of
rear drive belt cover.


13 - 2 Checking Adjustment of Balance Shafts Printed in Germany
9 4 4 E n g i n e / C r a n k c a s e, P i s t o n s 13


CHECKING AND ADJUSTING TIGHTNESS OF POWER STEERING PUMP DRIVE BELT


C h e c k i n g


Check tightness by applying thumb pressure on belt
at point midway between two pulleys.
Deflection: approx. 5 mm.


A d j u s t i n g


1. Remove splash shield.


2.  Loosen upper mounting bolt or nut slightly.


3.  Loosen bolts of pressure rod slightly.


Unscrew lock nuts of pressure rod and turn rod
accordingly until correct belt tightness is
reached.


4.  Tighten mounting batts and nuts atter finishing adjustment.


Printed in Germany - I, 1982
Checking and Adjusting Tightness of Power
Drive Belt
13 - 2a
13 E n g i n e / C r a n k c a s e, P i s t o n s 9 4 4


CALlBRATING SPECIAL TOOL 9201


TOOL


The testing gage is designed for a display
of 4.0 scale units and permits the check-
ing and calibrating of Special Tool 9201
to 4.0 scale units.

The tool must be calibrated after:

- about 100 measurements,

- hard jolts or knocks

- slight damage.

Calibration will not be sufficient in case
of greater damage or display deviation of
more than 2.0 scale units. These special
tools can be sent to the supplier for
repairing.

Address:

Fritt Staeger
Zossener Str. 56/58
0-1000 Berlin 61
Tel.: 030 / 693 1204
      CALlBRATING

Tools Required:

Small screwdriver 1.6 x 40 x 0.4 mm
Gage 9201/2

1. Adjust to zero point by turning the
dial gage's scale ring until the needle
and zero point are aligned.

2.  Insert gage 9201/2, checking for
centered position of both test bearing
surfaces on the sliding shoes.


3.  Proceed to same procedures for use
on toothed belt, i.e. press in testing
point slowly until the lock pin is felt
to engage and then read the displayed
value from the dial gage.

N o t e

Sliding shoes of older manufacture
might be bored offcenter. Depending on
the position of the sliding shoes there
could be different displayed values when
checking with this tool.


13 - 2 b Calibrating Special Tool 9201 V, 1985 -    Printed in Germany
9 4 4 E n g i n e / C r a n k c a s e,   P i s t o n s 13


Consequently the measurement with a gage
should be repeated with different sliding
shoe positions. Find the position, where the
scale value is closest to the 4.0 adjusting
value. Mark sliding shoe (e.g. with paint or
an electric inscriber) and perform the calibra-
tion as well as all measurements later at this
position.
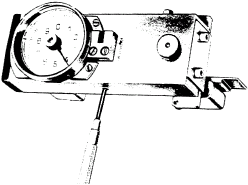

4.  If the display is outside of the test value
of 4.0 +- 0.3 scale values, readjust the
gage dial. This is done by turning the
calibration screw with a small screwdriver
until the specified value of 4.0 scale units
is reached. In so doing the gage 9201/2
remains between the test sensor of the
tester.


5. Recheck after finishing calibration.


Printed in Germany -    V, 1985 Calibrating Special Tool 9201 13 - 2 c
13 9 4 4


13 - 2 d Blank Page
9 4 4 E n g i n e / C r a n k c a s e,   P i s t o n s 13


CHECKING AND ADJUSTING TIGHTNESS OF DRIVE BELT FOR BALANCE SHAFTS
(ROLLER WITH SLOT)

N o t e :

Only check and adjust drive belt tightness on a cold engine (ambient temperature approx. 20°C/68°F}.

1. Remove splash shield.


2. Remove poly-rib belt.


     N o t e

Always first loosen bolts of pressure rod slightly
prior to unscrewing locknuts.


3. Unscrew vent hose and take off drive belt cover.

     
4.  Loosen idler pulley so that pulley does not
touch drive belt.


5 a.  Turn crankshaft clockwise until TDC mark on
camshaft sprocket is aligned with cast mark in
mount for distributor cap.


5 b.  TDC marks on flywheel and cast clutch housing
must also be aligned.


Printed in Germany  -  III, 1983
Checking and Adjusting Tightness
of Drive Belt for Balance Shafts
(Roller with Slot)
13 - 3
13 E n g i n e,   C r a n k c a s e,   P i s t o n s 9 4 4


6.  Check basic position of balance shaft sprockets.
Marks on sprockets should be aligned with marks
of rear drive belt cover.


7. Prepare special tool P 9201 for testing. Pull out lockpin on special tool and push out gauge pin opposite the lockpin completely. Zero telltale needle.

8.  Slide special tool on to belt. Push in gauge needle (arrow) until lockpin is heard to engage and read value from dial gauge.

N o t e :

Always zero telltale needle on gauge after lockpin
has engaged (turned anticlockwise) to exclude wrong
gauge readings.

    S p e c i f i c a t i o n s :

    2.7 +- 0.3 dial value

If necessary, correct belt tightness.


9.   Adjusting:
Turn tensioner clockwise to tighten.
Turn tensioner counterclockwise to loosen.
Tighten nut to specified tightening torque.


10.  After adjusting drive belt tension, adjust idler
pulley. Use special tool 9207 or 0.5 mm feeler
gauge so there is a clearance of 0.5 mm be-
tween drive belt and pulley when upper portion of drive belt is preloaded 0 to 1 mm (see sketch).
Tighten idler pulley in this position.
If correct gap cannot be reached. turn idler pulley 180 degrees and repeat adjustment. Tighten mounting nut to specified torque.


13 - 4 Checking and Adjusting Tightness
of Drive Belt for Balance Shafts
Printed in Germany
944 Engine/Crankshaft, Pistons 13


11.  Install Poly-Rib belt and
adjust; see page 13 - 1


Note:

Slides must make full-surface
contact with belt.

While measuring, do not allow the
Special Tool to turn or move on the
belt.


Printed in Germany   -   XIII, 1987
Checking and Adjusting Tension
of Drive Belt for Balance Shafts
13 - 5
13 Engine/Crankshaft, Pistons 944


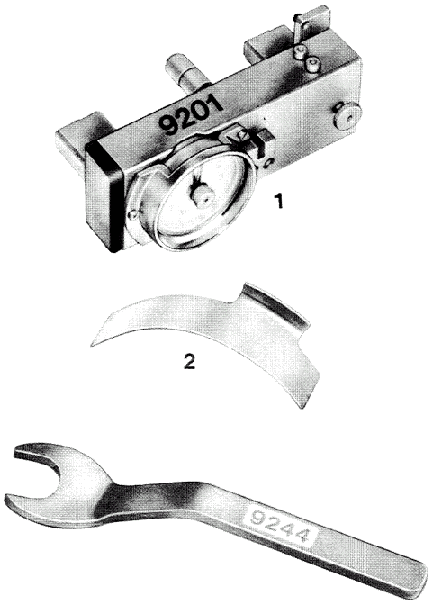
TOOLS


No. Description Special Tool Remarks
1


2

3
Tester for belt
tension

Gage

Wrench
9201


9207

9244


13 - 6 Tools - Checking and Adjusting
Tension of Drive Belt for
Balance Shafts
XIII, 1987 - Printed in Germany
944 Engine/Crankshaft, Pistons 13


CHECKING AND ADJUSTING TENSION OF DRIVE BELT FOR BALANCE SHAFTS
(ROLLER WITH SLOT)

Note:

Do not check or adjust drive-belt tension unless engine is cold (at room
temperature).

1. Remove air-cleaner assembly,
unbolt and remove engine
underguard.

2.  Remove Poly-rib belt and
servopump belt.


Note:

Always first loosen hex bolts of
linkage slightly before unscrewing
locknuts.


3.  Remove breather hose at top and
remove drive-belt cover.
     
4.   Slacken pulley so that it no
longer tensions drive belt.


5a.  Turn crankshaft clockwise until
TDC mark on camshaft sprocket is
aligned with mark on drive-belt
cover.


Printed in Germany - XIII, 1987
Checking and Adjusting Tension
of Drive Belt for Balance Shafts
13 - 7
13 Engine/Crankshaft, Pistons 944


Illustration shows 16-VALVE ENGINE


5b.  TDC mark on flywheel must also be
aligned.


6.  Check basic position of
balance-shaft sprockets. Marks on
sprockets must be aligned with
marks on rear drive-belt cover.


7. Prepare Special Tool 9201 for
testing. Pull lockpin from
Special Tool and push gage pin
opposite lockpin out as far as it
will go. Align telltale and
measuring needles.

8.  Slide Special Tool on to belt.
Press measuring key (arrowed) in
slowly until lockpin is heard to
engage and read the value from
dial gage.


Note:

To exclude errors in reading the
gage, always align telltale needle
and measuring needle once the
lockpin is engaged (turn
anticlockwise).


13 - 8 Checking and Adjusting Tension
of Drive Belt for Balance Shafts
XIII, 1987 - Printed in Germany
944 Engine/Crankshaft, Pistons 13


Specified value:

(new or used belt)
2.7 +- 0.3 scale gradations

If necessary, correct belt tension.


Adjusting

9.  Turn tensioning roller clockwise
to increase tension. Turn
anti-clockwise to slacken.
Tighten hex nut to 45 Nm
(33 ftlb) while countering.

     
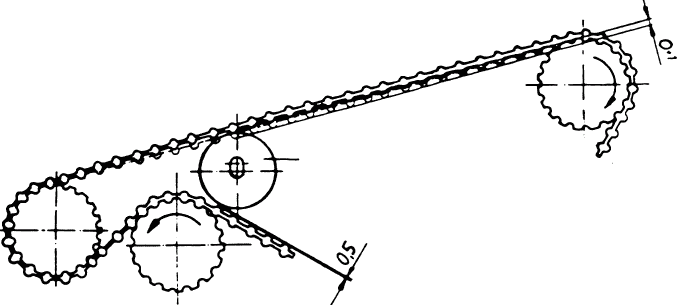
10.  After adjusting drive-belt
tension, adjust idler pulley.
Using Special Tool 9207 or
feeler gage (0.5 mm) set pulley
so that there is a clearance of
0.5 mm between belt and pulley
at the lower balance shaft when
0 to 1 mm pretension is applied
to upper run of toothed belt.
Tighten pulley in this position.
If correct clearance cannot be
reached, turn pulley through
180°C and repeat adjustment.
Tighten hex nut to 45 Nm
(33 ftlb) while countering.


11.  Install Poly-rib belt,
servopump belt and adjust.


Printed in Germany - XIII, 1987
Checking and Adjusting Tension
of Drive Belt for Balance Shafts
13 - 9
13 Engine/Crankshaft, Pistons 944


Note:

Slides must make full-surface
with contact belt.


While measuring, do not allow the
Special Tool to turn or move on
the belt.


13 - 10 Checking and Adjusting Tension
of Drive Belt for Balance Shafts
XIII, 1987 - Printed in Germany
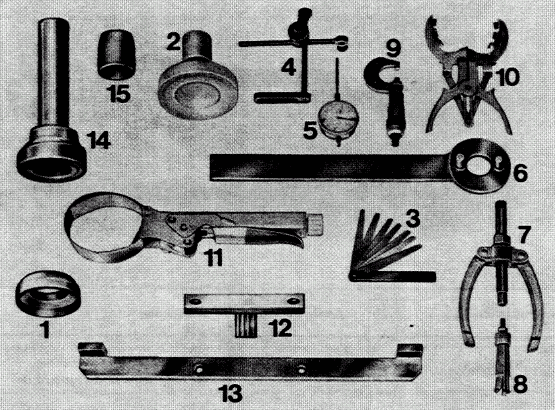
9 4 4 E n g i n e / C r a n k c a s e,   P i s t o n s 13


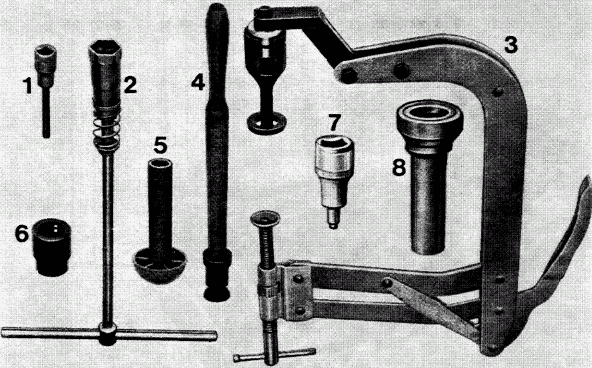
TOOLS


No. Description Special Tool Remarks
1
2

3
4
5
6
7
8

9
10
11
12
13
14
15
Assembly sleeve
Pressure pad for crankshaft
seal on flywheel end
Feeler gauge
Dial gauge holder
Dial gauge
Holding wrench
Support
Internal claw puller

Micrometer
Piston ring pliers
Piston ring compressor
Locking element
Flywheel holder
Pressure pad
Pipe
9203
9126


VW 387
US 1026 or 1027
9200
US 1039
US 8028

US 1025
VW 121 b
US 1008 a
9206
9130
9202
32-111


standard tool

standard tool

standard tool, e. g. Kukko
Standard tool, e. g. Kukko No. 21/2
(14.5 to 18.5 mm)
standard tool
standard tool, e. g. Hazet 790-1 a
standard tool, e. g. Hazet 794-U-3


Printed in Germany Crankscase Tools 13 - 11
13 E n g i n e / C r a n k c a s e,   P i s t o n s 9 4 4


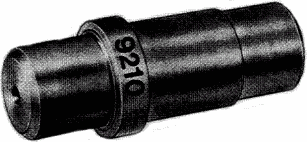
TOOLS


No. Description Special Tool Remarks
  Thrust pad 9210 To install bearing sleeve
for balance shaft bearing
housing


13 - 12 Crankscase Tools I, 1982 - Printed in Germany
944 Engine, Crankshaft, Pistons 13


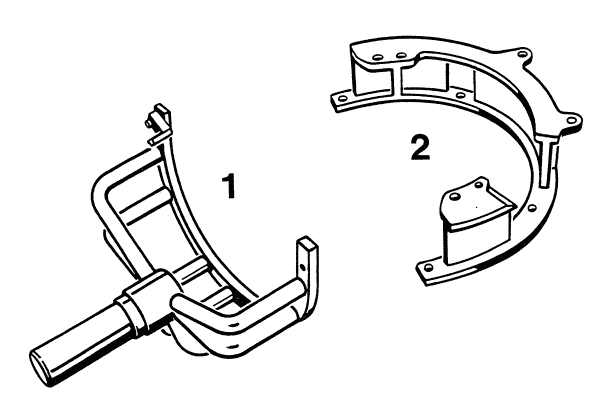
Engine Assembly Support


Tools


No. Designation SpecialTool Order number Explanation
1

2


Engine support

Engine support adapter
9127

9197
000.721.912.70

000.721.919.70


Engine Assembly Support
Printed in Germany - XXVI, 1993
13 - 13
13 Engine, Crankshaft, Pistons 944


Identification of engine number on crankcase

The engine number is stamped into the left-
hand rear crankcase section (relative to
direction of travel).


81/8080
      As of Model Year 1988, the engine number
is located on the right-hand rear side of the
engine.


87/463


13 - 14 Identification of engine number on crankcase
Printed in Germany - XXVI, 1993
9 4 4 E n g i n e / C r a n k c a s e,   P i s t o n s 13


No. Description Qty. Note When: Special
Instructions
Removing           Installing
 1


 2

 3


 4

 5

 6

 7

 8

 9

10

11


12


13

14


15


16


17


18
Bolt


Flywheel

Stud M 6 x 16
(reference mark
sensor)

Pin

Shaft seal

Pilot bearing

Nut

Plain washer A 6.4

Bolt M 6 x 35

Plain washer A 6.4

Bolt M 8 x 55
for oil intake pipe

Bolt
M 8x50

Washer

Bolt
M 8x50

Nut
M 10

Washer


Nut
M 12x1.5

Washer
9


1

1


1

1

1

1

1

5

5

1


6


6

1


7


7


10


10
 
Torque:  90 Nm
(65 ft lb)


Replace


rounded side
faces up

lettering faces up


rounded side
faces up


see page 13 - 24


see page 13 - 22

see page 13 - 23


Printed in Germany Disassembling and Assembling Crankshaft and Crankcase       13 - 15
13 E n g i n e / C r a n k c a s e,   P i s t o n s 9 4 4


No. Description Qty. Note When: Special
Instructions
Removing               Installing
19


20


21


22

23

24

25

26
Crankcase lower
section


Crankshaft


Closed main bearing
no. 1

Main bearing no. 2

Thrust bearing no. 3

Main bearing no. 4

Main bearing no. 5

Crankcase upper
section
1


1


1


1

1

1

1

1
  Clean sealing
surface and remove
grease in area of
oil intake and
flywheel. Seal with
Loctite 574

Check axial and
radial plav

Make sure bearing
engages in pin


Clean sealing
surface and
remove grease in
area of oil intake
and flywheel


see page 13.21


see page 13.18


seepage 13-21


13 - 16      Disassembling and Assembling Crankshaft and Crankcase Printed in Germany
944 E n g i n e / C r a n k c a s e,   P i s t o n s 13


DISASSEMBLlNG AND ASSEMBLlNG CRANKCASE AND CRANKSHAFT
SINCE 1985/2 MODELS


M a i n   B e a r i n g   N o .   1

The closed main bearing sleeve for bearing
no. 1 now only has a lubricating groove
around one half.


Old New
      M a i n   B e a r i n g s   N o .   2,   4   a n d   5

The bottom halves of the bearings are
designed without lubricating grooves. When
installing it is important, that bearing shells
w i t h lubricating grooves are placed in the
upper crankcase section and bearing shells
w i t h o u t lubricating grooves in the lower
crankcase section.


These bearing shells may also be used in
engines before 1985/2 models.


Printed in Germany - V, 1985 Disassembling and Assembling
Crankshaft and Crankcase
 13 - 20 a
(13 - 16 a USA)
13 Engine, Crankshaft, Pistons 944


Notes on assembly

Mount the cover of the centrifugal oil
compartment in the upper part of the
crankcase.


Model 89, 2.7 l
M 44/11/12

Note

It is not usually necessary to remove the
cover when overhauling an engine. Should this
be necessary, however, always heat the screw
area with a hot-air blower. Hexagon head bolts
fitted with Loctite 270.

Observe the marking on the cover.
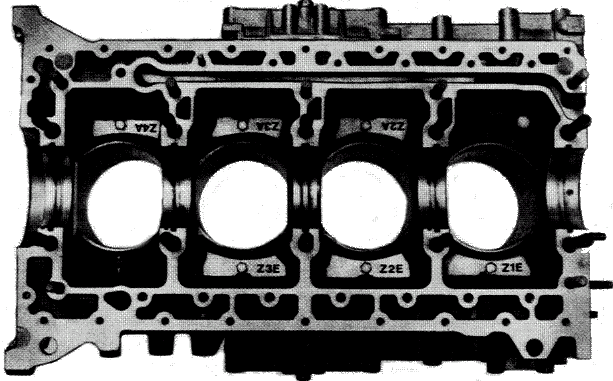


88/342


 13 - 20b
(13 - 16b USA)
Notes on assembly-Cover of the centrifugal oil
Printed in Germany - XVII, 1988
9 4 4 E n g i n e / C r a n k c a s e,   P i s t o n s 13


CHECKING CRANKSHAFT BEARING CLEARANCE

The "Plastigage" method is a simple way of
checking bearing clearance.

Plastigage is available in three different sizes for
measuring ranges from 0.025 to 0.23 mm.


Type

PG-1
PR-1
PB-1
Color

green
red
blue
Measuring Range

0.025 to 0.075 mm
0.05 to 0.15 mm
0.10 to 0.23 mm


C h e c k i n g   R a d i a l   C l e a r a n c e


1. Remove crankcase lower section.


2.  Remove oil from bearing shell and bearing
journal.

3. Place Plastigage having width of bearing on
crankshaft journal in axial direction. Install crank-
case lower section carefully and tighten to
specified torque.


N o t e

Do not turn crankshaft while measuring.


4.  Remove crankcase lower section. Read width of
flattened Plastigage from measuring scale.
Corresponding value on measuring scale equals
the bearing clearance.

Play of new bearings:      
Wear limit:
0.020 to 0.098 mm
0.16 mm


C h e c k i n g   A x i a l   C l e a r a n c e


Use Special Tool VW 387 to check axial clearance.

Play of new bearings:      
Wear limit:
0.110 to 0.312 mm
0.40 mm


Printed in Germany Checking Crankshaft Bearing Clearance     13 - 17
13 E n g i n e / C r a n k c a s e,   P i s t o n s 9 4 4


CODES OF CRANKCASE UPPER AND LOWER SECTIONS
AS WELL AS BALANCE SHAFT COVER
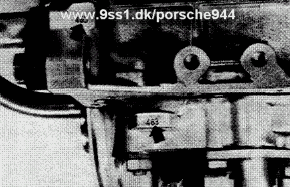

1. Crankcase upper and lower sections as well as the
balance shaft cover are machined together and must
always be installed together. Check codes.


2.  Codes of beth balance shaft covers must be visible
from above after installation.


13 - 18      Codes of Crankcase Upper and Lower Sections as well as
Balance Shaft Covers
Printed in Germany
9 4 4 E n g i n e / C r a n k c a s e,   P i s t o n s 13


SEALING UPPER AND LOWER CRANKCASE SECTIONS


N o t e

Only Loctite 574 (orange) should be used as a sealant.
Loctite 574 will dry only in conjunetion with metal
and exelusion of air. After applying a coat of sealant
the bolts should be installed and tightened within
10 minutes, since the sealant on the metal will start
to dry.


R e m o v i n g   O i l   S e a l a n t

The old sealant does not have to be removed for
repairs. It is only necessary to remove grease from the
surface, so that after the cleaning solution has dried
the new coat of sealant can be applied. The new
Loctite will dissolve the old sealant in the surface
finish and dry again after assembling.
We recommend a fine steel brush or Loctite 80646
adhesive remover for removing old sealant, if this is
ever necessary.


A p p l y i n g   S e a l a n t

1.  We recommend a short-pile velour roller for application by hand. A tray will also be required for the sealant and should have a raised section to squeeze excess sealant from the roller.


2.  Roll on a very thin coat of sealant with a velour roller.


Printed in Germany   -   I, 1982 Sealing Upper and Lower Crankcase Sections      13 - 19
13 E n g i n e / C r a n k c a s e,   P i s t o n s 9 4 4


INSTALLlNG UPPER AND LOWER CRANKCASE SECTIONS
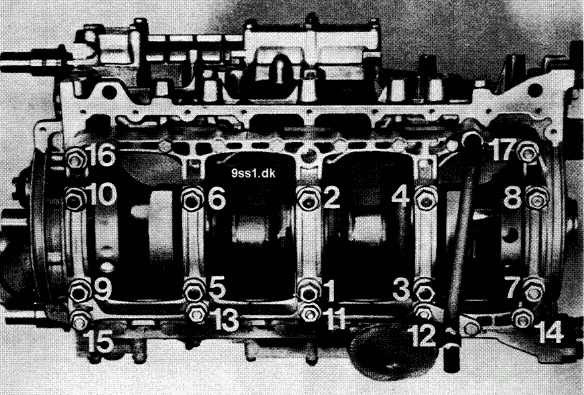

1.  Coat lower crankcase section with Loctite 574 in
areas of oil intake and sealing surface in areas of
flywheel
     

2.  Install lower crankcase section.
See page 10-03 for tightening procedures.
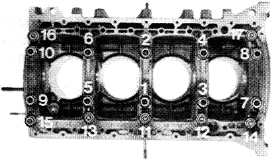
Order for tightening:


13 - 20 Installing Upper and Lower Crankcase Sections Printed in Germany
9 4 4 E n g i n e / C r a n k c a s e,   P i s t o n s 13


INSTALLlNG CRANKSHAFT OIL SEAL
(FLYWHEEL END)
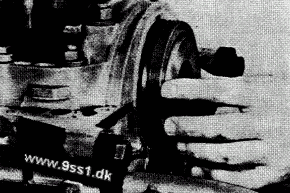

1.  Lubricate sealing lip with oil and slide oil seal over
Special Tool 9203 on to crankshaft.


2.  Remove special tool and drive in oil seal against
stop with Special Tool 9126.


Printed in Germany Installing Crankshaft OiI Seal (Flywheel End) 13 - 21
13 E n g i n e / C r a n k c a s e,   P i s t o n s 9 4 4


REMOVING AND INSTALLlNG FLYWHEEL


R e m o v i n g

Mount Special Tool 9130 on flywheel with two hex.
head bolts and loosen socket head bolts.


I n s t a l l i n g

Torque socket head bolts to 90 Nm (65 ft Ib).


REMOVING AND INSTALLlNG PILOT BEARING


R e m o v i n g

Pull out pilot bearing with an internat extractor,
e. g. Kukko 21/2 (14.5 to 18.5 mm).


I n s t a l l i n g

Drive in bearing against stop with Special Tool
VW 32-111.


13 - 22 Removing and Installing Flywheel
Removing and Installing Pilot Bearing
Printed in Germany
944 Engine, Crankshaft, Pistons 13


Notes on assembly


Aligning the upper and lower parts
of the crankcase.


Note


When assembling, make sure that there is no
offset between the crankcase halves on the
facing surface (on the oil pump side).
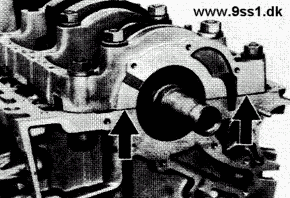
1. Using a plastic hammer, align the slightly
tightened lower part of the crankcase
(tightening torque 10 - 20 Nm) with the
upper part of the crankcase. Carry out
the finger-nail test at the joint.

2.  Tighten the crankcase with the specified
tightening torque (3 stages).


88/343

3.  Smooth any slight remaining offset at the
joint with oil stone.


Aligning the upper and lower parts of the crankcase.
Printed in Germany - XVII, 1988
13 - 24a
13 Engine, Crankshaft, Pistons 944


Flywheel, removing and installing

Removing


Fasten bracket Special Tool 9130 to the
flywheel with two hexagon head screws and
undo the screws with internal serrations

Installing

Tighten the screws with internal serrations
in 2 stages.

1st stage
2nd stage
40 Nm
90 Nm
     

8495


Grooved ball bearing, removing
and installing


Removing


Pull out grooved ball bearing with internal
puller, e.g. Kukko 21/2 (14.5 to 18.5 mm)
     

8490

Installing

Drive into position with tube, Special Tool VW
32-111.


8496


13 - 26 Flywheel, removing and installing
Printed in Germany - XIX, 1989
944 Engine, Crankshaft, Pistons 13


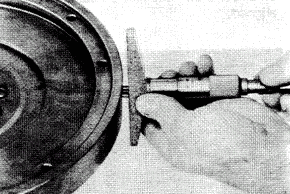
Refacing the flywheel

If severe score or burning marks are evident on the flywheel, the clutch disc mating surtace on the
flywheel maybe refaced on a lathe.

Remove as little material as possible.
Wear limit for flywheel thickness 11.8 mm.


728/13


1 Wear limit 11.8 mm

2 Remove as little material as possible

3 Max. runout 0.05 mm


Note for refacing the mating surtace:
Surt. roughness + unevenness = 0.008 mm


Refacing the flywheel
Printed in Germany - XXIV, 1991
13 - 26a
13   9 4 4


13 - 26b Blank Page
9 4 4 E n g i n e / C r a n k c a s e,   P i s t o n s 13


REPLACING STUD (REFERENCE MARK SENSOR)


1. Heat stud locally to about 200 °C (400 °F) to
unseal loctite 270. Unscrew stud.

2.  Screw in new stud with Loctite 270 and adjust to
5 +- 0.1 mm.


Printed in Germany Replacing Stud (Reference Mark Sensor) 13 - 27
(13- 23 USA)
13 E n g i n e / C r a n k c a s e,   P i s t o n s 9 4 4


SETTING CRANKSHAFT TO TDC IN
CYLINDER NO. 1


C r a n k s h a f t   P o s i t i o n
(E n g i n e   I n s t a l l e d)

TDC mark on flywheel and cast boss
on clutch housing must be aligned.


Additional TDC mark on flywheel, seen
from underneath car. TDC is reached, if
the approx. 5 mm wide groove in the
flywheel is in the middle of the opening
of the clutch housing.


      C r a n k s h a f t   P o s i t i o n
(E n g i n e   R e m o v e d)

TDC mark on flywheel and cast mark
on upper crankcase section must be
aligned.


13 - 28
(13 - 24 USA)
Setting Crankshaft to TDC in Cylinder No. 1 V, 1885  -  Printed in Germany
944 Engine / Crankshaft, Pistons 13


Checking pistons and cylinder bores

Motortype M 44.01...10 (2,5 l)


Repair Stage Piston Ø
(mm)
Fa. Mahle
Piston Ø
(mm)
Fa. Kolbenschmidt
Cylinder bore dia.
(mm)
tolerance group
code
Standard size 99,980
99,990 +- 0,005
100,000
99,980
99,990 +- 0,007
100,000
100,000
100,010+- 0,005
100,020
0
2
3
Oversize 1 100,480
100,490 +- 0,007
100,500
100,480
100,490 +- 0,007
100,500
100,500
1000,510 +- 0,005
100,520
I
I
I      
0
1
2


Checking pistons

Measure approx. 61 mm from piston crown,
90° offset from piston pin axis.
      Checking cylinder bores

Measure approx. 61 mm from upper edge of
cylinder bore, transverse to engine block.
Mount lower crankcase section and tighten
bolts to specified torque for measuring.

Note


It recommended that the stocks of the relevant tolerance group are checked before machining the
cylinders. If necessary, hone to the piston size available.
In some cases, certain tolerance groups may be in short supply.


Checking pistons and cylinder bores
Printed in Germany - XXIV, 1991
13 - 31
(13 - 27 USA)
13 Engine, Crankshaft, Pistons 944


Pistons, disassembling and assembling con rods
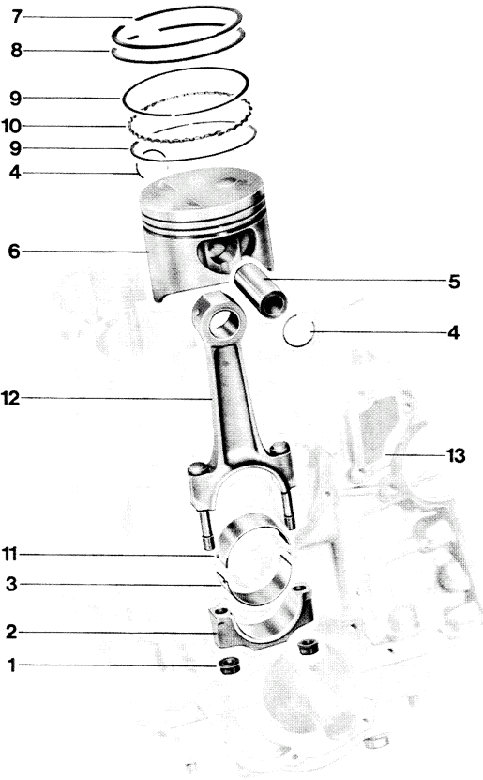


13 - 32
13 - 28 USA
Pistons, disassembling and assembling con rods
Printed in Germany - XIX, 1989
944 Engine / Crankcase, Pistons 13


No. Description Qty. Note when:
Removing             Installing
1


2


3


4

5

6


7


8


9


10
Connecting rod nut


Connecting rod cap


Lower bearing
shell half

Circlip

Piston pin

Piston


Piston ring
Groove 1
Tapered face

Piston ring
Groove 2
Tapered face
scraper ring

Oil scraper ring
Groove 3

Spring
Groove 3
8


4


4


8

4

4


4


4


8


4


Pry out
Replace, tighten
to specified torque.
Lubricate threads
and bearing surface

Pay attention to
pair numbers

Always renew worn
bearing shells

Position correctly


Give light coat
of oil; position
correctly; note
tolerance group


First install spring;
after installing oil
scraper rings check
whether end gaps of
springs are offset


Printed in Germany - XVI, 1987
Disassembling and Assembling
Pistons and Connecting Rods
13 - 33
(13 - 29 USA)
13 Engine / Crankcase, Pistons 944


No. Description Qty. Note when:
Removing             Installing
11


12


13
Upper conrod
bearing shell half

Connecting rod
with conrod bolts

Upper crankcase
section
4


4


1
  Always renew worn
bearing shells


Check cylinder bores
after mounting lower
crankcase section and
tightening bolts to
specified torque


PISTON SURVEY


Europe and Rest of World USA, Canada, Japan


13 - 34
(13 - 30 USA)
Disassembling and Assembling
Pistons and Connecting Rods
Printed in Germany
944 E n g i n e / C r a n k c a s e,   P i s t o n s 13


INSTALLING PISTON AND CONNECTING ROD


C o n n e c t i n g   R o d

The material of connecting rods was changed
since February, 1984. This did not change
the weight. New and old connecting rods
can be installed together in one engine.


O l d

Sintered connecting rod, Part No.
944 103 001 00 (rough part number on
inside of conrod shaft).

N e w

Cast connecting rod, Part No.
944 103 001 01 (rough part number
reduced on both sides on conrod base
and conrod cap).


C o n n e c t i n g   R o d   N u t s

The bearing surface of conrad nuts was also
changed due to the connecting rod material
change.


O l d

Smooth bearing surface,
Part No. 928 103 172 01.

N e w

Ribbed bearing surface,
Part No. 928 103 172 02.

After depletion of stocks, only the new
version (ribbed bearing surface) conrod
nuts will be available.


N o t e

The old (smooth) conrod nuts must never be
used with the new cast connecting rods.

It is recommended to use the new connecting
rod nuts each time the engine is repaired.
Tightening torque: 75 Nm.

The tightening torque of 57 + 5 Nm is still
applicable to smooth connecting rod nuts
used together with sintered steel connecting
rods.


Printed in Germany   -   V, 1985 Installing Piston and Connecting Rod 13 - 34 a
(13 - 30 a USA)
13 Engine / Crankshaft, Pistons 944


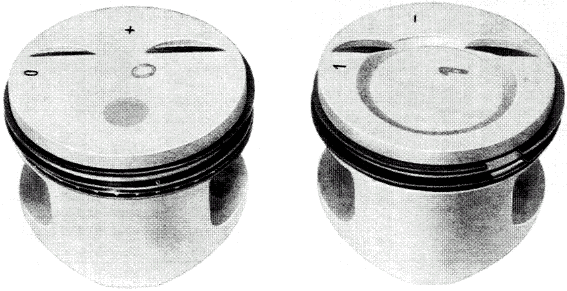
Pistons from Model 89 onward


Engine M 44. 11/12 (2,7 l) worldwide
Compression ratio: 10.9 : 1
Nominal Ø 104.00 mm


The installation position is indicated by an
arrow pointing towards the pulley.


Checking pistons and cylinder bore

Engine type M 44.11/12 (2,7 l)


Repair size Piston Ø
(mm)
Fa. MAHLE
Cylinder bore
(mm)
tolerance group
code
Standard size 103.980
103.990:1: 0.007
104.000
104.000
104.010 +- 0.005
104.020
0
1
2
Oversize 1 104.480
104.490:1: 0.007
104.500
104.500
104.510 +- 0.005
104.520
I
I
I      
0
1
2

Checking pistons

Measure approx. 57 mm from base of piston,
90° offset to axis of piston bolt.
      Checking cylinder bores

Measure approx. 57 mm from top edge of cylinder bore, across cylinder block. For measurement, mount lower crankcase section and tighten with prescribed tightening torque

Note
If recommended that the stocks of the relevant tolerance group are checked before machining the cylinders. If necessary, hone to the piston size available.
In some cases, certain tolerance groups may be in short supply.


13 - 34b
(13 - 30b USA)
Pistons from Model 89 onward
Printed in Germany - XXV, 1992
9 4 4 E n g i n e / C r a n k c a s e,   P i s t o n s 13


No. Description Qty. Note when: Special
Instruction
Removing Installing
1


2


3


4


5


6


7


8


8 a


9
Bolt
M 10 x 35


Washer


Collar


Drive gear for
compensating shaft


Woodruff key


Bolt
M 8 x 35


Plain washer
A 8.4


Upper bearing
housing

Sleeve


Shaft seal
30 x 47
1


1


1


1


1


3


3


1


1


1
  Coat threads with
Loctite 574
Torque: 45 Nm. Hold
with Special Tool 9200

Position
correctly

Position
correctly;
"O" and "U"
must be seen in
large bores

Check movement
on seat of
compensating
shaft, machining
if necessary.
Give seat a light
coat of Optimoly
HT


Replace and
lubricate sealing
lip with oil


Code "U"
deleted since
1984 model,
see page 13 - 50
(USA page 13 - 46)


see Page 13-42
(USA Page 13-38)


Printed in Germany  -  III, 1983 Disassembling and Assembling Compensating Shaft Drive      13 - 35
13 E n g i n e / C r a n k c a s e,   P i s t o n s 9 4 4


No. Description Qty. Note when: Special
Instruction
Removing Installing
10


11


12


13


14


15


16


17


18


19


20


21
Spacer


Gasket


O-ring


Bolt
M 8 x 55


Plain washer
A 8.4


Bolt
M 6 x 50


Plain washer
A 6.4


Nut on stud
M 8


Plain washer
A 8.4


Bolt
M 6 x 30

Plain washer
A 6.4

Upper compensating
shaft housing
1


1


1


4


4


4


4


2


2


2


2


1


If necessary, heat
housing cover with
hot air blower to
melt sealant.
Remove remainders
of Loctite with Loc-
tite 60646 adhesive
remover


Replace and
position
correctly

Replace and
give light coat
of oil


RolI Loctite 638
on sealing surface
with a velour roller.
Note tightening
procedures


see page 13 - 43
(USA page 13 - 39)


13 - 36 Disassembling and Assembling Compensating Shaft Drive Printed in Germany
9 4 4 E n g i n e / C r a n k c a s e,   P i s t o n s 13


No. Description Qty. Note when: Special
Instruction
Removing Installing
22


23


24


25


26


27


28


29


30


31


32
Upper compensating
shaft

End ring


Seal


Bearing shell


Bolt
M 10 x 35


Washer


Collar


Drive gear for
compensating shaft


Woodruff key


Bolt
M 8 x 50


Plain washer
A 8.4
1


1


1


2


1


1


1


1


3


3


Replace


Position
correctly


Coat threads with
Loctite 574
Torque: 45 Nm. Hold
with Special Tool 9200

Position
correctly

Position
correctly;
"O" and "U"
must be seen in
large bores

Check movement
on seat of
compensating shaft
and machine. if
necessary. Give
seat a thin coat of
Optimoly HT


Code "U"
deleted since
1984 model,
see page 13 - 50
(USA page 13 - 46)


Printed in Germany   -   III, 1983 Disassembling and Assembling Compensating Shaft Drive      13 - 37
13 E n g i n e / C r a n k c a s e,   P i s t o n s 9 4 4


No. Description Qty. Note when: Special
Instruction             
Removing            Installing
33


34


35


36


37
Lower bearing
Housing


Shaft seal
30 x 48


Spacer


Gasket


O-ring
1


1


1


1


1


Replace and
lubricate sealing
lip with oil


Replace


Replace and give
light coat of oil


REPLACING BEARING SLEEVE FOR COMPENSATING SHAFT BEARING HOUSING


R e m o v i n g

Press out sleeve with Special Tool 9210.

      I n s t a l l i n g

Press in sleeve against stop with Special Tool 9210.


13 - 38      Disassembling and Assembling Compensating Shaft Drive I, 1882  -  Printed in Germany
9 4 4 E n g i n e / C r a n k c a s e,   P i s t o n s 13


TIGHTENING PROCEDURES FOR CRANKCASE UPPER SECTION
ON BALANCE SHAFT HOUSING
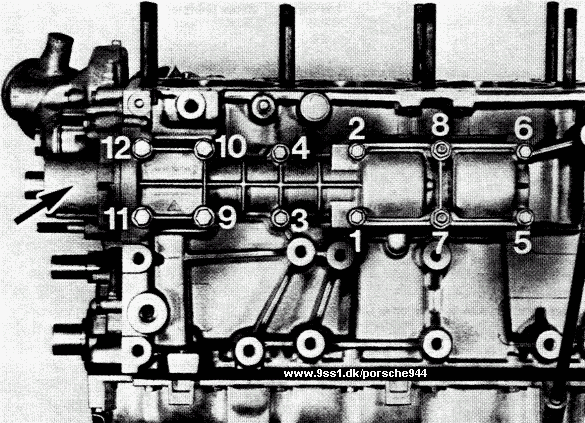


N o t e

Crankcase upper section and balance shaft housing
must be aligned with each other as described below.


1. Tighten all hexagon head bolts and hexagon nuts
finger tight.


2.  Mount bearing housing with a lightly oiled O-ring,
but without tightening the mounting bolts.


Printed in Germany Disassembling and Assembling Balance Shaft Drive         13 - 39
13 E n g i n e / C r a n k c a s e,   P i s t o n s 9 4 4


3.  TIGHTENING SPECIFICATIONS:

  Bolts

Nuts on studs

Bolts
M 6

M 8

M 8


2 steps:

2 steps:


1st step
2nd step
1st step
2nd step
8 Nm (6 ft Ib)

15 Nm(11 ft lb)
30 Nm (22 ft lb)
15 Nm (11 ft lb)
20 Nm (14 ft Ib)


N o t e

Check movement of balance shaft between each tightening step.


INSTALLlNG SHAFT SEALS OF BEARING HOUSING


N o t e

Seals deviate among each other in diameter and on
the sealing lip.

Code (arrow) faces in turning direction of balance
shafts.


"A" Seal of lower
balance shaft
"B" Seal of upper
balance shaft


Lubricate sealing lips with oil and at same time install
with spacer. Then drive in with Special Tool 9202.


13 - 40       Disassembling and Assembling Balance Shaft Drive
Installing Shaft Seals of Bearing Housing
Printed in Germany
9 4 4 E n g i n e / C r a n k c a s e,   P i s t o n s 13


INSTALLlNG DRIVE GEARS OF BALANCE SHAFTS

N o t e

Drive shafts are identical parts.


I n s t a l l i n g   D r i v e   G e a r   o f   U p p e r
B a l a n c e   S h a f t

1. Woodruff key groove of balance shaft faces up.

2.  Push drive gear with groove code "O" on woodruff
key.


I n s t a l l i n g   D r i v e   G e a r   o f   L o w e r
B a l a n c e   S h a f t

1. Woodruff key groove of balance shaft faces up.

2.  Push drive gear with groove code "U" on woodruff
key.

      M o u n t i n g   D r i v e   G e a r


1. Install bolt, washer and collar.

2.  Align collar that codes "O" and "U" can be
seen in large bores.


3.  Tighten bolt while holding with Special Tool
9200.


Printed in Germany Disassembling and Assembling Balance Shaft Drive       13 - 41
13 E n g i n e / C r a n k c a s e,   P i s t o n s 9 4 4


DISASSEMBLlNG AND ASSEMBLlNG BALANCE SHAFT DRIVE
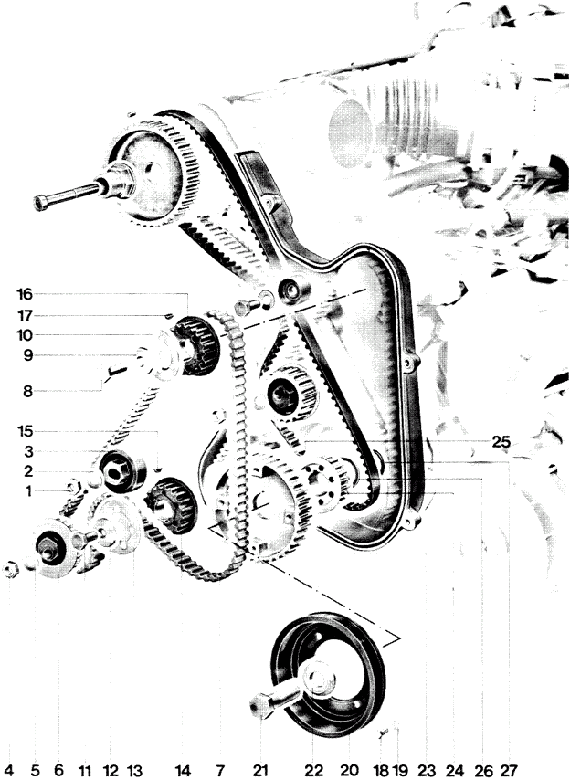
      

13 - 42 Disassembling and Assembling Balance Shaft Drive Printed in Germany
9 4 4 E n g i n e / C r a n k c a s e,   P i s t o n s 13


DISASSEMBLlNG AND ASSEMBLlNG COMPENSATING SHAFT DRIVE
SINCE 1985/2 MODELS

C o m p e n s a t i n g   S h a f t s   w i t h   S e p a r a t e   B e a r i n g   B r i d g e s
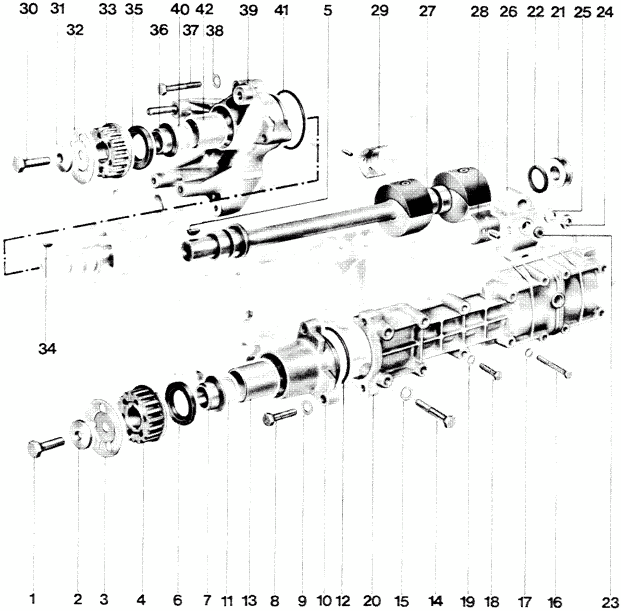


Printed in Germany  -  V, 1985
Disassembling and Assembling
Compensating Shaft Drive
13 - 44a
(13 - 40 a USA)
13 E n g i n e / C r a n k c a s e,   P i s t o n s 944


No. Description Qty. Note when: Special
Instruction
Removing Installing
1


2


3


4


5

6


7

8
Bolt
M 10 x 35


Washer


Collar for upper
compensating shaft


Drive gear for
compensating shaft


Woodruff key

Shaft seal
30 x 47


Spacer

Bolt
M 8 x 35


1


1


1


1


1

1


1

3
  Coat threads
with Loctite
574, torque:
45 Nm, hold
with Special
Tool 9200.

Position correct-
ly

Position correct-
ly, locating tab
protrudes into
unmarked groove
of drive gear.
Mark "0" can be
seen in large
opening of collar.

Check movement
on seat of com-
pensating shaft,
machining if
necessary. Give
seat a light coat
of Optimoly HT.


Replace, lubri-
cate sealing lip
with oil, mark
(arrow) faces in
turning direc-
tion of cam-
shaft. I dentical
part as shaft seal
of camshaft.


see page
13-50


see page
15 - 24


13 - 44 b
(13 - 40 b USA)
Disassembling and Assembling Compensating Shaft Drive Printed in Germany
944 E n g i n e / C r a n k c a s e,   P i s t o n s 13


No. Description Qty. Note when: Special
Instruction
Removing Installing
9

10

11


12


13


14


15

16


17

18


19

20


21

22
Washer A 8.4

Upper bearing housing

Polyester seal


O-ring


Sleeve


Bolt
M 8 x 55

Washer A 8.4

Bolt
M 6 x 50

Washer A 6.4

Bolt
M 6 x 42

Washer A 6.4

Upper compensating
shaft housing


End ring

Round seal
3

1

1


1


1


4


4

8


4

2


2

1


1

1


If necessary, heat
housing cover with
a hot air blower
to loosen the
sealing compound.
Use Loctite adhe-
sive remover
60646.


Replace, check
for correct fit.

Replace, give
light coat of oil,
do not position
incorrectly.


Apply coat of
Loctite 574
(was 638) with
a velours roller
on sealing sur-
face. Check
tightening
procedures.


Replace


see page
13 - 42


see page
13 - 43


Printed in Germany  -  V, 1985
Disassembling and Assembling
Compensating Shaft Drive
13 - 44 c
(13 - 40 c USA)
13 E n g i n e / C r a n k c a s e,   P i s t o n s 944


No. Description Qty. Note when: Special
Instruction
Removing             Installing
23


24


25

26


27


28


29

30


31


32


33
Seal


Nut M 8


Washer

Bearing bridge for
compensating shaft

Upper compensating
shaft

Bearing shell


Bearing shell

Bolt
M 10 x 35


Washer


Collar for lower
compensating shaft


Drive gear for
compensating shaft
1


2


2

1


1


1


1

1


1


1


1
  Replace, install in
bearing bridge
take-up bore
with grease.

Torque:
30+ 3 Nm


Check for
correct fit


Coat threads
with Loctite
574, torque:
45 Nm, hold
with Special
Tool 9200.

Position
correctly.

Position cor-
rectly, locating
tab protrudes
into groove "O"
af drive gear;
mark "O" ean be
seen in square
opening of collar.

Check movement
on seat of com-
pensating shaft,
machining if
necessary. Give
seat a th in coat
of Optimoly HT.


13 - 44 d
(13 - 40 d USA)
Disassembling and Assembling Compensating Shaft Drive Printed in Germany
944 E n g i n e / C r a n k c a s e,   P i s t o n s 13


No. Description Qty. Note when: Special
Instruction
Removing        Installing
34

35


36

37

38

39


40


41


42
Woodruff key

Shaft real
30 x 48


Spacer

Bolt

Washer

Lower bearing
housing

Polyester seal


O-ring


Sleeve
1

1


1

3

3

1


1


1


1
 

Replace, lubri-
cate sealing lip
with oil.


Replace, check
for correct
seating.

Replace, lubri-
cate Iightly with
oil; position
correctly.


see page
13 - 42


Printed in Germany  -  V, 1985
Disassembling and Assembling
Compensating Shaft Drive
13 - 44 e
(13 - 40 e USA)
13 E n g i n e / C r a n k c a s e,   P i s t o n s 944


INSTALLlNG BEARING BRIDGES OF COMPENSATING SHAFTS
1985/2 MODELS

Crankcase upper and lower sections as well
as bearing bridges of compensating shafts
are machined together and must always be
installed together. Check codes.


I n s t a l l i n g   B e a r i n g   B r i d g e s
o f   C o m p e n s a t i n g   S h a f t s

In installed state it will be possible to read
the codes of both bearing bridges from the
front (as seen looking forward in car).


Picture shows the left compensating shaft.
      In addition, the bearing bridges are stamped
with 1 and 2.


1 = Right side


2 = Left side


13 - 44 f
(13 - 40 f USA)
Installing Bearing Bridges of Compensating Shafts Printed in Germany
944 Engine / Crankshaft, Pistons 13


Note

The bearing bridge for the left balance shaft
has on oil feed bore for the exhaust turbo-
charger. Before installing the balance shaft, it
is vital to ascertain that the seal ring is in posi-
tion in the take-up bore of the bearing bridge
(use grease).
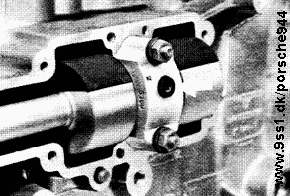


Assembly note

Whenever performing repairs on the engine,
make sure the seal is replaced.


Installing bearing bridges of compensating shafts
Printed in Germany - XXIV, 1991
13 - 44 g
(13 - 40 g USA)
13 Engine/Crankshaft, Pistons 944


NOTES ON ASSEMBLY

'85 MODELS ONWARD                ENGINE TYPE M 44.05/06/07/08

TORQUING PROCEDURE, CRANKCASE UPPER HALF   -   COMPENSATING-SHAFT COVER
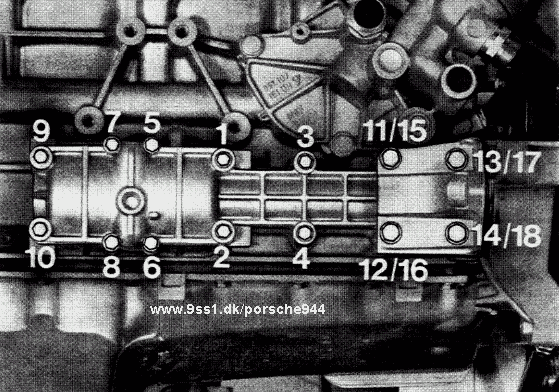


Note:

When aligning crankcase upper halt and compensating-shaft cover, proceed as
follows:

1. Tighten all hex bolts by hand

2.  Install bearing housing with O-ring lightly oiled but without mounting
bolts.

3. Tightening torque for M6 bolts: 10 Nm (7 ftlb)
Tightening torque for M8 bolts in 2 stages.

1st stage 15 Nm (11 ftlb)
2nd stage 20 Nm (14 ftlb)

Torquing sequence: see illustration.


13 - 44 h
(13 - 40 h USA)
Disassembling and Assembling
Compensating Shaft Drive
XIII, 1987   -   Printed in Germany
944 Engine/Crankshaft, Pistons 13


NOTES ON ASSEMBLY

'87 MODELS ONWARD                ENGINE TYPE M 44.40/05/06/07/08

TORQUING PROCEDURE, UPPER CRANKCASE HALF/COMPENSATING SHAFT COVER BOLTS
(with integrated bearing bridge)
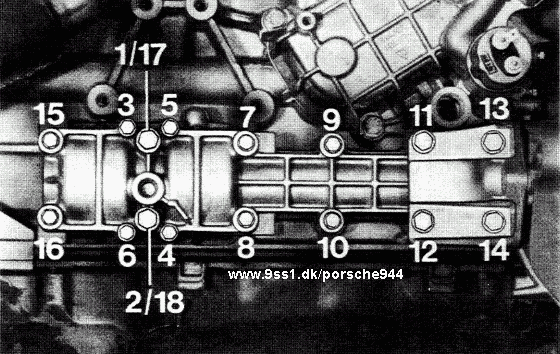


Note:

It is imperative to align upper half of crankcase and compensating-shaft cover
as follows:

1.  Tighten all hex bolts by hand.

2.  Place bearing housing in position with O-ring lightly oiled, but without
mounting bolts.

Torquing sequence: see illustration

1st stage No. 1 + 2
2nd stage No. 3...16

3rd stage No. 17 + 18  
Tightening torque for  
Tightening torque for

Tightening torque for
M8 bolts 15 Nm (11 ftlb)
M6 bolts 10 Nm (7 ftlb)
M8 bolts 20 Nm (14 ftlb)
M8 bolts 33 Nm (24 ftlb)


Printed in Germany   -   XIII, 1987
Disassembling and Assembling
Compensating Shaft Drive
13 - 44 i
(13 - 40 i USA)
13   9 4 4


13 - 46 Blank Page
9 4 4 E n g i n e / C r a n k c a s e,   P i s t o n s 13


No. Description Qty. Note when: Special
Instruction
Removing        Installing
1

2

3


4

5

6


7


8


9


10


11
Nut M 10

Washer A 10.5

Roller or roller
with slot

Nut

Washer A 10.5

Tensioning roller
for compensating
shaft belt

Compensating shaft
belt


Bolt
M 10 x 35


Washer


Collar


Bolt
M 10 x 35


1

1

1


1

1

1


1


1


1


1


1


Handle with care.
do not twist
or turn;
store separately


Hold with
Special Tool 9200
when unscrewing


Check


Check


When installing
belt make sure
side of belt with
color coded
tooth faces out

Same as for
removal


Position
correctly

Position
correctly


Printed in Germany Disassembling and Assembling Compensating Shaft Drive 13 - 47
(13 - 43 USA)
13 Engine / Crankshaft, Pistons 944


No. Description Qty. Note when:
Removing                 Installing
12

13

14


15

16


17

18


19

20

21


22


23
Washer

Collar

Balance shaft
drive gear


Woodruff key

Balance shaft
drive gear

Woodruff key

Bolt
M6x16 - 8.8

Hexagon socket
screw
M6x2.5 - 10.9

Use from Mod. 87

Washer A 6.4

Pulley

Bolt
M16x1.5x60

Washer


Gear for balance
shaft drive

1

1

1


1

1


1

4


4


4

1

1


1
  Position correctly

Position correctly

Check movement on
seat of balance shaft


Check movement on
seat of balance shaft

Torque: 8 Nm


Torque: 13 Nm


Torque: 210 Nm


Position correctly,
pay attention to
surve, see Page 13-49


13 - 48
(13 - 44 USA)
Disassembling and Assembling
Balance Shaft Drive
XVI, 1987 - Printed in Germany
9 4 4 Engine / Crankshaft, Pistons 13


No. Description Qty. Note when:
Removing        Installing
24


25

26

27


Gear for camshaft
drive


Woodruff key

Thrust washer

Seal
1


1

1

1
  Belt collar faces
compensating shaft
drive gear


Replace


ASSEMBLY NOTES ON SECURING THE PULLEY

The pulley (A) without recess must
only be installed for old crankshafts
without extended journal for accom-
modation of the serve pump drive.
Pulley (B) with recess for crankshaft
with extended journal can also
be used on old crankshafts.
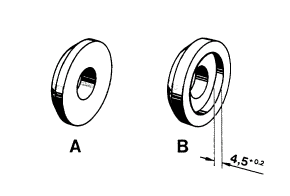


Printed in Germany
Disassembling and Assembling
Compensating Shaft Drive
13 - 49
(13 - 45 USA)
13 E n g i n e / C r a n k c a s e,   P i s t o n s 9 4 4


INSTALLING DRIVE GEARS OF BALANCE SHAFTS
( S i n c e   1 9 8 4   M o d e l s )


N o t e :

Groove code "U" is omitted on drive gears.


I n s t a l l i n g   D r i v e   G e a r   o f
U p p e r   B a l a n c e S h a f t


1.  Woodruff key groove of balance shaft faces up.
Insert woodruff key.
Apply thin coat of Optimoly HT on
bearing surface for drive gear.


2.  Push drive gear with groove code "0" on
woodruff key.


3.  Install collar that its locating tab protrudes
into unmarked groove of drive gear.
Code "0" can be seen in large bore of
collar. Install bolt and washer.
Coat threads of bolt with Loctite 574.


13 - 50
(13 - 46 USA)
Installing Drive Gears of Balance Shafts
(Since 1984 Models)
III, 1983   -   Printed in Germany
9 4 4 E n g i n e / C r a n k c a s e,   P i s t o n s 13


4.  Tighten bolt while holding with Special
Tool 9200.
Tightening torque: 45 Nm.


I n s t a l l i n g   D r i v e   G e a r   o f
L o w e r   B a l a n c e   S h a f t


1.  Woodruff key groove of balance shaft faces
up. Insert woodruff key.
Give bearing surface for drive gear a thin
coat of Optimoly HT.

     
2.  Push drive gear without a groove code on
woodruff key.


3.  Install collar that its locating tab protrudes
into groove "O" of drive gear.
Code "O" can be seen in square opening
of collar.
Install bolt and washer.
Coat threads of bolt with Loctite 574.


4.  Tighten bolt while holding with Special
Tool 9200.
Tightening torque: 45 Nm.


Printed in Germany   -   III, 1983 Installing Drive Gears of Balance Shafts
(Since 1984 Models)
13 - 51
(13 - 47 USA)
13 9 4 4


13 - 52 Blank Page
9 4 4 E n g i n e / C r a n k c a s e,   P i s t o n s 13


MACHINING CYLINDER BORES IN UPPER CRANKCASE SECTION

The upper crankcase section is an aluminum alloy product and contains minute particles of
pure silicium.

In order to have an usable cylinder surface finish, the cylinder bores have to be machined in
a manner that the silicium particles protrude out of the aluminum and therefore pistons and
piston rings only have contact with the silicium.

If it is necessary to machine cylinder bores, they can be restored with a SUNNEN CK - 10/
CV - 616 cylinder repairing machine for installation of oversize pistons.

Standard size
Oversize 1
Oversize 2
100.00 mm
100.50 mm
101.00 mm

Single cylinder bores can be machined as required, since pertinent oversize pistons weigh the
same as standard pistons.

Prior to machining cylinder bores it is recommended to check the stocks on hand for pertinent
tolerance groups and, if necessary, to hone the bore for a certain piston size which is available.
There could be problems in supplying pistons of certain tolerance groups depending on
circumstances.

The following procedures are necessary.

Rough turning to 0.1 mm before finished size.
Dressing to 0.02 mm before finished size.
Polishing to finished size.
Lapping with Sunnen silicium mixture.
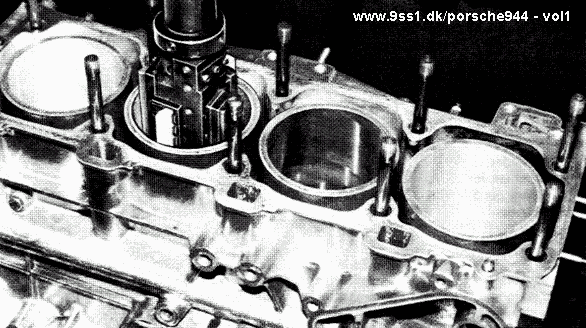


Printed in Germany - V, 1985 Machining Cylinder Bores 13 - 53
13 E n g i n e / C r a n k c a s e,   P i s t o n s 944


PROCEDURES

It is absolutely
necessary to bolt
the upper and lower
crankcase sections
together with help
of the bearing studs
prior to machining.
   
Tightening Procedures Torque in Nm Threads
3 steps:


2 steps:
    step 1
step 2
step 3

step 1
step 2
10
40
75

20
50
10
20
M 12 x 1.5


M 10

M 6
M 8


TOOLS

Machine

Grinding attachment
Grinding oil
Felt inserts
Silicium mixture
Storage box
for felt inserts
Stone holder set for
felt inserts instead
of honing stones
Stone holder set for
honing stones for 3
different stones
(types)
Felt holder seat
instead of guide shoe
Roughing stone set
Dressing stone set
Polishing stone set
    CK-10 with filter
CV-616 with filter
CK-3000 or CK-2600
MB-30 or MAN-845
C30-F 85 1 set
AN-30
AN-35


CK-3035 A 1 set


CK-3035 A 3 set


CK-3130 A 1 set
C30-J 55 ++ shorten to 70 mm length
C30-J 84 ++ shorten to 70 mm length
C30-C 03 - 81


13 - 54 Machining Cylinder Bores Printed in Germany
944 E n g i n e / C r a n k c a s e,   P i s t o n s 13


H o n i n g   P r o c e d u r e s

Perform all honing and lapping jobs   w i t h o u t   the upper dressing guide shoe.
The protrusion of the bronze bar on main guide shoe no. 3 has to be eliminated; flush with
guide shoe base.


S e t t i n g   U p   M a c h i n e

Roughing adjustment table described in column 1.
Dressing adjustment table described in column 2.
Polishing adjustment tabte described in column 3.
Lapping - uncovering the silicium crystals.
1. Set up machine as described in column 4 of test sheet.
2. Thoroughly remove all abrasive residue from previous honing jobs with filtered honing oil.
3. Wipe cylinder bores dry and apply a thin coat of thoroughly mixed silicium mixture.
N o t e:
If the silicium mixture is too consistent, it can be diluted by adding fresh honing oil and mixing
thoroughly.
4. Holders with felt inserts are new placed in the grinding attachment instead of guide shoe
   and honing stones.
Adjusting to the cylinder diameter is made with a gage as for the guide rails and honing stones.
5. Soak felt inserts in filtered honing oil and coat with silicium mixture.
6. Stop grinding oil feed; cylinders are lapped without grinding oil!


M a c h i n i n g   C y l i n d e r s

Guide grinding attachment into bore. Turn feed wheel anticlockwise until felt inserts rest on
walls. Start machine and keep turning handwheel anticlockwise until needle of load instrument
reaches approx. 20 to 30 %.

Now set scale of feed wheel to 20.

The machine stops on its own after about 80 seconds. The cylinder surface will new be dull and
without gloss.

First coat felt inserts with new silicium mixture before going on to the next cylinder.


N o t e:

If holder with felt inserts are not being used, they must be kept in the storage box to avoid
contact with dirt.

Never reuse old silicium mixture.


Printed in Germany   -   V, 1985 Machining Cylinder Bores 13 - 55
13 E n g i n e / C r a n k c a s e,   P i s t o n s 944


Machining Cylinder Bores with SUNNEN 10/CV 616
Machine.

1. Roughing
    to Dia
2. Dressing
    to Dia.
3. Polishing
    to Dia
4. Lapping
Cylinder dia.
Standard: 100.00 mm

Cylinder dia.
Oversize 1 : 100.50 mm

Cylinder dia.
Oversize 2 : 101.00 mm

Cylinder length 145 mm

Honing head type


Travel scale for
stone length

Adjustment on
scale

Speed (rpm)


Strokes per minute

Feed

Stone protrusion
top

Roughing stone

Dressing stone

Polishing stone

Felt insert

Display (%)

Material removed


Adjustment on feed
wheel

Surface finish (Rt.)


100.40 mm


CK-3000 or
CK-2600


70mm


160 mm

125 CK/CV


49 CK/57 CV

5

21 mm


C30-J55


30 - 40

0.07 mm/


10 lines


approx.
7 - 8 my


100.48 mm


ditto


70 mm


160 mm

125 CK/CV


49 CK/57CV

4

21 mm


C30-J84


30-40

0.03 mm/


10 lines


approx.2my


100.50 mm


ditto


70 mm


160 mm

125 CK/CV


49 CK/57 CV

3

21 mm


C 30-C03-81


20 - 30

0.01 mm/


10 lines


approx 0.6-
0.8 my


100.50 mm


ditto


70 mm


125 mm

185 CK/
230 CV

73 CK/80CV

2

2mm


C 30-F 85

20-30

approx. 20
lines

80 seconds
running time

approx. 1 -
2 my


13 - 56 Machining Cylinder Bores VI, 1985 - Printed in Germany
944 E n g i n e / C r a n k c a s e,   P i s t o n s 13


A chamfer of 0.5 mm x 30° has to be machined
on the upper cylinder wall of machined
cylinder bores after finishing the honing
procedures.
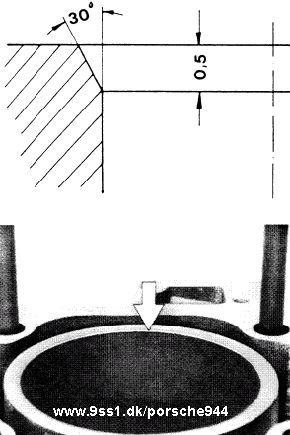


Clean upper and lower crankcase sections
thoroughly to remove abrasion residue and
silicium pasta prior to assembling.


Printed in Germany   -   V, 1985 Machining Cylinder Bores 13 - 57
15 9 4 4


15 - 0 Blank Page
9 4 4 E n g i n e / C y l i n d e r   H e a d,   V a l v e s 15


TOOLS


No. Description Special Tool Remarks
1

2
Belt tightness tester

Adjusting gauge for roller
with slot


9201

9207


Printed in Germany Tools 15 - 1
15 944


15 - 2 Blank Page
944 E n g i n e / C y l i n d e r   H e a d,   V a l v e s 15


CHECKING AND ADJUSTING TIGHTNESS
OF CAMSHAFT DRIVE BELT

N o t e

The tightness of the drive belt must only be checked and adjusted on a cold engine (room
temperature).


C h e c k i n g

1.  Turn crankshaft clockwise slowly until
TDC mark on camshaft sprocket is
aligned with cast mark in console for
the distributor cap.


N o t e

Check drive belt for wear and damage at
same time while turning.

2.  TDC mark on flywheel and cast boss on
clutch housing must also be aligned.


3.  Turn engine on crankshaft anticlockwise
approx. 10° on crankshaft, which is equal
to about 1.5 teeth toward mark on the
camshaft sprocket.

4. Prepare Special Toaol 9201 for checking.
Pull out lockpin on special tool and push
out test pin opposite the lockpin com-
pletely. Align drag needle with gage
needle.

5. Slide special tool on to drive belt. Press
in test point (arrow) slowly until lockpin
is felt to engage and read displayed value
from the dial gage.


N o t e

Always line up the drag needle and gage
needle after engagment of the lockpin to
exclude incorrect display (by turning
anticlockwise) .


Printed in Germany   -   V, 1985 Checking and Adjusting Tighness
of Camshaft Drive Belt
15 - 3
15 E n g i n e / C y l i n d e r   H e a d,   V a l v e s 944


A d j u s t i n g   V a l u e :

  Seale Value:

New belt:
Used belt:
4.0 +- 0.3
2.7 +- 0.3


C o n t r o l   V a l u e :

for operation

up to about 3,000 km
more than 3,000 km
2.4 to 4.3
2.7 +- 0.3

Correct drive belt tightness if necessary.


N o t e

Sliding shoes must have complete contact
on surface of drive belt.
The special tool must not be turned nor
moved on the belt while checking.
     
6.  Turn the tensioning roller anticlockwise
while tightening.
Turn the tensioning roller cloekwise
while loosening.


7.  Tighten mounting nuts with specified
torque while counterholding.

8. Turn engine clockwise two complete
turns and align TDC mark on camshaft
sproeket with cast mark in console for
distributor cap. Turn engine anticlock-
wise approx. 10 crankshaft degrees
from this position.

9. Recheck tightness of drive belt and,
if necessary, correct.


15 - 4      Checking and Adjusting Tighness of Camshaft Drive Belt Printed in Germany
9 4 4 E n g i n e / C y l i n d e r   H e a d,   V a l v e s 15


INSTALLlNG CAMSHAFT DRIVE BELT AND ADJUSTING TIMING


1.  Turn engine crankshaft to TDC for cylinder no.
1. TDC marks on flywheel and cast clutch hous-
ing must be aligned.


2.  Align mark on camshaft sprocket with mark on
rear drive belt cover.


3.  Install drive belt according to following
procedures:
Place belt on sprocket of crankshaft (1),
tensioning roller (2). water pump pulley (3)
and camshaft sprocket (4). preloading belt slightly
by hand each time so that belt can be pushed on
to camshaft sprocket.


4.  Tighten drive belt; see page 15 - 3.


Printed in Germany Installing Camshaft Drive Belt
and Adjusting Timing
15 - 5
15 9 4 4


15 - 6 Blank Page
9 4 4 E n g i n e / C y l i n d e r   H e a d,   V a l v e s 15


REMOVING AND INSTALLlNG CYLINDER HEAD

R e m o v i n g

The cylinder head can be taken off without removing
the engine.


1. Disconnect battery ground wire.


2. Unscrew cap on coolant expansion tank.


3. Remove splash guard.


4.  Unscrew coolant drain plug on radiator and drain
coolant.


5. Remove poly-rib belt.


6. Remove drive belt cover.


7. Turn engine to TDC in cylinder no. 1.


8.  Remove distributor cap, unscrew distributor rotor
and remove protective cap.


9. Remove mount for distributor cap.


Printed in Germany Removing and Installing Cylinder Head 15 - 7
15 E n g i n e / C y l i n d e r   H e a d,   V a l v e s 9 4 4


10.  Relax belt tension and pull camshaft belt off
of camshaft sprocket.


11. Unscrew 2 mounting bolts on rear drive belt
cover.


12. Unscrew fuel lines.


13.  Remove plastic cover on fuel collection tube,
pull off wire plugs on fuel injectors and lay
wire harness aside.
     
14.  Unscrew aluminum plugs, coolant line and
bolts (with attached washers) and remove
camshaft housing from cylinder head.


N o t e

Make sure that hydraulic valve tappets do not fall
out and are not mixed up.


15. Remove air cleaner assembly.


15 - 8 Removing and Installing Cylinder Head Printed in Germany
9 4 4 E n g i n e / C y l i n d e r   H e a d,   V a l v e s 15


16. Unscrew bolt of intake brace.


17.  Remove intake distributor by dismantling holder
on oil dipstick tube, hose on brake booster, hose
on intake distributor, retaining clamp on accel-
erator cable and mounting bolts of intake distri-
butor/cylinder head.


18.  Unscrew bolts of exhaust manifold/catalytic
converter pipe flange.


19.  Unscrew hose damp on heater regulating valve
and two screws on neck for coolant circuit.


20. Unscrew mounting nuts for cylinder head.


N o t e

Order for unscrewing mounting nuts is crosswise
from outside to inside.


21. Take off cylinder head.


Printed in Germany Removing and Installing Cylinder Head 15 - 9
15 E n g i n e / C y l i n d e r   H e a d,   V a l v e s 9 4 4


I n s t a l l i n g

1.  Install cylinder head gasket in correct
position.


2. Mount cylinder head.


Tightening order: see figure.

N o t e

Never use a lubricant for installation of
cylinder head nuts and washers. Only
give the threads of studs a light coat of
engine oil. The washers must not turn
when tightening cylinder head nuts! If
necessary, check this with paint stripes.
In the repair sector the washers can be
reused after roughening the bearing
surface for the cylinder head with a
rough sandpaper.
      A.  Preloading Cylinder Head Gasket
1st step
2nd step
3rd step
20 Nm
50 Nm
90 Nm


3.  Mount camshaft housing.
Tightening torque for socket head
batts: 20 Nm.
Tightening torque for aluminum
plugs: 40 Nm.


4. Install drive belt, see page 15 - 5.


5. Adjust polyrib belt, see page 13 - 1.


15 - 10 Removing and Installing Cylinder Head V, 1985 -  Printed in Germany
944 Engine, Cylinder Head, Valve Drive 15


Installation instructions


Tightening torque specifications for
cylinder head
as from Model 82
Engine type M44. 01... 10


Applicable in conjunction with 12 mm high nut
and new washer


1st stage
2nd stage
3rd stage
20 Nm
90° torque angle
90° torque angle


A light film of oil must be applied to the stud
threads.
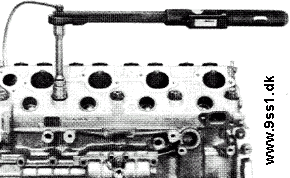

As from Model 89
Engine type M 44. 11/12 (2.7 i)


1st stage
2nd stage
3rd stage
20 Nm
60° rotation angle
60° rotation angle


A light film of oil must be applied to the stud
threads.


88/341


Tightening torque specifications for cylinder head
Printed in Germany - XXV, 1992
15 - 10a
15 9 4 4


15 - 10b Blank Page
9 4 4 E n g i n e / C y l i n d e r   H e a d,   V a l v e s 15


TOOLS


No. Description Special Tool Remarks
1

2

3


4

5


6

7

8
Wrench socket

Spark plug wrench

Valve spring compressor


Valve grinder

Pad for installation of valve
stem seal

Valve spring adjuster

Screwdriver socket

Pressure pad
9133


US 1020 with
US 1020/1 or
P200a


10 - 204


9138/1

9205

9202


Standard


Standard


Printed in Germany Valve Tools 15 - 11
15 E n g i n e / C y l i n d e r   H e a d,   V a l v e s 9 4 4


DISASSEMBLING AND ASSEMBLING VALVE DRIVE
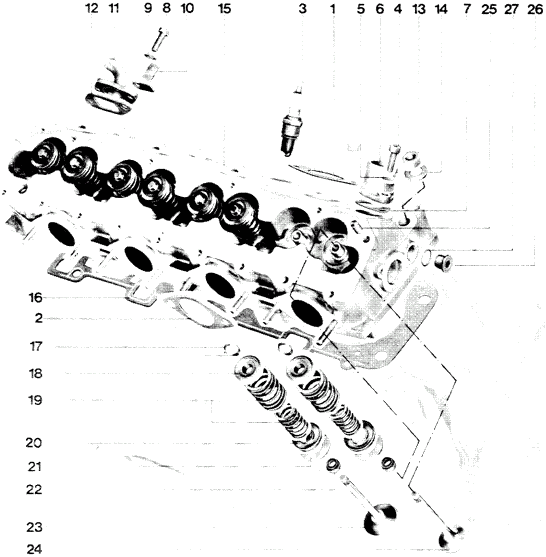


15 - 12 Disassembling and Assembling Valve Drive Printed in Germany
9 4 4 E n g i n e / C y l i n d e r   H e a d,   V a l v e s       15


No. Description Qty. Note when: Special
Instruction
Removing        Installing
1


2


3


4


5


6


7


8


9


10


11


12


13
Gasket


Gasket


Spark plug


Bolt
8 x 25


Washer A 8.4


Adapter


Gasket


Bolt
8 x 20


Washer
A 8.4


Bracket


Connector


Gasket


Nut
4


4


4


2


2


1


1


2


2


1


1


1


10
  Replace


Replace


Torque:  25 - 30 Nm
(18 -22
ft lb)


Replace


Replace


Give threads
ot studs a light
coat of oil


Printed in Germany Disassembling and Assembling Valve Drive       15 - 13
15 E n g i n e / C y l i n d e r   H e a d,   V a l v e s 9 4 4


No. Description Qty. Note when: Special
Instruction
Removing        Installing
14


15


16


17


18


19


20


21


22


23


24


Washer


Cylinder head


Cylinder head
gasket


Valve keeper


Spring retainer


Valve spring set


Valve spring disc


Washer 0.5

Washer 1.0


Valve stem seal


Intake valve


Exhaust valve
10


1


1


16


8


8


8


x

x


8


4


4


Note quantity
Rounded surface
faces up


Always replace


Position
correctly


If necessary,
determine
thickness and
quantity;
use Special Tool
9138/1


Always replace


15 - 14 Disassembling and Assembling Valve Drive Printed in Germany
9 4 4 E n g i n e / C y l i n d e r   H e a d,   V a l v e s       15


No. Description Qty. Note when: Special
Instruction
Removing        Installing
25


26


27


Dowel pin


Plug


Seal
2


1


1


Printed in Germany Disassembling and Assembling Valve Drive       15 - 15
15 E n g i n e / C y l i n d e r   H e a d,   V a l v e s 9 4 4


DISASSEMBLlNG AND ASSEMBLlNG VALVE TRAIN

I n s t a l l i n g   C y l i n d e r    H e a d

N o t e

The cylinder head can be removed from an engine in
the car, see page 15 - 7.
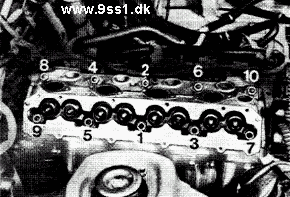


Tightening sequence (in 3 steps): see figure.
Loosening sequence: opposite.
Note tightening torque.


N o t e

Never use any lubricant for the installation of
cylinder head nuts and washers. Only give threads
of studs a light coat of engine oil.
Washers must not turn when tightening cylinder head
nuts! Control by making paint marks if necessary.
During repairs, the washer can be made reuseable by
roughening the bearing surface facing the cylinder
head with coarse sandpaper.


15 - 16 Disassembling and Assembling Valve Drive Printed in Germany
944 Engine / Cylinder Head, Valve Drive 15


Grinding Cylinder Head Maling Surface

Checking Cylinder Head for Distortion

Check mating surface of cylinder head for dis-
tortion with a feeler gauge blade and straight-
edge.

Permissible distortion of maling surface:
0,05 mm. Cylinder heads with a distorted seal-
ing surface can be resurfaced by grinding.
Permisible distortion efter machining:
0,03 mm.

Grinding Cylinder Head

Only machine the sealing surface of a cylin-
der head enough to reach a level surface.
Wear limit: 23,6 mm

Sealing surface machining note:
Peak-to-valley      0.015 mm

If the new-dimension tolerance is exceeded
during machining, a cylinder head gasket with
a thickness of 1.4 mm must be fitted.

New distance A = 24 +- 0.1 mm
Wear limit distance A = 23.6 mm


      Note

When refacing the sealing surface on the com-
bustion chamber side, always check the seal-
ing surface on the camshaft side as well and
reface if necessary.
Admissible distortion of the camshaft sealing
surface:
When checking: 0.1 mm
efter refacing : 0.03 mm
Before machining the sealing surface to the
camshaft housing, check dimension "A" to
avoid unnecessary work.
Before machining, plug the oil passage of the
return valve. Remove cylindrical pins.


Cylinder head refacing dimension and
Identification


New dimension
Gasket
Identification
: 24 +- 0,1 mm
: 1.1 mm
: none

Refacting dimension
Gasket
Identification
: 23.8 to 23.6 mm
: 1.4 mm
: N


Identification "N"

To be embossed on cylinders No. 1 and 4.


Punch character height "N" = 10 mm


Machining Cylinder Head
Printed in Germany - XXV, 1992
15-16a
15 E n g i n e / C y l i n d e r   H e a d,   V a l v e s 9 4 4


REPLACING VALVE GUIDES


TOOLS


No. Description Special Tool Remarks
1

2

3

4

Pressing out base

Driver

Pressure pad

Reamer
9220

9224

9221

3015


15 - 16 b Cylinder Head Tools III, 1983  -  Printed in Germany
9 4 4 E n g i n e / C y l i n d e r   H e a d,   V a l v e s       15


REPLACING VALVE GUIDES


1. Clean and inspect cylinder head. Cylinder
heads, the valve seats or sealing surfaces of
which can no longer be machined, are not
suitable for replacement of valve guides.


2.  Grind off enough of valve guides protruding
from the camshaft end with a spot facer
that guides are flush with the cylinder head.


N o t e :

Be careful not to damage guide collar for
spring retainers.


3. Place cylinder head on Special Tool 9220.


4.  Loosen valve guides from the camshaft
end with Special Tool 9224 by applying
brief knocks and press out rest of guides
toward combustion chamber end in a
press.


5.  Measure bores in cylinder head with an
internal gauge.


Printed in Germany  -  III, 1983 Replacing Valve Guides       15 - 16 c
15 E n g i n e / C y l i n d e r   H e a d,   V a l v e s 9 4 4


6.  Grind off a service valve guide, Part No.
928 104 328 52 (13.27 mm outside dia-
meter), accordingly.

The press fit for intake and exhaust valve
guides must be 0.06 to 0.08 mm.


E x a m p l e :

Cylinder head bore measures 13.01 mm.
Service valve guide ground off to outside
diameter of 13.07 to 13.09 mm.


7.  Coat valve guides with talcum powder,
insert with a light knock, align and press
into cylinder head against stop from the
camshaft end with Special Tool 9221.


N o t e :

If appropriate workshop equipment
is available, cool valve guides in liquid air and
press into cylinder head heated to 190 °C.

Cylinder head must not be kept in heated
state (190 °C) longer than 90 minutes.


8.  Correct valve guides to size 9.00 to
9.015 mm (9 H 7) with a broach.


15 - 16 d Replacing Valve Guides Printed in Germany
9 4 4 E n g i n e / C y l i n d e r   H e a d,   V a l v e s       15


9.  If necessary, valve guides could be reamed
out with Special Tool 3015.

Procedures:

Always rub down valve guides with
"petroleum" lube. Run out ream frequently
to remove burrs. Check reamed out bore
with Special Tool P 206 and, if necessary,
ream out bore again with a dry ream.


10.  Valve seat inserts must also be machined
after replacing valve guides.
Grinding in valves with grinding paste
would not be sufficient.


Printed in Germany   -   III, 1983 Replacing Valve Guides       15 - 16 e
15 9 4 4


15 - 16 f Blank Page
9 4 4 E n g i n e / C y l i n d e r   H e a d,   V a l v e s       15


R e m o v i n g   a n d   I n s t a l l i n g
V a l v e   S p r i n g s


Use Special Tool P 200a to remove and
install valve springs


Use Special Tool US 1020 to remove and
install valve springs (only for USA).
      C h e c k i n g   I n s t a l i e d   L e n g t h
o f   V a l v e   S p r i n g s

1. Install Special Tool 9138/1 with the
shims, spring retainer and both collets
belonging to a pertinent valve.

2.  Read distance on Special Tool 9138/1
and correct by installing or removing
shims if applicable. Shims are available
in thicknesses of 0.5 and 1.0 mm.

Intake valve
Exhaust valve
41.0 + 0.5 mm
40.0 + 0.5 mm


C h e c k i n g   I n s t a l l e d   L e n g t h   of
V a l v e   S p r i n g s   (1985/2 Models)

N o t e

The bearing surface of valve springs is
machined to the same depth since installation
of the cylinder head with cast number
944 104 303 7R.

Intake valve
Exhaust valve
41.0 + 0.5 mm
41.0 + 0.5 mm


Printed in Germany  -  V, 1985 Disassembling and Assembling Valve Drive       15 - 17
15 Engine, Cylinder Head, Valve Drive 944


Valve sizes


Engine type M 44.01 - 10
Dimension Intake Exhaust
a
b
c
45.00 mm
8.97 mm
111.50 mm
45°
40.00 mm
8.95 mm
111.90 mm
45°

Engine type M 44.11/12 (2.7 I)
a             48.00 mm 40.00 mm

Removing and instaIling the valve stem seal

(Cylinder head removed)

Pull off valve steam seals with Special Tool
3047


1.  Slide the plastic assembly sleeve, e.g. from
the spare parts valve stem seal kit for Type
924, onto the valve stem.


2.  Lubricate valve stem seal with oil and slide
on to the valve guide carefully using the
pressure pad.


15 - 18 Disassembling and assembling valve drive
Printed in Germany - XVII, 1988
944 Engine / Cylinder Head, Valve Drive 15


Machining Valve Seats

Note


Before refacing the valve seats, check dimen-
sion "A" to avoid carrying out work that may
be unnecessary since the wear limit has
been exceeded.


Valve seats may be machined until the wear
limit distance "A" = 14,5 mm is reached.
(New part size: 13,65 +- 0,45 mm)

If applicable test with a new valve.
Distance "A" must not be exceeded, since
otherwise the function ot the hydraulic valve
tappet could not be guaranteed.
      The amount ot metal removed should be
limited to .an absolute minimum, to prevent
premature wear of part.


Checking valve guides

1. Remove remainders with a cleaning reamer.

2.  Place a new valve in valve guide and make
sure that valve stem end is flush with mat-
ing surface of cylinder head/carnshaft
housing.


3.  Check clearance with a dial gauge in dial
gauge holder VW 387.
Wear limit = 0,8 mm


Machining Valve Seats, Checking Valve Guides
Printed in Germany - XXIV, 1991
15-19
15 E n g i n e / C y l i n d e r   H e a d,   V a l v e s 9 4 4


DISASSEMBLlNG AND ASSEMBLlNG VALVE DRIVE
(CAMSHAFT HOUSING)
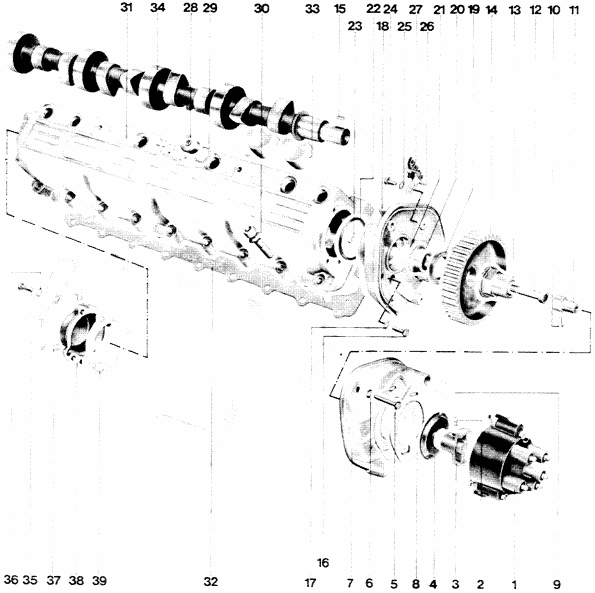


15 - 20 Disassembling and Assembling Valve Drive (Camshaft Housing) Printed in Germany
9 4 4 E n g i n e / C y l i n d e r   H e a d,   V a l v e s       15


No. Description Qty. Note when: Special
Instructions
Removing        Installing
1

2


3

4


5


6


7


8


9


10


11

12


13


14
Distributor cap

Bolt
M 4 x 6


Distributor rotor

Dust cap


Bolt
M 6x30


Washer 6.4


Console for
distributor cap

Gasket (self-
adhesive)


End cap for sight
hole


Bolt
M 5 x 10


Connector

Bolt M 10 x 65

Hex. socket bolt
Polygon head bolt


Dog


Camshaft sprocket
1

1


1

1


3


3


1


1


1


1


1

1


1


1


Hold dog


Lock with
Loctite 221


Position
correctly


Lock with
Loctite 221


Same as for removal
Torque:
45 Nm
65 Nm


Note position
when installing
toothed belt


Only use polygon
head bolts for re-
pairs


Printed in Germany - III, 1983 Disassembling and Assembling Valve Drive (Camshaft Housing)       15 - 21
15 E n g i n e / C y l i n d e r   H e a d,   V a l v e s 9 4 4


No. Description Qty. Note when: Special
Instructions
Removing        Installing
15


16


17


18


19


20


21


22


23

24


25


26


27
Woodruff key 4 x 4


Bolt
M 6 x 35


Washer


Camshaft bearing
cap


Shaft seal
30 x 47


Spacer


Gasket
(formerly O-ring
in spacer)


O-ring 50 x 5


Seal

Bolt M 6 x 12


Washer


Ignition cable
holder


Ignition cable
holder
1


3


3


1


1


1


1


1


1

1


1


1


1


Replace,
lubricate sealing
lip, knock in
with Special
Tool 9202


Replace


Replace,
lubricate lightly


15 - 22       Disassembling and Assembling Valve Drive (Camshaft Housing) Printed in Germany
9 4 4 E n g i n e / C y l i n d e r   H e a d,   V a l v e s       15


No. Description Qty. Note when: Special
Instructions
Removing        Installing
28


29


30


31


32


33


34


35


36


37


38


39
Plug
M 18 x 1.5


Seal
A 18 x 22


Bolt with non-
removable washer


Camshaft housing


Gasket for
camshaft housing


Hydraulic valve
tappet


Camshaft


Bolt
M 6 x 22


Washer
B 6


Transport bracket


Cover


Gasket


6


6


15


1


1


8


1


3


3


1


1


1


Store so that oil
bore faces up,
do not mix up


Torque: 20 Nm
           (14 ft lb)


Lubricate
bearings of
camshaft


Always replace.
Note "TOP"
when installing


Check


Replace


Printed in Germany Disassembling and Assembling Valve Drive (Camshaft Housing)       15 - 23
15 Engine / Cylinder Head, Valves 944


INSTALLING SHAFT SEAL ON CAMSHAFT
BEARING COVER

Note

Shaft seal is an identical part with
shaft seal for upper balance shaft.

The shaft seal (32 x 47 x 7,
as af May, 1985) and the
spacer af the camshaft are
no longer identical with
the seal and the spacer of
the upper balance shaft.


Code (arrow) faces in turning
direction of camshaft.


Lubricate sealing lip with oil and
install together with spacer, and
drive in with Special Tool 9202.
      FITTING DISTRIBUTOR ROTOR

Note

Distributor rotor, connector and hex
socket bolt are adhered to each
other.

Applicable from: September 1982


1. Secure distributor rotor with
micro-encapsulated hexagon screw.

Torque: 4 Nm
Hexagon screw must only be used
once or, when re-used, must be
locked with "Loctite 221".

2.  Attach dust cap.
Cut open new cap and adhere
lightly to brackets quick-action
adhesive.


15 - 24       Disassembling and Assembling
Valve Drive (Camshaft Housing)
Printed in Germany  -  XXIV, 1991
9 4 4 E n g i n e / C y l i n d e r   H e a d,   V a l v e s       15


DISASSEMBLlNG AND ASSEMBLlNG CAMSHAFT DRIVE
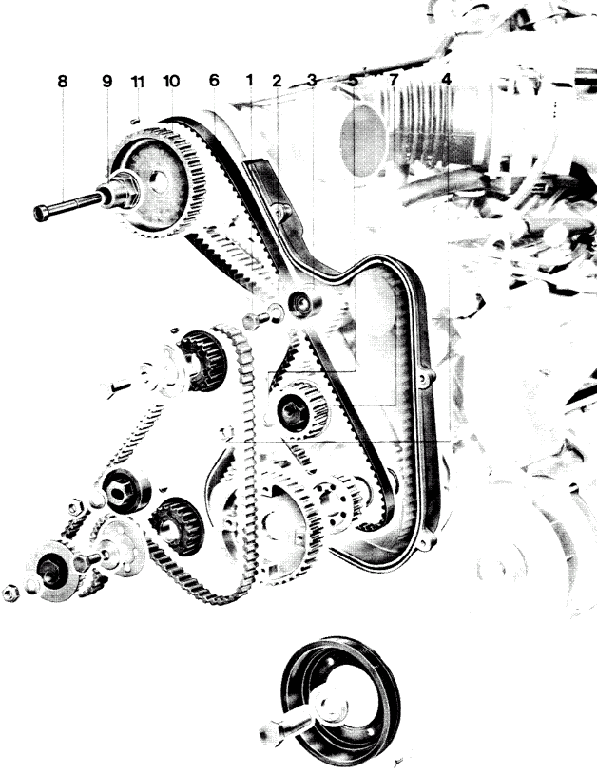


Printed in Germany Disassembling and Assembling Camshaft Drive       15 - 25
15     E n g i n e / C y l i n d e r   H e a d,   V a l v e s 944


No. Description Qty. Note when: Special
Instructions
Removing        Installing
1


2

3

4

5

6


7

8


9

10


11


Hexagon head bolt
M 10 x 35

Washer A 10.5

Roller

Hexagon nut

Washer A 10.5

Camshaft drive belt


Tensioning roller

Socket head bolt
M 10 x 65 (hex.)

or

Soeket head bolt
M 10 x 65 (multiple)


Dog

Camshaft sprocket


Woodruff key 4 x 4
1


1

1

1

1

1


1

1


1

1


1


Mark to have same
running direction
when installed
again


Hold on dog with
Special Tool 9205


Unscrew with stan-
dard screwdriver
socket and hold
on dog


Check


Check for wear
and damage


Check

Same as for
removal;
torque: 45 Nm


Torque: 65 to
70 Nm


Note position
when installing
drive belt


Only use mul-
tiple socket
head bolt for
repairs


15 - 26     Disassembling and Assembling Camshaft Drive V, 1985  -  Printed in Germany
944 Engine / Cylinder Head, Valve Drive 15


Disassembling and assembling camshaft drive


Installing camshaft housing


Note


1. It is essential that cylinder no. 1 be at TDC
and the camshaft sprocket aligned with
mark to install a complete camshaft hous-
ing, since otherwise valves could be dam-
aged.


2.  Never crank engine as long as camshaft
belt is off or not tightened, since valves
could also be damaged.


Special note on toothed belts and drive
belts


As a rule. make sure the toothed belts and
drive belts are not kinked during assembly,
packaging and storage. Improper handling
may cauge incipient damage to the camshaft
toothed belts and may lead to engine damage.


Disassembling and Assembling Camshaft Drive
Printed in Germany - XXVI, 1993
15 - 27
15 Engine, Cylinder Head, Valve Drive 944


Camshaft-
Installation
Worldwide
Engine type 944
As from Model 82


Camshaft


Identification code
between exhaust and
intake cams
on cylinder 2


Valve timing
1 mm stroke,
zero play


Intake opens


Intake closes


Exhaust opens


Exhaust closes

 
M 44. 01 - 0.4


944.105.155.05


155.05


 1° CS after TDC


49° CS after BDC


43° CS before BDC


 3° CS before TDC
 
M 44. 05 - 10


944.105.155.09


155.09


 1° CS after TDC


49° CS after BDC


47° CS before BDC


 1° CS after TDC
 
M 44. 11/12 (2.7 l)


944.105.155.10


155.10


 1° CS after TDC


49° CS after BDC


47° CS before BDC


 1° CS after TDC


15 - 28 Camshaft Installation
Printed in Germany - XVII, 1988
944 Engine / Cylinder Head, Valve Drive 15


Adjusting camshaft belt with mechanical belt tensioner


Model 87 onward
Engine type 44.40/41/05-12


Note


The belt must only be checked and adjusted
when the engine is Cold (room temperature).


1.  Turn crankshaft slowly clockwise until TDC
marking (cylinder 1) on the camshaft drive
wheel is level with the marking on the rear
belt cover.


Illustration shows 16-valve engine


86/460


Note

While tuming, check belt for wear and
damage.
     
2.  The TDC marking on the flywheel must also
be in line.


10083


Adjusting

3. Undo nut A and screw B.


86/486


Adjusting camshaft belt with mechanical belt tensioner
Printed in Germany - XIX, 1989
15 - 29
15 Engine, Cylinder Head, Valve Drive 944


4.  Check mobility af the tensioning roller lever
with thumb pressure an the toothed side of
the drive belt between camshaft pulley and
deflection roller (water pump).


5.  Tighten nut A and screw B. It is no longer
necessary to measure the belt tension.


Tightening torque 20 Nm.


Do not turn the crankshaft while nut A and
screw B are undone.


Note

The belt tensioner can be released using
Special Tool 9200.


87/692


Do not adjust the spring tension. The belt ten-
sioner must be removed from the upper crank-
case section complete when fitting and remo-
ving the belt.
      Note

Idle-pulley width af the belt tensioner


16-VALVE 2-VALVE


159-15


15 - 30 Adjusting camshaft belt with mechanical belt tensioner
Printed in Germany - XIX, 1989
9 4 4 E n g i n e / L u b r i c a t i o n       17


REPLACING ENGINE OIL AND ENGINE FILTER

Requirements:
Engine at operating temperature.

1.  Unscrew oil drain plug on oil pan and drain
engine oil.


2.  Loosen oil filter with a standard oil filter wrench
(e.g. from Mann & Hummel with designation LS
7). Catch escaping oil.


CHECKING ENGINE FOR LEAKS

V i s u a l   I n s p e c t i o n
     
3.  Clean drain plug. Replace seal. Tightening tor-
que of drain plug: 60 Nm (43 ft lb).


4. Give gasket on oil filter a light coat of oil. Screw
on filter by hand until gasket contacts, tighten
by one further turn and finally recheck tightness
of filter with the oil filter wrench.


Specified tightening torque: 20 Nm (14 ft lb).


5. Add engine oil. Run engine to operating tempera-
ture and check for leaks.


6. Check oil level on stopped engine.


Printed in Germany
Replacing Engine Oil and Filter
Checking Engine for Leaks
      17 - 1
17 9 4 4


17 - 2 Blank Page
9 4 4 E n g i n e / L u b r i c a t i o n       17


TOOLS


No. Description Special Tool Remarks
1

2

Pressure pad

Oil filter wrench
10 - 203

9204
Only use outer part


Printed in Germany Tools       17 - 3
17 E n g i n e / L u b r i c a t i o n 9 4 4


17 - 4       Removing and Installing Lubricating System Components I, 1982  -  Printed in Germany
9 4 4 E n g i n e / L u b r i c a t i o n       17


No. Description Qty. Note when: Special
InstructionS
Removing        Installing
1

2


3


4

5


6


7

8


9


10


11

12


13


14

15

16


17


Oil dipstick

Guide tube


Plug
M 20 x 1.5

Seal

Bolt
M 6 x 25

Bolt
M 6 x 50

Washer

Oil pan


Gasket


Bolt
M 5 x 12

Washer

Oil pan insert


Bolt
M 6 x 10

Washer

Bolt M 8 x 55

Nut M 10


Washer
1

1


1


1

18


4


22

1


1


7


7

1


1


1

1

1


1


Caution!
Do not damage oil
intake pipe when
removing


Install with
Loctite 638

Torque:  50 Nm
(36 ft lb)

Replace

Note tightening
procedures

Note tightening
procedures


Check, replacing
if necessary

Lock with
Loctite 270


Open oil pan insert
tabs and clean
inside

Lock with
Loctite 270


Torque:  50 Nm
(36 ft lb)


see page 17 - 9


see page 17 - 9


Printed in Germany Removing and Installing Lubricating System Components       17 - 5
17 E n g i n e / L u b r i c a t i o n 9 4 4


No. Description Qty. Note when: Special
Instructions
Removing        Installing
18

19

20


21
21a
22


23

24

25

26

27


27a


28

29

29a

30


31


32

33
Oil intake pipe

Seal

Bolt
M 8 x 50

Oil drain pipe
O-ring
Camshaft drive gear


Thrust washer

Seal

Shaft seal

Sleeve

Bolt
M 6 x 45

Bolt
M 6 x 50

Washer

Bolt M 6 x 35

Bolt M 6 x 40

Oil pump assy.


Plug M 18 x 1.5


Seal

Oil pressure sensor
M 18 x 1.5

1

1

1


1
1
1


1

1

1

1

3


2


9

4

1

1


1


1

1
 

Always replace


Belt collar faces bal-
ance shaft drive gear


Replace

Replace


If oil pump is disas-
sembled. coat outside
diameter on housing in-
sert before installing in
pump housing with Loc-
tite 574. Coat sealing
surface with Loctite 574

Torque:  35 Nm
(25 ft lb)

Replace

Torque:  35 Nm
(25 ft lb)


see page 17 - 9


17 - 6       Removing and Installing Lubricating System Components I, 1982  -  Printed in Germany
9 4 4 E n g i n e / L u b r i c a t i o n       17


No. Description Qty. Note when: Special
Instructions
Removing        Installing
34

35


36

37

38


39


40

41

42


43


44

45

46


47


48


49
Seal

Plug for pressure
relief valve
M 20 x 1.5

Seal

Spring

Piston for pressure
relief valve


Bolt
M 6 x 12

Washer

Cover

Oil filter


Bolt
M 8 x 25

Washer

Housing

Seal


Gasket


Seal


Oil/water cooler
1

1


1

1

1


2


2

1

1


4


4

1

1


1


1


1
  Replace

Torque: 45 Nm


Replace


Check for wear
and seizure
traces, replacing
piston if necessary


Give seal a light
coat of oil;
torque: 20 Nm


Replace, coat
groove in case
with Curil T

Replace, coat
groove in case
with Curil T

Replace, coat
groove in case
with Curil T

Pre-assemble in
housing and mount
together with crank-
case upper section


Printed in Germany  -  I, 1982 Removing and Installing Lubricating System Components       17 - 7
17 E n g i n e / L u b r i c a t i o n 9 4 4


No. Description Qty. Note when: Special
Instructions
Removing        Installing
50


51


52

53


54


55

56


57
Rubber ring


Seal


Oil filter cap

Seal


Bolt
M 8 x 20

Washer A 8.4

Oil trap


Seal
20 x 5


1


2


1

1


3


3

1


2


Remove intake distri-
butor for this purpose
Replace and paste
on crankcase upper
section with
Loctite 638

Replace and
lubricate lightly


Check. replacing if
necessary


Replace


17 - 8       Removing and Installing Lubricating System Components III, 1983  -  Printed in Germany
9 4 4 E n g i n e / L u b r i c a t i o n       17


REMOVING AND INSTALLlNG PARTS OF LUBRICATING SYSTEM

Remove housing insert.


Punch mark (on outer rotor) faces out.


Align oil pump body surface with upper
crankcase section before tightening the
mounting bolts.


      Apply toothed sleeve on sealing lip and seal
simultaneously and drive in with Special
Tool 10 - 203 (only outer part).


Coat both sides of gasket in area of corners
with engine oil prior to installation of the
oil pan gasket.


Various modifications have been made on
the oil pump and crankcase beginning with
1985/2 models. Consequently the new oil
pump, Part No. 944 107 014 08, must not
be installed in older engines.


Printed in Germany  -  V, 1985 Removing and Installing Parts of Lubricating System       17 - 9
17 E n g i n e / L u b r i c a t i o n 9 4 4


DISASSEMBLlNG AND ASSEMBLlNG OIL PUMP


17 - 10 Disassembling and Assembling Oil Pump Printed in Germany
9 4 4 E n g i n e / L u b r i c a t i o n       17


No. Description Qty. Note when: Special
Instructions
Removing Installing
1


2

3


4


5

6


7
Shaft seal
38 x 55 x 7


Toothed sleeve

Countersunk screw
M 6 x 25

Housing insert


Inner rotor

Outer rotor


Oil pump housing
1


1

2


1


1

1


1
Replace, lubricate lip
with oil, install seal
together with toothed
sleeve and drive in with
tool 10-203 (only outer
part)


Torque: 8 Nm (6 ft lb)


Apply coat of Loctite
No. 574 on outside
diameter of housing
insert over entire width
before installing

Lubricate with oil

Lubricate with oil;
punch mark faces out

Coat face end with
Loctite No. 574


see page 17 - 9


Printed in Germany  -  I, 1982 Disassembling and Assembling Oil Pump       17 - 11
17 E n g i n e / L u b r i c a t i o n 9 4 4


REMOVING AND INSTALLlNG BUSHING FOR OIL PRESSURE RELIEF VALVE


R e m o v i n g

Remove damaged bushing by unscrewing with grip
pliers.


N o t e

Be careful not to damage crankcase.


I n s t a l l i n g

1.  Coat bushing at lower scored surface with
Loctite No. 648 or 638.


2.
Drive in bushing to stop with Special
Tool 9215.


17 - 12 Removing and Installing
Bushing for Oil Pressure Relief Valve
II, 1983  -  Printed in Germany
9 4 4 E n g i n e / L u b r i c a t i o n       17


TIGHTENING PROCEDURES FOR OIL PAN MOUNTING BOLTS


1st step:

2nd step:        

3rd step:
install bolts

4 Nm (3 ft lb)

8 Nm (6 ft lb)


T i g h t e n i n g   s e q u e n c e:   clockwise from inside to outside.
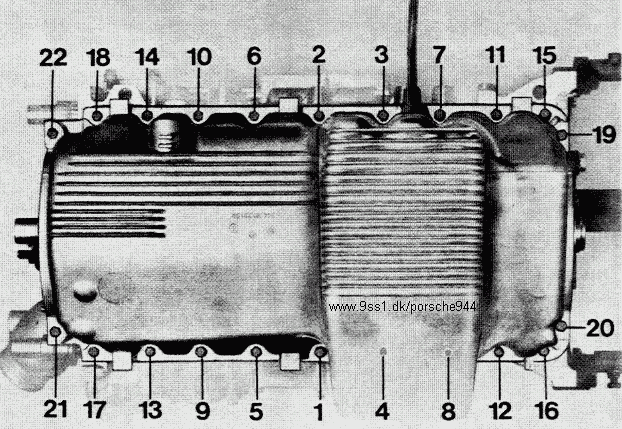


Printed in Germany  -  I, 1982 Tightening Porcedures for Oil Pan Mounting Bolts       17 - 13
17 E n g i n e / L u b r i c a t i o n 944


TOOLS


No. Description Special Tool Remarks
  Oil pressure tester VW 1342  


17 - 14 Tools - Checking Oil Pressure V, 1985  -  Printed in Germany
944 E n g i n e / L u b r i c a t i o n       17


CHECKING OIL PRESSURE

1.  Remove oil pressure transmitter and
screw oil pressure tester VW 1342
together with M 10 x 1 adapter, Part No.
999.105.013.02, and M 10 x 1/M 18 x
1.5 adapter, Part No. 901.101.175.01, in
its place in the oil/water cooler housing.


2.  Run engine to operating temperature
(80° C oil temperature), checking the
temperature with, for example, an oil
temperature tester (Special Tool 9122
+ 9122/2).


3.  At idle speed the oil pressure should be
2.5 bar or more.
Have a second person accelerate the
engine speed to 4000 rpm.
Read oil pressure from tester. The value
should be greater than 4.5 bar.

4. Install oil pressure transmitter with a new
A 18 x 24 seal. Tightening torque: 35 Nm


Printed in Germany  -  V, 1985 Checking Oil Pressure       17 - 15
17 Engine / Lubrication 944


REMOVING AND INSTALLING OIL CHECK
VALVE IN CYLINDER HEAD


1   Guide piece

2   Spring

3   Ball


Removing

Oil check valve - 944 turbo engine
Part No. 951 104 229 00
Identifying feature: Ø 2.5 mm bore.

Predrill valve approx. 5 mm deep
using a Ø 4.8 - 5 mm drill, then cut
thread with a commercially available
M 6 threaded blind hole drill. Coat
drill with grease. Extract valve
using an M 6 bolt and a spacer
sleeve.

Oil check valve - 944 engine
Part No. 928.104.131.00
Identifying feature: Ø 8 mm bore.
Cut thread using M 10 threaded blind
hole drill. Turn out valve using an
M 10 bolt and a spacer sleeve.


Note

When overhauling engines, only the
oil check valves from the 944 turbo
engine, Part No. 951 104 229 00
should now be installed.


17 - 16 Removing and Installing Oil Check
Valve in Cylinder Head
XVI, 1987 - Printed in Germany
944 Engine, Lubrication 17


Cleaning the entire engine oil system after an engine fallure (bearing failure)

Note

This cleaning sequence is only intended to
give pointers as to whereyou may find chips.
The actual amount of work involved will
depend oneach individual case of engine
damage.

Replace the following parts:

- Hydraulic valve tappets

- Chain tensioner (16-valve engine)

- Pressure relief valve (crankcase)

- Pressure reducing valve (cylinder head)

- Oil/Water heat exchanger

- Oil filter


The following parts mult be dismantled,
inspected and cleaned thoroughly:


- Oil pump

- Thermostat housing (turbo)

- Oil/Water heat-exchanger housing

- Oil check valve in the cylinder head
      see Page 17 - 16
      The following parts must be cleaned tho-
roughly and/or rinsedthrough repeatedly:

Note:


All oil bores may be rinsed through thoroughly
with benzine and a commercially available
oil/benzine syringe.

- Oil pan

- Oil intake pipe

- Oil drain pipe

- Crankcase
     see Page 17 - 18

- Crankshaft

- Cylinder head

- Camshact housing

- Oil lines (turbo)

- Oil cooler (turbo)

- Oil separator


Change oil filter and engine oil
after approx. 500 km.

Note:


After an engine fallure. the entire intake
system must be inspected for foreign bodies
and/or oil and cleaned before assembly.


Cleaning the entire engine oil system after an engine failure (bearing failure)
Printed in Germany - XVII, 1988
17 - 17
17 Engine, Lubrication 944


Cleaning the main oil duct in the crankcase

Note

Both sealing caps must be removed from the
crankcase for this procedure.


Removing

1. Drill a hole in the sealing cap

2. Drive out the sealing cap with a suitable
    punch.


83/9323


3. Clean and/or flush the main oil duct


Installing

1. Apply film af Loctite 262 to the sealing
    surface af the cap.
2. Drive into a place with a plunger,
    e.g. VW 295.


Note

The sealing cap must lie approx. 2 - 3 mm
below the edge of the housing.


9836


17 - 18 Cleaning the main oil duct in the crankcase
Printed in Germany - XVII, 1988
944 Engine, Lubrication 17


Removing and instaIling the pressure reducing valve

Engine type M 44. 11/12 (2.7 l)
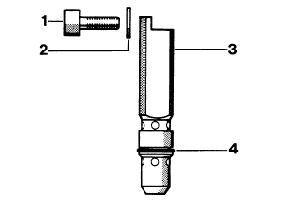


81/17

1 - Fillister head screw
2 - Gasket
3 - Pressure reducing valve
4 - O-ring


1. Remove the camshaft housing, undo and
remove the fillister head screw.


2. Fit a screw, e.g. M 5 x 30 in the pressure re-
ducing valve from above andpull the valve
out of the cylinder head.


3. Replace the O-ring before installation,
applying a light film of oil.


4.  Install the pressure reducing valve in the
correct position, replacethe gasket and
tighten the fillister head screw.
Tightening torque 8 Nm.


Removing and installing the pressure reducing valve
Printed in Germany - XVII, 1988
17 - 19
19 9 4 4


19 - 00 Blank Page
9 4 4 E n g i n e / C o o l i n g       19


REPLACING COOLANT AND BLEEDING COOLING SYSTEM

1.  Drain coolant (only from cold engine). Set heater
control lever to "warm" position and unscrew
drain plugs on radiator and crankcase.


COOLANT MIXING CHART
(A v e r a g e   V a l u e s)
2.
Install drain plugs.
Tightening torque:
Radiator 5 Nm (43 in. lb)
Crankcase 20 Nm (14 ft lb)
Leave or set heater control lever to "warm"
position and remove bleeder plugs. Add coolant
slowly until fluid level in expansion tank is kept
at the "max." mark constantly.


3.  Start engine and run to operating temperature at
fast idle speed (until radiator fan has switched on
and off).

If fluid leaving bleeder opening is without air bub-
bles, insert plug and tighten hose clamp. Check
coolant level, adding more coolant if necessary.
Protection
to
Antifreeze Water Antifreeze Water
-25° C/ -13° F
-30° C/ -22° F
-35° C/ -31° F
40%
45%
50%
60%
55%
50%
3.1 ltr./3.3 US qt
3.5 ltr./3.7 US qt
3.9 ltr./4.1 US qt
4.7 ltr./5.0 US qt
4.3 ltr./4.5 US qt
3.9 ltr./4.1 US qt


Printed in Germany
Replacing Coolant and Bleeding
Cooling System
      19 - 1
19 E n g i n e / C o o l i n g 9 4 4


REPLACING COOLANT AND BLEEDING COOLING SYSTEM
(With New Bleeder Adapter)

1.  Drain coolant (only when engine is cold).
Set heater lever at "warm" and unscrew drain
plugs on radiator and crankcase.


Note

The drain plug in the crankcase has been
discontinued as from model 89. Draining
facility from the auxiliary plastic connector
on the water pump. (For 944 turbo with
thermostat insert only).


88/150
     
2.  Screw in drain plugs.
Tightening torque:
radiator     = 5 Nm   (43 in. lb)
crankcase = 20 Nm (14 ft lb)

Leave or set heater lever at "warm" and unscrew
bleeder screw.
Add coolant  s l o w l y  until coolant runs out
of bleeder adapter.


  Drain a small amount of coolant again until
coolant level reaches approx. half fult reservoir
mark. so that coolant will not overflow when
running engine warms up.


3.  Tighten bleeder screw several turns, start engine
and run at fast idle speed to reach operating
temperature (until radiator fan has switched on
and off).

Tighten bleeder screw when escaping fluid does
not have air bubbles.

Correct coolant level to reach "max," mark on
reservoir.

Check and, if necessary. correct coolant level
after test driving car.


19 - 2       Replacing Coolant and Bleeding Cooling System
(With New Bleeder Adapter)
Printed in Germany - XVII, 1988
9 4 4 E n g i n e / C o o l i n g       19


CHECKING THERMOSTAT


Place thermostat in a water bath.

Begins to open
Fully open
   = approx. 83° +- 2°C (181° +- 3.5°F)
= approx. 90°C (194°F)


Opening travel (distance A) = at least 7 mm


CHECKING COOLlNG AND HEATING SYSTEM
FOR LEAKS


1. Inspect visuillly for leaks.


2. Check hoses for porosity and brittleness.


3. Tighten hose clamps.


Printed in Germany - I, 1982
Checking Thermostat
Checking Cooling and Heating System for Leaks
      19 - 3
19 E n g i n e / C o o l i n g 9 4 4


REMOVING AND INSTALLlNG PARTS OF COOLING SYSTEM
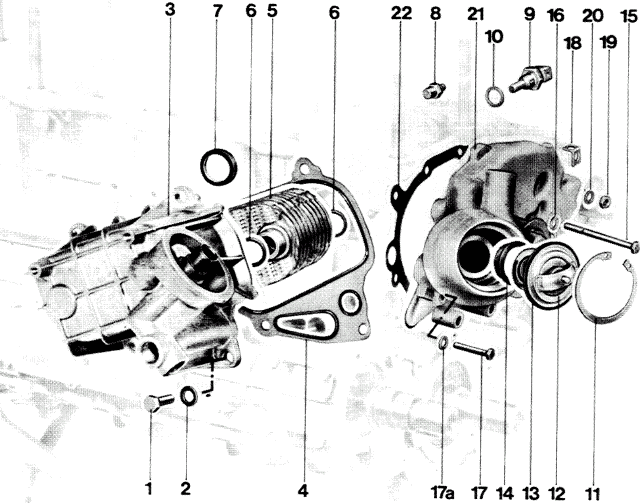


19 - 4      Removing and Installing Parts of Cooling System V, 1985 - Printed in Germany
944 E n g i n e / C o o l i n g       19


No. Description Qty. Note when: Special
Instructions
Removing        Installing
1


2

3


4


5


6


7


8


9


10

11


12

13

14
Hexagon head bolt
M 8 x 25

Washer

Housing for oil/
water cooler

Profile gasket with
vulcanized seals

Oil/water cooler


Seal


Rubber ring


Temperature
transmitter

Temperature sensor


Seal 12 x 18

Circlip


Thermostat

Seal

Molded gasket
4


4

1


1


1


2


1


1


1


1

1


1

1

1


Always replace


Assemble in
housing and
mount together
on upper
crankcase
section

Replace, light
coat of oil

Replace, check
for correct fit
in uppercrank-
case section

Torque: 8 Nm
(0.8 kpm)

Torque: 15 Nm
(1.5 kpm)

Replace

Check for cor-
rect tit

Check

Check


see P. 19-6


see P. 19-3


Introduction
July, 1983
Engine No.
41 E 00 429
43 E 00 391
43 E 20 138


Printed in Germany - V, 1985 Removing and Installing Parts of Cooling System       19 - 5
19 E n g i n e / C o o l i n g 944


No. Description Qty. Note when: Special
Instructions
Removing        Installing
15


16

17


17a

18

19

20

21


22

Soeket head screw
M 6 x 70

Washer

Soeket head screw
M 6 x 35

Washer

Bracket

Hexagon out M 6

Washer

Water pump,
assembly

Gasket
1


1

7


7

1

3

3

1


1


Replace


REMOVING AND INSTALLlNG PARTS
OF COOLlNG SYSTEM

1.  Place assembled oil/water cool er housing
on upper crankcase section.
Insert Special Tool 9215 in guide sleeve
for oil pressure relief valve.


2.  Now bolt down centered housing to
final torque.

3. Mount oil pressure relief valve.


19 - 6 Removing and Installing Parts of Cooling System Printed in Germany
944 Engine/Cooling       19


REMOVING AND INSTALLING PARTS OF
COOLING SYSTEM, 187 MODELS ONWARD
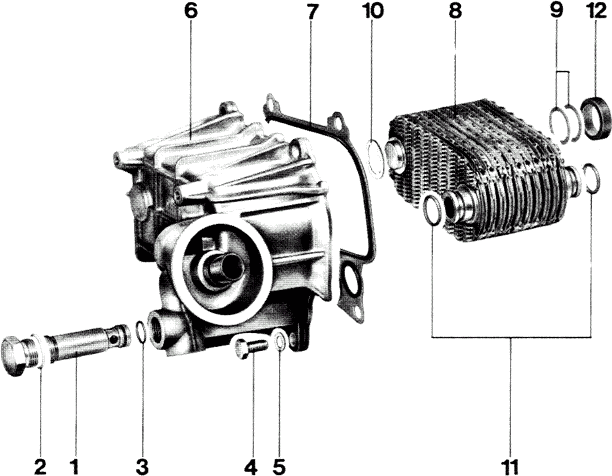


Printed in Germany - XIII, 1987
Removing and Installing Parts
of Cooling System, '87 Models Onward
      19 - 6 a
19 Engine/Cooling 944


No. Description Qty. Note when:
Removing        Installing
1


2

3


4


5

6


7


8


9


10


11


12
Oil pressure-
relief valve

Sealing ring

Round-section
sealing ring

Hex bolt
M8 x 25

Washer

Housing for
oil-water heat
exchanger

Special-
section gasket

Oil-water heat
exchanger

Shim (alum-
inum, 0.5 mm)

Plastic washer


Round-section
sealing ring

Rubber ring
1


1

1


4


4

1


1


1


x


1


2


1


Replace

Replace


Replace


Place in housing
before assembly


Install between
housing and oil-
water heat exchanger

Replace, oil lightly


Replace, check that
ring is correctly
seated in upper
crankcase half,
install with grease
or Curil, for
example.


19 - 6 b Removing and Installing Parts of
Cooling System, '87 Models Onward
Printed in Germany
944 Engine, Cooling 19


Notes on assembly

A modified oil/water heat exchanger housing
has been installed as from Model 87. Part No.:
944 107 149 06. The lower part of the hous-
ing's heat-exchanger mounting has been mod-
ified. Always use the new housingwhen over-
hauling engines in earlier models.


A = Original design
B = New design


Preassembling the heat exchanger

Mount the O-ring-type sealing rings on the oil-
feed connector piecesand insert the heat
exchanger into the housing with the plastic
washer.

2. Lay a straight edge on the contact surface
of the housing (without profile-section gear).

3.  Make up the gap between the spigot on the
heat exchanger and the straight edge with
shims (approx. 2). Suitable shims must be
fitted to provide an assembly dimension of 0
or +- 0.25 mm.


Note

The number of shims required between heat
exchanger and crankcase must be redeter-
mined every time repairs are carried out.

4. Position the preassembled housing on the
crankcase and tighten the screws lightly.
Screw in the lubricated assembly pin 9262/1
by hand, center and tighten the fastening
screws (crosswise). If there is any resistance
when unscrewing the assembly pin, repeat
the assembty procedure.


5.  Install the oil pressure-relief valve with a new
gasket and lubricated O-ring. Tightening
torque 45 Nm.


Notes - Removing and installing parts of cooling system
Printed in Germany - XXI, 1989
19 - 6c
19 944


19 - 6 d Blank Page
9 4 4 E n g i n e / C o o l i n g       19


REMOVING AND INSTALLING RADIATOR


R e m o v i n g


1.  Unscrew cap on expansion tank. If engine is hot, first turn cap to first catch and let pressure escape. Then unscrew cap completely.


2. Remove air cleaner complete with air flow
sensor.


3. Remove splash guard.


4. Drain and catch coolant through drain plug
opening on radiator or coolant hose.


5. Disconnect wire harness on fan housing.


6. Unscrew three each bolts on top and
bottom and remove complete fan housing.


7.  Disconnect coolant hoses.


8. Cars with automatic transmission:
Disconnect ATF hoses on radiator while
holding.


Printed in Germany - III, 1983 Removing and Installing Radiator       19 - 7
19 E n g i n e / C o o l i n g 9 4 4


9.  Loosen two straps on coolant feed hose
and two clamps.


10.  Disconnect vent hose, tilting radiator
back slightly for this purpose.


11. Remove radiator from below.


I n s t a l l i n g


1.  Check that radiator fits properly in rubber
mounts.
Place radiator on bottom rubber mounts
first and then press in forward direction,
making sure that rubber seal between top
of radiator and jack carrier is not damaged.


2. Install clamps and straps.


3. Pour in coolant and bleed cooling system
(see page 19 -1).


19 - 8 Removing and Installing Radiator Printed in Germany
944 Engine/Cooling 19


REMOVING AND INSTALLING TEMPERATURE
SWITCH

Removing

1.  Remove air cleaner complete with
air flow sensor.


2. Remove splash guard.


3. Remove fan housing.


4. Drain approx. 2 liters of
coolant.


5. Unscrew temperature switch
(wrench size across flats:
30 mm).


Installing

Torques:
- with plastic thread: 20 Nm
- with brass thread: 28 Nm
each in conjunction with a new fiber
seal ring, Part No. 900.123.012.70

CHECKING TEMPERATURE SWITCH

1. Remove temperature switch.


Printed in Germany - XVI, 1987
Removing and Installing Temperature
Switch, Check Temperature Switch
      19 - 9
19 Engine/Cooling 944


2.  Connect testing buller on flat
male plugs of switch. Place
switch in warm water bath.

Buzzer must sound off at
temperature of about 92°C and
stop buzzing when temperature
drops to approx. 87°C.


19 - 10 Removing and Installing Temperature
Switch, Checking Temperature Switch
XVI, 1987 - Printed in Germany
944 Engine, Cooling 19


Cleaning the cooling system after
water has been contaminated with
oil


Cleaning


1.  Drain the coolant (drain plugs on cooler and
crankcase). There is no drain plug in the
crankcase as from Model 89. Drainage
facility from the plastic auxiliary connection
pjece of the water pump.


88/150


2.  Remove the water expansion tank and clean
separately with cold cleaningagent.


3. Pour 2 liters of cold cleaning agent into the
coolant system. Fill up with water (approx. 6
liters).


4. Allow the engine to warm up and bleed.


5. Once the thermostat has opened. run the
engine at a higher speed for approx.
2 minutes with the heating turned on.


6. Shut down the engine. drain off all cleaning
fluid.
7.  Fill the cooling system with new cold
cleaning agent and fresh, warm water and
clean again.


Rinsing

Then rinse out with clear, warm water. Repeat
the rinsing procedure until there is no evidence
of oil or cold cleaning agent in the water.


Filling the cooling system

1. Filt the cooling system with warm water and
antifreeze.

2.  Bleed the cooling system, see Page 19 - 2.


Cleaning the cooling system after water has been contaminated with oil
Printed in Germany - XXII, 1988
19 - 11
20 9 4 4


20 - 00 Blank Page
9 4 4 F u e l  S u p p l y 20


REPLACING FUEL FILTER


1. Pinch fuel teed line shut with a standard hose clamp. Unscrew fuel lines, not forgetting to counterhold. Catch escaping fuel.


2.  Loosen clamp and remove fuel filter.


3.  Install new filter. Watch direction of flow = direc-
tion of arrow.


4. Remove hose clamp. Start engine and check fuel
lines as well as fuel filter for leaks.


CHECKING FUEL AND INJECTION LINES FOR
LEAKS AND TIGHTNESS


1. Inspect visually for leaks.


2. Tighten coupling nuts and hose clamps.


Printed in Germany Replacing Fuel Filter; Checking Fuel and
Injection Lines for Leaks and Tightness
      20 - 1
20 F u e l   S u p p l y 9 4 4


CHECKING FUEL PUMP DELIVERY RATE


Requirements:

Fuel filter and power supply in perfect condition.


1.  Unscrew fuel return hose on pressure regulator.
Catch escaping fuel.


2.  Connect standard hose and hold other end in a
measuring glass (approx. 1500 cm3 volume).

3. Pull off fuel pump relay on Fuse/relay board.


4. Bridge terminals 30 and 87 b with a piece of
wire. Fuel pump should new run.


N o t e :

Fuel pump can also be run by supplying battery
voltage to terminal 4 (black/green) of multiple-pin
plug with a pjece ot wire.


5.  Let fuel run into measuring glass 30 seconds.
See page 25 - 3 for test values.


20 - 2 Checking Fuel Pump Delivery Rate I, 1982 - Printed in Germany
944 F u e l   S u p p l y       20


REMOVING AND INSTALLlNG FUEL PUMP

N o t e

Conform with local safety regulations for
working on fuel systems.


R e m o v i n g

1. Disconnect battery ground lead.

2.  Take off fuel pump cover at bottom
right. Pinch fuel feed hose with a standard
hose clamp, loosen hose clamp and pull
hose off of fuel pump. Disconnect electric
plug.


3.  Unscrew fuel pipe from pump on fuel
filter, while counterholding with a
second wrench. Catch escaping residual
fuel.

4. Loosen right fuel tank strap at bottom
and detach. Take off lower guard with
fuel pump.

5. Unscrew and remove fuel pipe and
electric connector on pump. Loosen
hose clamp and remove fuel pump.


I n s t a l l i n g

1. Always use new seals.

2.  Tightening torque for capped nut is 22
Nm, while counterholding.

3. Remove hose pinching clamp and check
for leaks. Install guard again.


Printed in Germany - V, 1985 Removing and Installing Fuel Pump       20 - 3
20 F u e l   S u p p l y 944


REMOVING AND INSTALLING FUEL TANK

R e m o v i n g

1. Disconnect battery ground lead.

2. Draw out fuel.


N o t e

Conform with local safety regulations for
working on fuel systems.

3.  Unscrew hexagon head bolts on exhaust
flange and both final muffler suspension
points, and take off assembly.

4. Unscrew final muffler shield on fuel tank
and rear suspension point, and remove.

5. Take off fuel pump cover at bottom right.
Pinch fuel feed hose with a standard hose
pinching clamp, loosen hose clamp and
pull hose off of fuel pump. Disconnect
electric plug.


6.  Unscrew fuel pipe from pump on fuel
filter, while counterholding with a
second wrench. Catch escaping residual
fuel.

7. Unscrew right strap of fuel tank at
bottom and detach. Remove lower
guard with fuel pump.

8. Remove transmission - see Group 34
in Repair Manual.

9. Unscrew fuel pipe on fuel filter, while
counterholding with a second wrench.
Unscrew transmission carrier on body
and take off with the fuel filter.


20 - 4 Removing and Installing Fuel Pump Printed in Germany
9 4 4 F u e l   S u p p l y       20


10.  Remove trunk floor cover. Take off cover
for fuel level transmitter. Pull off fuel
return hose and electric plug on level
transmitter.


11.  Remove right rear side window. Loosen
and take off side trim panel carefully.
Pull off wheel house trim and insulation
sheet up to rear cover of fuel filler neck.
Loosen and remove cover.

12. Loosen hose clamp on fuel filler neck.
Pull off both fuel vent hoses on filler
neck.


13.  Loosen left strap of fuel tank at bottom
and unscrew both M 8 nuts, and remove.

14. Remove fuel tank by pulling back and
down.


I n s t a l l i n g

1.   Make sure of perfect hose connections
and hose routing prior to installation of
the fuel tank.


Printed in Germany - V, 1985 Removing and Installing Fuel Pump       20 - 5
20 Fuel Supply 944


2.  Insert both inner sealing hoses
(with bead) into connecting hose.
Coat inner sealing hoses with
assembly oil, e.g. Capella WE32
or Omnis 32. If necessary.
Contifix tire mounting paste can
also be used.


3.  Slide preassembled connecting
hose onto tank neck or filler
neck, paying attention to correct
seating of inner sealing hoses
(avoiding creases).

4. Seal cover for filler neck
thoroughly with a sealing
compound (8) prior to
installation to prevent leakage
of fuel vapors.


20 - 6 Removing and Installing Fuel Tank XVI, 1987 - Printed in Germany
944 F u e l   S u p p l y       20


FUEL SYSTEM LINE ROUTING - 1985/2 MODELS
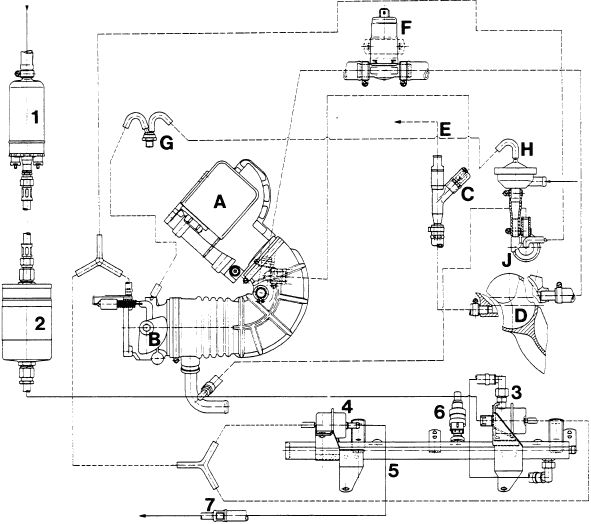


1 - Fuel pump
2 - Fuel filter
3 - Pressure damper
4 - Pressure regulator
5 - Injection line
6 - Fuel injector
7 - Fuel return
A - Air flow sensor
B - Throttle housing
C - Ejection pump
D - Intake pipe
E - To brake booster
F - Idle speed control
G -  Temperature valve
(open above 58° C)
H - Shutoff valve
J - Control valve


Printed in Germany - V, 1985 Fuel System Line Routing       20 - 7
20 F u e l   S u p p l y 944


ACTIVE CARBON TANK FOR POLLUTANT-FREE FUEL TANK VENTING
(LAYOUT)
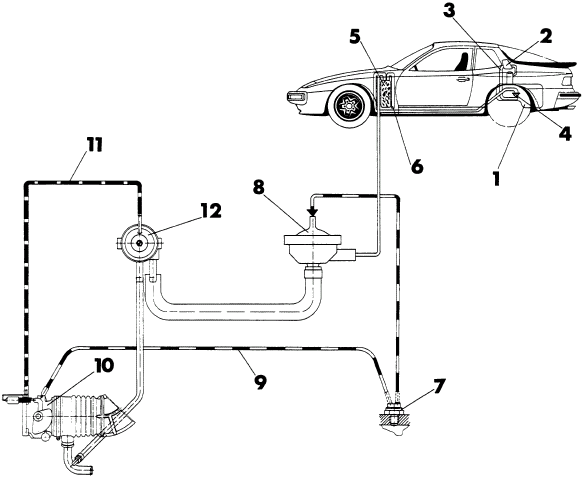


1 - Fuel tank
2 - Expansion tank
3 - Vent line
4 - Safety valve
5 - Active carbon tank
6 - Flushing air line
7 - Temperature valve
8 - Shutoff valve
9 - Vacuum line
10 - Throttle valve
11 - Vacuum line
12 - Control valve


20 - 8 Active Carbon Tank for Pollutant-Free Fuel Tank Venting
(Layout)
Printed in Germany
944 F u e l   S u p p l y       20


REMOVING AND INSTALLING FUEL EXPANSION TANK (Since July, 1983)


N o t e

Conform with local safety regulations for
working on fuel systems.


R e m o v i n g

1. Disconnect battery ground lead.

2. Remove right rear side window.

3.  Loosen and take off side trim panel
carefully.

4. Pull off wheel house trim and insulation
sheet up to rear cover on filler neck.
Loosen and take off cover.

5. Remove guard for expansion tank.

6. Loosen both hose clamps on expansion
tank and pull off hoses. Unscrew
expansion tank mounting bolt.


7. Pull out expansion tank from below.
      I n s t a l l i n g

1.  Check for perfect seating of hoses and
hose clamps.

2.  Seal cover for fuel filler neck thoroughly
with a sealing compound (tape) prior to
installation, to prevent leakage of fuel
vapors.


Printed in Germany - V, 1985 Removing and Installing Fuel Expansion Tank       20 - 9
20 F u e l   S u p p l y 944


CHECKING FUEL EXPANSION TANK

1.  Check fuel expansion tank after removal.

2. Plug venting connection.

3. Connect manual vacuum pump 9160 on
drawing-off connection.


4.  The pressure gage reading should not drop
with sufficient vacuum (approx. 400 mbar).


20 - 10 Checking Fuel Expansion Tank Printed in Germany
944 Fuel Supply       20


REMOVING AND INSTALLING FUEL
LEVEL SENDER

TOOLS
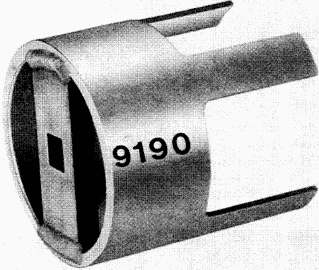


No. Description Special Tool Remarks
  Pin wrench


9190  


Printed in Germany - XIII, 1987
Removing and Installing
Fuel Level Sender
      20 - 11
20 Fuel Supply 944


REMOVING AND INSTALLING FUEL LEVEL
SENDER


Note:

Observe safety precautions for
working on the fuel system. Do not
remove sender when tank is full.


Removing

1.  Remove luggage-compartment floor
covering. Remove panel covering
fuel-level sender. Slacken hose
clamps. Disconnect fuel return
hose. breather hose and
electrical connections from sender.


2.  Slacken union nut with Special
Tool 9190. Remove sender with
seal.
      Installing

1.  Always use a new seal. Coat
thread and contact face of union
nut with Optimoly TA.


2. Tighten union nut with Special
Tool 9190 to specified torque.


Note

To facilitate assembly,
immerse the new union nut
in a container with water
heated to 60 to 70 deg.
C for approx. 8 minutes


3.  Tightening torque for union nut
35 +- 5 Nm (26 +- 3.6 ftlb).


4. When reconnecting the fuel return
hose, ensure that the screw of
the hose clamp does not came into
contact with union nut or
fuel-level sender.


20 - 12 Removing and Installing Fuel Level Sender Printed in Germany
XXIV, 1991
9 4 4 A F C   F u e l   S y s t e m       24


REPLACING AIR FILTER CARTRIDGE


1.  Loosen, vent hose and mounting screws with a
screwdriver and remove housing cover.


2.  Remove filter cartridge and clean inside of air
cleaner housing lower section with a lint-free
cloth.


3. Install filter cartridge, mount housing cover care-
fully and tighten mounting screws. Make sure
dust cover fits correctly between air cleaner inlet
and wheel house side wall.


      CHECKING INTAKE AIR GUIDE AND CRANK
CASE VENT HOSES FOR LEAKS AND TIGHT
FIT


1. Check all hoses of intake system for correct fit.


2. Tighten hose clamps.


Printed in Germany - I, 1982
Replacing Air Filter Cartridge
Checking Intake Air Guide and
Crankcase Vent Hoses for Leaks
      24 - 1
24 944


24 - 2 Blank Page
944 E l e c t r o n i c   F u e l   I n j e c t i o n       24


TESTING AND ADJUSTING SPECIFICATIONS


Test Specification Remarks
Electric fuel pump
        Delivery rate

at least 850 cc/30 sec.
 
Fuel pressure
(engine stopped)
        Fuel pump bridged

        Idle speed value


2.5 +- 0.2 bar

approx. 2 bar
 
Leak test
        Min. pressure atter
        20 minutes


1 bar
 
Idle adjustment

        Idle speed (rpm)
        Europe
        USA/Canada/Japan
        Australia + Sweden

        CO (%)
        Europe
        USA/Canada/Japan
        Australia + Sweden


800 + 50
900 +- 50
800 + 50


0.5 - 1.0
0.6 +- 0.2 *
0.5 - 1.0
Idle speed:
Adjust to top limit
for cars with auto-
matic transmission
or power steering.

* Measured ahead
of catalytic con-
verter and with
oxygen sensor
plug disconnected


Printed in Germany - II, 1983 Testing and Adjusting Specifications       24 - 3
24 L - J e t r o n i c   F u e l   I n j e c t i o n 944


TESTING AND ADJUSTING SPECIFICATIONS
MODELS FROM 85/2 AND 924 S

Test Specification Remarks
Electric fuel
pump
Delivery rate


min. 850 cm3/30 sec
        750 cm3/30 sec **
 
Fuel pressure
(Engine stopped)
Fuel pump
bridged

Idle speed control
value


2.5 +- 0.2 bar


approx. 2 bar
 
Leak test
min. pressure after
20 Min.


1 bar
 
Idle adjustment


Idle Speed
l/min

CO-Content
without
catalytic        
converter


840 +- 20

0.5 - 1.5
USA and
catalytic
converter
vehicles


840 +- 20

0.6 +- 0.2 *


*   Measured ahead af
catalytic converte
and with Lambda
sensor plug
disconnected


* USA and catalytic converter cars

**      Speed-reduced pump with green paint color code,
Bosch No. 0 580 464 028


24 - 4 Testing and Adjusting
Specifications
VII, 1986 - Printed in Germany
944 L - J e t r o n i c   F u e l   I n j e c t i o n       24


CHECKING FUEL PRESSURE

TOOLS


No. Description Special Tool Remarks
  Pressure gage with hose
from pressure tester
P 378 or VW 1318


Printed in Germany - V, 1985 Checking Fuel Pressure       24 - 5
24 L - J e t r o n i c   F u e l   I n j e c t i o n 9 4 4


CHECKING FUEL PRESSURE

1.  Unlock and fold up cover. Unscrew and
remove capped out on test connection
of fuel distribution line.


N o t e

Be careful that sealing ball does not fall out
when removing the capped nut.

2.  Connect pressure gage on test connec-
tion with hose from pressure tester
P 378 or VW 1318.


3.  Pult off fuel pump relay on central
electric board.


4.  Bridge terminals 30 and 87b with a
pjece of wire. Fuel pump must now
run.


Bridge fuel pump relay in central electric
board at left front in blower/fresh air
chamber from 1985/2 models on.


5.  Control values:
Engine stopped = 2.3 to 2.7 bar
(relay bridged)
Engine running at idle speed =
approx. 2 bar.

6. Tightening torque of capped out =
22 Nm.


24 - 6 Checking Fuel Pressure Printed in Germany
9 4 4 E l e c t r o n i c   F u e l   I n j e c t i o n       24


MAKING IDLE ADJUSTMENTS - USA


TOOLS


No. Description Special Tool Remarks
1

2

3
Oil temperature tester

Testing sensor

Exhaust gas test line
9122

9122/1

US 8023


or SUN 120 - 239


Printed in Germany - II, 1983 Making Idle Adjustments. USA       24 - 7
24 E l e c t r o n i c   F u e l   I n j e c t i o n 9 4 4


ADJUSTING IDLE SPEED/CO - USA

N o t e

A d j u s t i n g   R e q u i r e m e n t s:
Engine must be in perfect running condition.


1.  Connect exhaust gas test line US 8023 or SUN
120 - 239 on test connection of catalytic
converter.


Since 1984 Models


2.  Connect CO tester according to manufacturer's
instructions.
     
3.  Connect oil temperature tester 9122. Adjust test
sensor to length of oil dipstick.


4.  Run engine to operating temperature (oil tem-
perature approx. 80° C/176° F).

5. Turn regulating screw or bypass screw on throttle
housing until specified speed is reached.
Use separate tachometer from tester or similar.


N o t e

Fan motor and a/c compressor must be switched
off during adjustments.
Make adjustments as quickly as possible to pre-
vent intake ports from becoming too hot, to avoid
false CO reading.


24 - 8 Adjusting Idle Speed/Co - USA III, 1983 - Printed in Germany
9 4 4 E l e c t r o n i c   F u e l   I n j e c t i o n       24


6.  Pull off rubber cap on plug for oxygen sensor and
detach plug.


7.  Check CO level. If CO level is not the specified
value, correct the setting on the air flow sensor.


8. Connect plug for oxygen sensor again after finish-
ing adjustments.


9. Coat threads of cap nut for test connection on
catalytic converter with Bosch VS 140 16 Ft or
Optimoly HT grease.
Torque specification: 30 Nm (22 ft lb).


Printed in Germany - III, 1983 Adjusting Idle Speed/CO - USA       24 - 9
24 E l e c t r o n i c   F u e l   I n j e c t i o n 9 4 4


CORRECTING CO SETTING ON AIR FLOW SENSOR - USA


N o t e

If CO level is not as specified, remove plug from
bore providing access to the mixture regulating
screw after removing the air flow sensor.


R e m o v i n g


1. Remove air flow sensor.


2.  Drill hole in plug with a 2 mm dia. drill (against
steel insert).


3. Pull out plug with a left-hand twist drill (No. 2).


I n s t a l l i n g


1. Install air flow sensor.


2.  Adjust idle speed and correct CO level.
Turn mixture regulating screw accordingly with
a screwdriver.
Turning clockwise = richer mixture


3.  Install a new plug in bore providing access to mix-
ture regulating screw after finishing adjustments.
Press plug in flush.


N o t e

Never reuse drilled plugs!


24 - 10 Correcting CO Setting on Air
Flow Sensor - USA
Printed in Germany
9 4 4 E l e c t r o n i c   F u e l   I n j e c t i o n       24


REMOVING AND INSTALLING FUEL INJECTORS
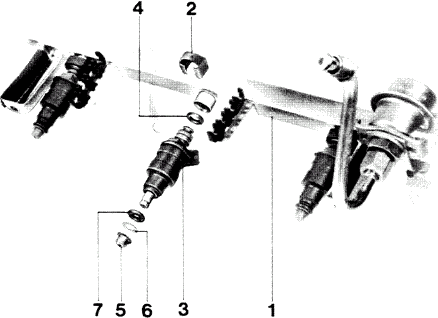


No. Description Qty. Note when: Special
Instructions       
Removing Installing
1


2


3


4

5


6

7
Fuel distribution
tube

Retaining clamp


Fuel injector


Seal

Protective sleeve


Washer

Seal
4


4


4


4

4


4

4


Check for correct fit
in groove

Electric connection
faces down

Replace

Replace, press on and
be careful not to
damage injector needle


Replace


Printed in Germany - III, 1983 Removing and Installing Fuel Injectors       24 - 11
24 F u e l   S y s t e m 9 4 4


INSTALLING FUEL INJECTORS


1.  Coat bottom seal with a silicone grease,
e. g. Bosch Ft 2 v 2 and press fuel injectors
into bores of intake manifold separately.


2. Then push fuel distributor pipe on fuel
injectors and mount retaining clamps.


24 - 12 Installing Fuel Injectors Printed in Germany
944 Fuel System - L-Jetronic / Control 24


Removing and Installing Air Flow Sensor


Removing
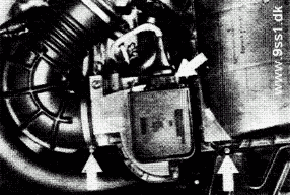

1.  Loosen hose clamp on intake air cowl, dis-
connect plug on air flow sensor, unscrew
phillips head screws on upper air cleaner
section and take out air filter cartridge.


7885


2.  Unscrew mounting screws between lower
air cleaner section and air flow sensor, heat-
ing the screw head zone to about
150° C (300° F) with a hot air blower if
necessary. Never aim the hot air stream at
the air flap potentiometer.


Installing

Clean threads, coat lightly with Loctite No.
270 and tighten screws with 10 Nm (7 ft. Ibs.)
torque.


Removing and Installing Air Flow Sensor
Printed in Germany - XXI, 1989
24 - 12a
24 9 4 4


24 - 12b Blank Page
9 4 4 E l e c t r o n i c   F u e l   I n j e c t i o n       24


REMOVING AND INSTALLING FUEL INJECTORS


No. Description Qty. Note when: Special
Instructions       
Removing Installing
1


2


3


4

5


6

7
Fuel distribution
tube

Retaining clamp


Fuel injector


Seal

Protective sleeve


Washer

Seal
4


4


4


4

4


4

4


Check for correct fit
in groove

Electric connection
faces down

Replace

Replace, press on and
be careful not to
damage injector needle


Replace


Printed in Germany - III, 1983 Removing and Installing Fuel Injectors       24 - 13
24 L-Jetronic, Fuel System 944


InstaIling Fuel injectors


Installing Instructions


1.  Apply a thin coat of oil to lower seal and
press fuel injectors into bores of intake
manifold separately.


2. Then push fuel distributor pipe on fuel injec-
tars and mount retaining clamps.


24 - 14 Installing Fuel Injectors
Printed in Germany - XXV, 1992
944 L-Jetronic Fuel Injection       24


ADJUSTING IDLE SPEED
MODELS FROM 85/2 AND 924 S


T o o l s
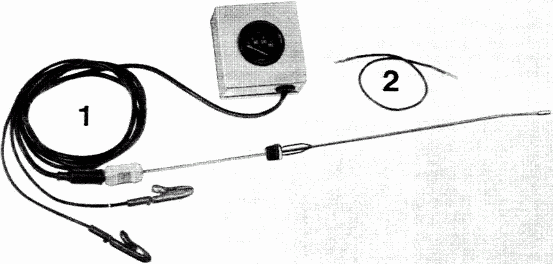


No. Description Specia1 Tool Remarks
1


2
Oil temperature
tester with
sensor

Locally made lead
9122 + 9122/2  


Printed in Germany - VII, 1986
Adjusting Idle Speed, Models
from 85/2 and 924S
      24 - 17
24 L - J e t r o n i c   F u e l   I n j e c t i o n 944


ADJUSTING IDLE SPEED

A d j u s t i n g   R e q u i r e m e n t s

Engine in perfect running condition. Electric
equipment switched off for duration of
adjustments. Adjustments carried out as
quickly as possible to avoid excessive heat in
intake ports and consequently incorrect CO
level. Ambient temperature 15 to 35° C.

1.  Run engine to operating temperature
(70 to 90° C oil temperature), checking
temperature with Special Tool 9122 +
9122/2 (oil temperature tester).


2.  Check CO level. If CO level is not
within specified limits, it must be
corrected on the air flow sensor.


CO level specification: 0.5 to 1.5 % by vol..
Turned clockwise
Turned anticlockwise  
= richer mixture.
= leaner mixture.

3. Connect a separate tachometer to
instructions supplied with it. Idle
speed specification: 840 +- 20 rpm.

4. Check and/or adjust idle speed. This
requires stopping operation of the idle
speed filling control.

a.)  Bridge round female plugs B and C on
diagnosis plug with a locally made test
read. This stops operation of the idle
speed firling control.


24 - 18 Adjusting Idle Speed Printed in Germany
944 L - J e t r o n i c   F u e l   I n j e c t i o n       24


b.)  Check and adjust engine idle speed with
VAG tester 1367.

5. Turn control screw (bypass) on throttle
housing until specified speed of 840 +- 20
rpm is reached.


6.    Restore operation of idle speed filling
control (remove locally made lead on
diagnosis plug) after finishing adjust-
ments.

7. Recheck adjusted values.


Printed in Germany - V, 1985 Adjusting Idle Speed       24 - 19
24 L-Jetronic Fuel Injection 944


ADJUSTING IDLE SPEED - USA - AND CATALYTIC CONVERTER CARS,
MODELS FROM 85/2 AND 924 S


T o o l s
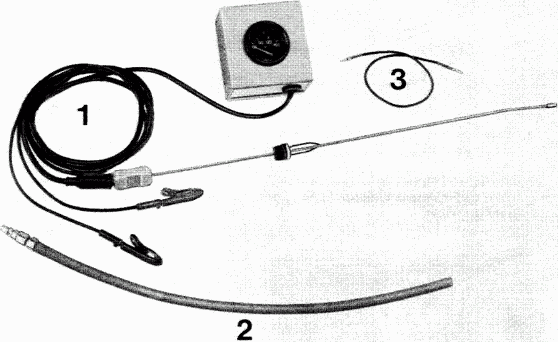


No. Description Special Tool Remarks
1


2

3
Oil temperature
tester with sensor

Exhaust sensor

Locally made lead
9122 + 9122/2


US 4492


24 - 20       Adjusting Idle Speed-USA and
Catalytic Converter Cars, Models from
85/2 and 924 S
VII, 1986 - Printed in Germany
944 L - J e t r o n i c   F u e l   I n j e c t i o n       24


ADJUSTING IDLE SPEED - USA and Catalytic Converter Cars


Note:

A d j u s t i n g   R e q u i r e m e n t s

Engine in perfect running condition. Electric
equipment switched oil for duration of
adjustments. Adjustments carried out as
quickly as possible to avoid excessive heat
in intake parts and consequently incorrect
CO level. Ambient temperature 15 to 35° C.

1.  Slide exhaust testing line or exhaust
sensor US 4492 on to CO testing pipe.


2.  Run engine to operating temperature
(70 to 90° C oil temperature), checking
temperature with Special Tool 9122 +
9122/2 (oil temperature tester).


3.  Disconnect oxygen sensor piug and
connect CO tester to supplied
instructions.


4.  Check CO level. Correct CO level adjust-
ment on the air flow sensor, if it is not
within specified limits.


Printed in Germany - V, 1985 Adjusting Idle Speed - USA and Catalytic Converter Cars       24 - 21
24 L - J e t r o n i c   F u e l   I n j e c t i o n 944


CO level specification: 0.6 +- 0.2 % by vol.
Turned clockwise
Turned anticlockwise  
= richer mixture.
= leaner mixture.


N o t e

If the CO level has to be corrected on the
air flow sensor, remove the air flow sensor
to be able to take the plug out of the bore
providing access to the idle speed CO
adjusting screw.

5. Connect oxygen sensor plug and plug
CO testing pipe in engine compartment
after finishing adjustments.

6. Connect a separate tachometer to
supplied instructions. Idle speed
speeification: 840 +- 20 rpm.

7. Check and adjust engine idle speed,
which makes it necessary to stop the
operation of the idle speed filling
control.

a)  Bridge round female plugs B and C
on diagnosis plug with a locally made
test lead. This stops operation of the
idle speed filling control.


b)  Check and adjust speed with, for
example, VAG Tester 1367.

8. Turn control screw (bypass) on throttle
housing until specified speed of
840 +- 20 rpm is reached.


24 - 22       Adjusting Idle Speed - USA and Catalytic Converter Cars Printed in Germany
944 L - J e t r o n i c   F u e l   I n j e c t i o n       24


9. Restore operation of idle speed filling
control by removing locally made lead
on diagnosis plug atter finishing
adjustments.

10.  Recheck adjusted values.


Printed in Germany - V, 1985
Adjusting Idle Speed - USA and
Catalytic Converter Cars
      24 - 23
24 944


24 - 24 Blank Page
944 Air Flow Controlled Fuel Injection 24


Testing and adjusting specifications


Engine type M 44.11/12 (2.7 l)


Test Specification Remarks
Electric fuel
pump
Delivery rate


at least 850 cm3 /30 s
 
Fuel pressure
(engine stationary)
DME relay bypassed


3.8 +- 0.2 bar
 
Control value at
idle

approx. 3.3 bar
 
Leak test
minimum pressure
after 20 min.


2.0 bar
 
Idle setting without
catalytic converter
USA and
catalytic converter
vehicles
 
Idle speed
rpm

CO content %


HC value ppm

840 +- 40

0.5 - 1.5


<= 300

840 +- 40

0.4 - 1.8 *


<= 300 *


Measured upstream of
the catalytic converter and
with the Lambda probe
plug disconnected


Note

The system fuel pressure has been increased from 2.5 bar to 3.8 bar. The test connection to check
the fuel pressure remains the same. Carry out the working procedure CHECKING FUEL PRESSURE
as described on Pages 24 - 5 to 24 - 6. Tightening torque for the cap nut 12 Nm.


Testing and adjusting specifications
Printed in Germany - XVII, 1988
24 - 25
24 Air Flow Controlled Fuel Injection 944


Adjusting Idle speed and CO


As from Model 89
Enginetype M 44. 11/12 (2.7 l)


Note


Carry out the working procedure ADJUSTING IDLE SPEED/CO as described on Pages
24-17 to 24-23.


Vehicles without catalytic converter

Idle speed

CO
= 840 +- 40 rpm

= 0.5 - 1.5% (measured in the final exhaust pipe)


Vehicles with catalytic converter

Idle speed

CO
= 840 +- 40 rpm

= 0.4 - 0.8 %  (measured upstream of the catalytic converter,
Lambda probe plug disconnected)


24 - 26 Adjusting Idle speed and CO
Printed in Germany - XVII, 1988
944 Air Flow Controlled Fuel Injection 24


Equipment table


As from model 89

Engine type M 44 11/12 (2.7 l)


Electric
fuel pump


Fuel filter Fuel
pressure damper
Fuel
pressure regulator
944.608.102.06
Bosch No.
0580.464.042
928.110.253.00
Purolator No.
506.883.901.5
944.110.201.04
Bosch No.
0280.161.036
944.110.198.06
Bosch No.
0280.160.287
Air flow
sensor
NTC
temperature
sensor II


Throttle
valve
switch
Idle speed
controller
944.606.121.01
Bosch No.
0280.202.064


944.606.125.00
Bosch No.
0280.130.026
944.606.113.01
Bosch No.
0280.120.308
930.606.161.00
Bosch No.
0280.140.501
Electric injection valve


DME control unit    
944.606.114.00
Bosch No.
0280.150.824
944.618.121.06
Bosch No.
0261.200.089


Equipment tabte
Printed in Germany - XVII, 1988
24 - 27
26 9 4 4


26 - 0 Blank Page
9 4 4 E x h a u s t   S y s t e m       26


CHECKING TIGHTNESS OF EXHAUST SYSTEM FLANGES
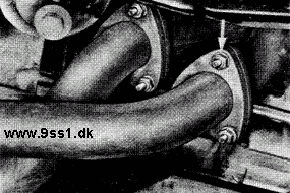


1.  Check tightness of hexagon nuts on exhaust mani-
fold/cylinder head.


2. Check tightness of hexagon nuts on exhaust mani-
fold/primary muffler flange.


3.  Check tightness of hexagon nuts on primary muff-
ler/final muffler flange.


Tightening torque for M 8 bolts and nuts: 20 + 2 Nm
(2.0 + 0.2 kpm).


Printed in Germany
Checking Tightness of Exhaust
System Flanges
      26 - 1
26 E x h a u s t   S y s t e m 9 4 4


REPLACING EXHAUST PIPE OR PRIMARY MUFFLER/
CATALYTIC CONVERTER
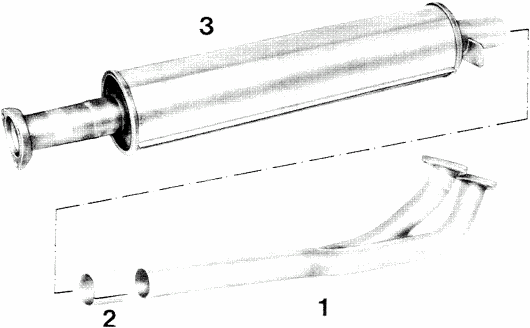


No. Description Qty. Note when: Special
Instructions       
Removing Installing
1

2

3
Exhaust pipe

Sleeve

Primary muffler
1

1

1


26 - 2       Replacing Exhaust Pipe or Primary Muffler /
Catalytic Converter
III, 1983 - Printed in Germany
9 4 4 E x h a u s t   S y s t e m       26


REPLACING EXHAUST PIPE OR PRIMARY MUFFLER /
CATALYTIC CONVERTER


1.  Remove complete primary muffler or
catalytic converter.
Mark cutting point and saw off exhaust
pipe (cutting plane perpendicular to pipe
axis, dimensions in mm).


2.  Mount new parts on car, using old gaskets
and nuts at first.


3. Align exhaust assembly with connecting
sleeve to be without stress and tack weld
sleeve at several points to keep the parts
in installed position.


4.  Remove exhaust assembly and weld sleeve
all around.


5. Use new gaskets and mounting nuts for
final installation.


Printed in Germany - III, 1983
Replacing Exhaust Pipe or Primary Muffler /
Catalytic Converter
      26 - 3
27 9 4 4


27 - 0 Blank Page
9 4 4 S t a r t e r ,   P o w e r   S u p p l y ,   C r u i s e   C o n t r o l       27


AUTOMATIC CRUISE CONTROL
(TEMPOSTAT)


Printed in Germany - III, 1983 Automatic Cruise Control (Tempostat)       27 - 1
27 S t a r t e r ,   P o w e r   S u p p l y ,   C r u i s e   C o n t r o l 9 4 4


AUTOMATIC CRUISE CONTROL
(TEMPOSTAT)


27 - 2 Automatic Cruise Control (Tempostat) Printed in Germany
9 4 4 S t a r t e r ,   P o w e r   S u p p l y ,   C r u i s e   C o n t r o l       27


No. Description Qty. Note when: Special
Instructions       
Removing Installing
1


2

3

4

5


6

7

8

9


10

11

12

13

14

15

16

17

18


Bolt
M 6 x 25

Washer

Spacer

Rubber grommet

Nut
M 6

Cable

Plug holder

Plug

Bolt
M 6 x 10

Drive holder

Drive holder

Drive

Screw

Washer

Plug

Control unit

Switch

Lock washer
2


4

3

3

2


1

1

1

4


1

1

1

2

2

1

1

1

5


Printed in Germany - III, 1983 Automatic Cruise Control (Tempostat)       27 - 3
27 S t a r t e r ,   P o w e r   S u p p l y ,   C r u i s e   C o n t r o l 9 4 4


No. Description Qty. Note when: Special
Instructions       
Removing Installing
19

20

21

22

23

24

25

26

27

28

29

30


Washer

Roller

Sleeve

Operating lever

Pull spring

Sleeve

Accelerator lever

Accelerator pedal

Nut

Clutch switch

Plug

Rubber Stop
4

1

2

1

1

2

1

1

2

1

1

1


27 - 4 Automatic Cruise Control (Tempostat) Printed in Germany
9 4 4 S t a r t e r ,   P o w e r   S u p p l y ,   C r u i s e   C o n t r o l       27


REMOVING AND INSTALLING CONTROL UNIT FOR CRUISE CONTROL


1. Turn off ignition.


2.  Unscrew trim panel in footwell on driver's
side.


3. Unscrew control unit mounting bolts.


4.  Pull off multiple pin plug after pulling
out control unit slightly.


5. Remove control unit.


Printed in Germany - III, 1983
Removing and Installing Control Unit
for Cruise Control
      27 - 5
27 S t a r t e r ,   P o w e r   S u p p l y ,   C r u i s e   C o n t r o l 9 4 4


REMOVING AND INSTALLlNG CRUISE CONTROL SWITCH
(STEERING COLUMN SWITCH)


1. Disconnect battery.


2. Pull off cover by hand.


3. Unscrew casing mounting screws.


4.  Unscrew steering column switch and take
off casing.


5.  Pull off multiple pin plug on steering
column switch.
Pull out four-pin plug of control switch
from underneath the instrument panel
and disconnect.


27 - 6 Removing and Installing Cruise Control Switch
(Steering Column Switch)
Printed in Germany
9 4 4 S t a r t e r ,   P o w e r   S u p p l y ,   C r u i s e   C o n t r o l       27


6.  Cruise control switch and turn signal
switch make up a single unit. Two
retaining tabs must be disengaged and the
switches pulled apart, in order to separate
the turn signal switch and wiper switch.


REMOVING AND INSTALLlNG DRIVE


1. Turn off ignition.


2.  Open holder for multiple pin plug and
disconnect plug.


3.  Press off cable on ball head of operating
lever.


4.  Unscrew lock nut on cable adjusting screw
completely and disconnect cable.


5.  Unscrew mount on body and holder on
drive.


Printed in Germany - III, 1983
Removing and Installing Cruise Control Switch
(Steering Column Switch)
Removing and Installing Drive
      27 - 7
27 S t a r t e r ,   P o w e r   S u p p l y ,   C r u i s e   C o n t r o l 9 4 4


REMOVING AND INSTALLlNG CRUISE CONTROL CABLE


1.  Press off cable on ball head ot operating
lever.


2.  Unscrew lock nut on cable adjusting screw
completely and disconnect cable.


3.  Press off cable on control lever above
accelerator pedal.
Cable mount has no additional lock.


4.  Press rubber grommet out ot compartment
wall and pull out together with the cable.


27 - 8 Removing and Installing Cruise Control Cable Printed in Germany
9 4 4 S t a r t e r ,   P o w e r   S u p p l y ,   C r u i s e   C o n t r o l       27


A d j u s t i n g


R e q u i r e m e n t s :

Accelerator pedal cable and, if car has
automatic transmission, control cable
must be adjusted as specified.

Adjust cruise control cable that control lever
with roller rests on accelerator lever above
the accelerator pedal without stress.
Operate lever on drive by hand.
The operated throttle must return to idle
position afterwards, since otherwise coasting
shutoff would malfunction among others.


REMOVING AND INSTALLlNG CLUTCH
SWITCH


N o t e :

Cars with automatic transmission do not have
this switch.


1. Pull off two-pin plug on clutch switch.


      2. Unscrew lock nut and remove switch.


A d j u s t i n g

Adjust clutch switch that distance between
end of threads and clutch pedal in neutral
position is 4 mm.


Points are closed in neutral position.


Printed in Germany - III, 1983
Removing and Installing Cruise Control Cable
Removing and Installing Clutch Switch
      27 - 9
27 S t a r t e r ,   P o w e r   S u p p l y ,   C r u i s e   C o n t r o l 9 4 4


TROUBLESHOOTING CRUISE CONTROL


First check the following points if automatic
cruise control malfunctions.


1.  Check cable for damage and correct adjust-
ment.


2. Check fuse no. 8 on central electric board
(stop light uses same fuse).


3. Check function of stop lights.
Terminal 8 of control unit for cruise control
will have ground potential from the stop
tight bulb filament when brake pedal is not
operated.
Should both stop light bulbs de defective
simultaneously, the control unit cannot
function because the connection with car
ground is interrupted.


4. Check function of clutch switch.

Switch must be closed in neutral position
(ground switched to control unit terminal
14).
See "Removing and Installing Clutch
Switch" for adjustments.
      If a defect is not found while checking these
points, troubleshooting must be continued
on the control unit multiple pin plug and
drive.


27 - 10 Troubleshooting Cruise Control Printed in Germany
944 Starter, Power Supply, Cruise Control       27


TESTING MULTIPLE-PIN PLUG FOR CONTROL UNIT FOR CRUISE
CONTROL WITH AN OHMMETER


1.  With ignition off, pull
multiple-pin plug on control
unit.


2.  Connect tester to term. 1 (+)
and term. 12 (ground) on
multiple-pin plug. Switch on
ignition.

Reading = battery voltage


3. Connect tester to term. 12 and
term.3.
Reading = battery voltage

Operate "off" switch on control
switch.

Reading = 0 volt
     
4.  Connect tester to term. 12 and
term. 4.

Reading = 0 volt

Operate "ON/ACCELERATE"

Reading = battery voltage


5. Connect tester to term. 12
and term. 6.

Reading = 0 volt

Press "MEMORY" button

Reading = battery voltage


6. Connect tester to term. 12
and term. 8.

Reading = 0 volt

Operate brake

Reading = battery voltage


7. Connect tester term. 1 (Postive)
term. 14.

Reading = battery voltage

Operate clutch (switch breaks).

Reading = 0 volt


Printed in Germany - VII, 1986
Checking Multiple-Pin Plug
Control Unit for Cruise Control
      27 - 11
27 Starter, Power Supply, Cruise Control 944


8.  Connect tester to term.12 and
term.11 (Hall pulse generator)
transmitter.

Turn left front wheel slowly by
hand. Voltage must rise and drop
from less than 1 V to greater
than 6 V per wheel revolution
(rectangular pulse).


CHECKING MULTIPLE-PIN PLUG ON
CRUISE CONTROL DRIVE WITH AN
OHMMETER


1. Switch off ignition.


2.  Disconnect plug in engine
compartment.


3.  Connect tester to term. 1 and
term. 7 on plug half of drive
(engine resistance).

Reading = 3 bis 15 ohm
     
4.  Connect tester to term. 2 and term.
4 (potentiometer +).

Reading = 2 to 4 kohm


5. Connect tester to term. 2 and term.
3. (potentiometer sliding contact).

Reading = 2 to 4 kohm


6. Connect tester to term. 5 and term.
6 (clutch actuator).

Reading = 30 to 40 Ohm


If no defect can be detected by these
tests, check wire harness to
control unit for cruise control.
If necessary, replace control unit.


27 - 12 Checking Multiple-Pin Plug of Cruise
Control Drive
Printed in Germany
944 Starter, Power Supply, Tempostat       27


AUTOMATIC CRUISE CONTROL (TEMPOSTAT) FROM 85/2 MODEL
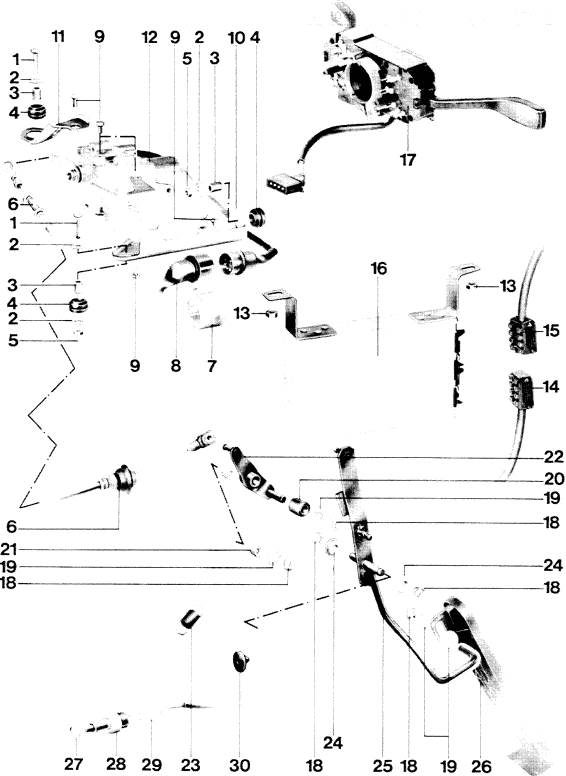


Printed in Germany - VII, 1986
Automatic Cruise Control
(Tempostat)
      27 - 13
27 Starter, Power Supply, Tempostat 944


AUTOMATIC CRUISE CONTROL (TEMPOSTAT) FROM 85/2 MODEL


27 - 14 Automatic Cruise Control
(Tempostat)
Printed in Germany
944 Starter, Power Supply, Tempostat       27


No. Description Qty. Note When:
Removing Installing
1


2

3

4

5


6

7


8

9


10


11


12

13

14


15


16

17
Hex -
bolt
M 6 x 25

Washer.

Spacers

Rubber grommet

Hex
nut M 6

Bowden cable

Plug
holder

Plug

Hex
bolt
M 6 x 10

Drive
holder

Drive
holder

Drive

Nut M 6

Front end
cable plug

Instrument
cable plug

Control unit

Operating switch
2


4

3

3

2


1

1


1

4


1


1


1

2

1


1


1

1


Printed in Germany - VII, 1986
Automatic Cruise Control
(Tempostat)
      27 - 15
27 Starter, Power Supply, Tempostat 944


No. Description Qty. Note When:
Removing Installing
18

19

20

21

22


23


24

25


26


27


28

29

30
Lock washer

Washer

Roller

Bushing

Reverse-
transfer lever

Extension
spring

Bushing

Accelerator
lever

Accelerator
pedal

Hex
nut

Clutch switch

Plug

Rubber
stop
5

4

1

2

1


1


2

1


1


2


1

1

1


27 - 16 Automatic Cruise Control
(Tempostat)
Printed in Germany
944 Starter, Power Supply, Tempostat       27


REMOVING AND INSTALLING
CONTROL UNIT FOR CRUISE CONTROL

N o t e

The control unit is located on the
left in the driver's side footwell
underneath the instrument panel.


1. Switch off ignition.


2. Remove circlip.


3. Remove both multiple plugs.


4.  Unscrew fastening nuts on control
unit.


5. Pull out control unit.


      REMOVING AND INSTALLING STEERING
COLUMN SWITCH

1. Disconnect battery.


2.  Pull off cover by hand.
Unscrew hex nut and remove steering
wheel.


3.  Unscrew and remove steering column
switch cover.


Printed in Germany - VII, 1986
Removing and Installing Control
Unit and Steering Column Switch
for Cruise Control
      27 - 17
27 Starter, Power Supply, Tempostat 944


4.  Remove buttons on heater control
switch. Using a putty knife, care-
fully push down switch cover.


5.  Unscrew fastening screws for con-
trol switch and cover on steering
lock.


6.  Loosen but do not unsrew steering
column switch fastening screw.
Pull out steering column switch
and disconnect plugs. Pull out
four-pin plug of control switch
from underneath the instrument
panel and disconnect.


27 - 18 Removing and Installing Steering Column Switch Printed in Germany
944 Starter, Power Supply, Tempostat       27


REMOVING AND INSTALLING DRIVE.


1. Switch off ignition.


2.  Open holder for multiple-pin
plug and disconnect plug.


3. Press off cable retaining
clip.


4.  Unscrew lock nut on cable
adjusting screw completely
and disconnect cable.


5.  Unscrew mount on body and remove
holder from drive.


Printed in Germany - VII, 1986 Removing and Installing Drive       27 - 19
27 Starter, Power Supply, Tempostat 944


REMOVING AND INSTALLING CLUTCH
SWITCH


N o t e

Instead of the switch, cars with
automatic transmission have a bridge.


1.  Unscrew cover on central electric
console in driver's side of
footwell. (3 nuts)


2.  Pull off two-pin plug en clutch
switch.


3.  Unsrew lock nut and remove
switch.


A d u s t i n g

Adjust clutch switch so that the
interval between the end of the
threads and the clutch pedal
in neutral position is 4 mm.


In neutral position the contacts are closed.


27 - 20 Removing and Installing Clutch Switch Printed in Germany
944 Starter, Power Supply, Tempostat       27


CRUISE CONTROL TROUBLESHOOTING


In case of automatic cruise control
malfunctions, check the following
points first:


1.  Check cable for damage and correct
adjustment.


2. Check fuse and No. 19 in central
electric console. The brake light
uses the same fuse.


3. Check function of brake lights.
Terminal 2, plug 1 of the control
unit for cruise control will have
ground potential from the brake-
light bulb filament when the brake
I pedal is not operated. If both brake-
light bulbs are simultaneously
defective, the control unit cannot
function because the connection with
the car ground is interrupted.


4. Check function of clutch switch.


The switch must be closed and in
neutral position (switches ground
to control unit term. 7, plug 1)
      If no defect is found while checking
these points, troubleshooting
must be continued on the control unit
multiple-pin plug.


Printed in Germany - VII, 1986 Cruise Control Troubleshooting       27 - 21
27 Starter, Power Supply, Tempostat 944


PLUG ASSIGNMENT, CONTROL UNIT FOR
CRUISE CONTROL


Plug 1 - Instrument Cable

Plug 2 - Front End Cable (Drive)
      Plug 1


1. Speedometer signal

2. Brake lights

3. "Switch off"

4. Term. 15

5. Switch "Resume"

6. Switch "On/Accelerate"

7. Clutch switch

8. Term. 31


Plug 2


1. Clutch

2. Clutch

3. Coding plug

4. Potentiometer, negative

5. Engine, positive

6. Engine, negative

7. Potentiometer, positive

B. Potentiometer, sliding contact


N o t e

Plug 2 has coding, in order to
exclude the possibility of
incorrect connection.


27 - 22 Plug Assignment, Control Unit for Cruise Control Printed in Germany
944 Starter, Power Supply, Tempostat       27


CHECKING MULTIPLE-PIN PLUGS
OF CONTROL UNIT FOR CRUISE CONTROL


N o t e

Check Plug 1 with a voltmeter and
Plug 2 with an ohmmeter.


1.  With ignition off, pull off
both multiple-pin plugs on
control unit.


2. Connect testers to term. 4
(positive) and term.8 (ground)
on plug 1.

Switch on ignition.

Reading: Battery voltage


3. Connect testers to term. 2 and
term. 8.

Reading: 0 volt
Operate brakes
Reading: battery voltage


4. Connect testers to term.3 and
term. 8.
Reading: battery voltage
Operate control switch to
"Off"
Reading: 0 volt


5. Connect testers to term.5 and
term.8.
Reading: 0 volt
Operate switch to "Resume"
Reading: battery voltage
     
6.  Connect tester to term.6 and term.8
Reading: 0 volt
Operate switch to "0n/Accelerate"
Reading: battery voltage"


7. Connect tester to term. 4 and term. 7.
Reading: battery voltage
Operate clutch
Reading: 0 volt


8. Place vehicle on lifting platform
and lift until wheels freely
turn.

Connect testers to battery + and
term. 1.

Ignition off.
Reading: approx. 1 V below battery
voltage.

Ignition on.
Reading: 0 V
Start engine, engage second gear and
accelerate to 50 km/h.
Reading: approx. every 4 V.


Voltage will increase with speed.


N o t e

The speedometer signal can be tested
more simply in vehicles with a lifting
roof. Unlock lifting roof and
accelerate vehicle to more than
5 km/h. The roof should lock automa-
tically. Now use an ohmmeter to
check continuity from lifting roof
relay term. A to cruise control
control unit plug 1 term. 1.


Printed in Germany - VII, 1986
Cheeking Multiple-Pin Plugs of
Control Unit for Cruise Control
      27 - 23
27 Starter, Power Supply, Tempostat 944


9. Connect ohmmeter term. 1 and term. 2
on plug 2.

Reading every 30 - 40 ohm


10.  Connect tester to term. 4 and term. 7.

Reading: 2 - 4 kohm


11. Connect testers term. 4 and term. 8

Reading: every 2 - 4 kohm


12. Connect testers term. 5 and term. 6

Reading: every 20 - 30 ohm


If no defect can located based en these
tests, replace control unit.


27 - 24 Cheeking Multiple-Pin Plugs of Control Unit
for Cruise Control
Printed in Germany
944 Starter, Power Supply, Cruise Control 27


Removing and installing the alternator on vehicles with air-conditioning
system


Removing

1.  Disconnect the battery from ground.

2. Raise the vehicle and remove the engine
guard.

3. Pull off the alternator's ventilation hose.

4. Release the tension on the PoIy-rib drive
belt and remove.


54/13


5.  Disconnect and remove the air filter housing
with air flow sensor.

6. Undo the fastening screws for the alternator
and press the alternator out of the console
with a screwdriver.

7. Remove the air box and separete all
electrical connections.
      Installing

Check the tension of the alternator's Poly-rib
belt and adjustaccording to Page 13 - 1.
Tightening torque for the fastening screws
M 10 = 45 Nm.


Removing and installing the alternator
Printed in Germany - XVII, 1988
27 - 25
28 9 4 4


28 - 0 Blank Page
9 4 4 I g n i t i o n   S y s t e m       28


EQUIPMENT SURVEY


I g n i t i o n   C a i l

Type/Model Version Remarks
944 944 602 115 00
Bosch No.
0 221 118 322
Without ballast resistors


D i s t r i b u t o r (Cap)

Type/Model Version Remarks
944 944 602 251 00
Bosch No.
1 235 522 325
Only high voltage
distribution


S p a r k   P l u g s

Type/Model Version Remarks
944 Bosch WR 8 DS


Champion RN - 10 GY


Electrode gap
0.7 + 0.1 mm
(0.028 + 0.004 in.)


Printed in Germany Equipment Survey       28 - 1
28 I g n i t i o n   S y s t e m 9 4 4


D M E   C o n t r o l   U n i t

Type/Model Version Remarks
944 944 618 111 01
Bosch No.
0 261 200 015


S p a r k   P l u g   C a p s

Type/Model Version Remarks
944   Without series gap


28 - 2 Equipment Survey Printed in Germany
9 4 4 I g n i t i o n   S y s t e m       28


DANGERS ON ELECTRONIC IGNITION SYSTEMS


The Type 944 is equipped with a digital engine electronic system (DME). In comparison to conventional systems the ignition power of DME is so high, that contact with current carrying parts while engine is running could be fatal. Consequently the ignition must always be turned off or battery ground wire disconnected when doing any work on ignition system.
Such work would be:

1. Connecting engine testers.

2. Replacing ignition system parts.

If DME testing or engine tuning requires turning on the ignition, the dangerous current mentioned above will be in the DME ignition system.

Lightning bolts indicate the danger spots in the wiring diagram illustrated below.
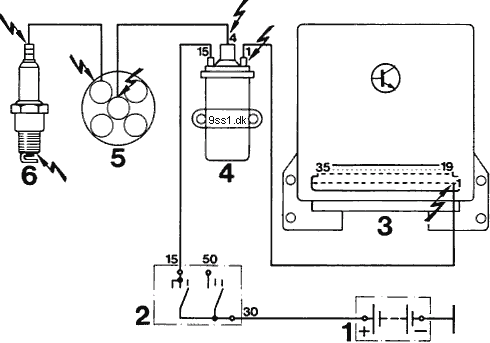


1 = Battery
2 = Ignition lock
3 = DME control unit
4 = Ignition coil
5 = Distributor
6 = Spark plug


Printed in Germany Dangers on Electronic Ignition Systems       28 - 3
28 9 4 4


28 - 4 Blank Page
9 4 4 I g n i t i o n   S y s t e m       28


REMOVING AND INSTALLlNG DISTRIBUTOR CAP


N o t e

To facilitate installation work we recommend chan-
ging a standard screwdriver into a locally made tool.


Heat screwdriver at bending point to glowing red
and cool down slowly after bending.


R e m o v i n g

1.  Push in lower clamping hook with a suitable
screwdriver and turn to the right.


2. Push in upper clamping hook and turn to the right.


3. Take off distributor cap.


I n s t a l l i n g

1.  Align distributor tap (locking boss on distributor
cap must face up).


2. Align clamping hooks in distributor cap so that
they are positioned horizontally and face toward
left side as seen from front.


3.  Guide clamping hooks into both slots and engage
distributor tap by turning back and forth slightly.
Watch position of dust cap.


4. Turn both clamping hooks against left stop. Press
in clamping hooks far enough so that they can
be turned counterclockwise further (approx. 1/4
turn) and engage when released.


5. Check that distributor tap fits tight
Clamping hooks must engage firmly.


Printed in Germany Removing and Installing Distributor Cap       28 - 5
28 9 4 4


28 - 6 Blank Page
9 4 4 I g n i t i o n   S y s t e m       28


REPLACING SPARK PLUGS


1. Pull off spark plug caps.
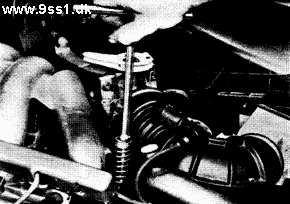

2.  Unscrew spark plugs with a conventional wrench
(e.g. Hazet No. 767-1). A spark plug wrench is pro-
vided in the car's tools.


3.  Give spark plug threads a light coat of graphite
grease or similar (e.g. Molykote HTP White Paste).


Tightening torque: 25 to 30 Nm (18 to 22 ft lb).


Printed in Germany Replacing Spark Plugs       28 - 7
28 I g n i t i o n   S y s t e m 9 4 4


D M E   ( D I G I T A L   E N G I N E   E L E C T R O N I C S )
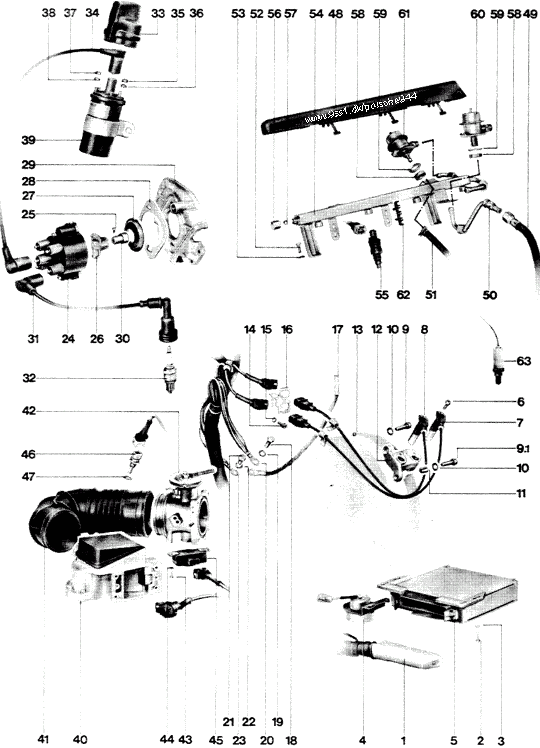


28 - 10 DME Printed in Germany
9 4 4 I g n i t i o n   S y s t e m       28


No. Description Qty. Note When: Special
Instructions
Removing Installing
1


2

3

4


5


6


7

8

9

9.1

10

11

12

13


14

15

16

17


18

19


Multiple pin plug for
DME control-unit

Screw B 4.8 x 18

Washer A 5.3

Altitude correction
box

DME control-unit


Bolt M 6 x 16


Speed sensor

Reference mark sensor

Bolt M 8 x 25

Bolt M 8 x 30

Washer A 8.4

Key

Bracket

Stud M 6 x 16 for
reference mark sensor


Bolt M 6 x 15

Washer A 6.4

Holder

Ground wire between
body and engine

Bolt M 8 x 20

Washer A 8.4
1


4

4

1


1


2


1

1

1

1

2

1

1

1


1

1

1

1


1

1


Essential that
ignition is off.


Heat to about
200 °C (400 °F)
Have plug engage
firmly


Torque: 8 Nm
(6 ft lb)


Install with
Loctite 270. Note
0.8 mm clearance


Printed in Germany DME       28 - 11
28 I g n i t i o n   S y s t e m 9 4 4


No. Description Qty. Note When: Special
Instructions
Removing Installing
20


21

22

23


24

25


26

27

28

29

30

31

32

33

34

35

36

37

38

39

40

41

42
Ground wire on
clutch bell housing

Bolt M 6 x 12

Washer A 6.4

Eleetronic ground on
engine block

Distributor cap

Bolt M 4 x 6


Distributor rotor

Dust cap

Gasket

Housing

Dog

Spark plug cap

Spark plug

Cover

Ignition cable

Nut M 6

Lock washer B 6

Nut M 5

Lock washer B 5

Ignition coil

Air flow sensor

Connector duct

Throttle housing
1


1

1

1


1

1


1

1

1

1

1

4

4

1

1

1

1

1

1

1

1

1

1


Lock with
Loctite 221


28 - 12 DME Printed in Germany
9 4 4 I g n i t i o n   S y s t e m       28


No. Description Qty. Note When: Special
Instructions
Removing Installing
43

44

45


46


47

48

49

50

51

52

53

54

55

56


57

58

59

60

61

62

63
Bolt M 4 x 10

Washer A 4

Throttle switch


Temperature sensor


Seal

Cover

Fuel line (feed)

Line

Fuel line (return)

Bolt M 6 x 12

Washer A 6.4

Fuel collecting pipe

Fuel injector

Capnut


Sealing ball

Nut M 16

Washer A 16

Fuel pressure damper

Pressure regulator

Ignition cable holder

Oxygen sensor
2

2

1


1


1

1

1

1

1

2

2

1

4

1


1

2

2

1

1

2

1


Switching point
< 1° throttle angle

Torque:  12 -15 Nm
(9-11
ft lb)


Torque:  22 Nm
(16ft lb)


Torque:  50 -60 Nm
(36 - 43
ft lb)


Printed in Germany DME       28 - 13
28 I g n i t i o n   S y s t e m 9 4 4


REMOVING AND INSTALLlNG SPEED AND REFERENCE MARK SENSORS


R e m o v i n g


1. Disconnect plugs.


DG = SPEED SENSOR
BG = REFERENCE MARK SENSOR


2.  Unscrew bolt and pull out sensor while turning
back and forth at same time.


D = SPEED SENSOR
B = REFERENCE MARK SENSOR
      I n s t a l l i n g


N o t e

Sensors have permanent magnets. Make sure that
sensors do not have any metal parts stuck on them
before installation.


1.  Check codes on sensors. Never use force when
installing.


2. Tighten sensors. Tightening torque:
8 Nm (6 ft lb).


3. Check marks when connecting sensors.


A d j u s t i n g   C l e a r a n c e   o n   S p e e d
a n d   R e f e r e n c e   M a r k   S e n s o r s


N o t e

A clearance of 0.8 mm is specified between the
speed sensor and ring gear. If this clearance is
correct, the reference mark sensor will be
positioned correctly automatically.


The reference mark sensor clearance will only have
to be adjusted in the case of damage or replacement
of the locked reference mark screw (see Group 13).


28 - 14      Removing and Instailing Speed and Reference Mark Sensors Printed in Germany
9 4 4 I g n i t i o n   S y s t e m       28


A d j u s t i n g   w i t h   E n g i n e   R e m o v e d


1. Bolt speed sensor on bracket.


2.  Unscrew bolts on bracket. Adjust clearanee between gear ring and speed sensor with a 0.8 mm teeler gauge blade.


A d j u s t i n g   w i t h   E n g i n e   I n s t a l l e d


1. Remove speed sensor.


2.  If available, a defective sensor could be used as
an adjusting tool. Then pasta a 0.8 mm thick
washer (for clearance) on sensor with a suitable
quick-drying glue. The car's sensor could also
be used when work is performed carefully. The
adhesive surface should then be kept as small as
possible or an easily removable glue should be
used.


3.  Loosen bolts on bracket and tighten again finger
tight so that bracket can still be pivoted at
bottom bolt.


4. Install longer sensor in speed sensor opening and
tighten.


5. Move bracket with long sensor against stop
(gear ring) and then tighten bracket bolts.


6. Remove longer sensor. If car's sensor was used,
pry off glued washer carefully and remove
remainders of glue.


7. Install speed sensor. Tightening torque:
8 Nm (6 ft lb).


Printed in Germany Removing and Instailing Speed and Reference Mark Sensors       28 - 15
28 I g n i t i o n   S y s t e m 9 4 4


TROUBLESHOOTING DME


T e s t e r s   a n d   T o o l s


Engine tester with oscilloscope, e. g. SUN 1010 or
1080, Bosch Mot 002.01

- Multiple tester (internal resistance at least
20 k-ohm/V).

- Adapter read (Bosch "L-Jetronic"
No. 1684 463 093).

- Pressure gage P 378 or VW 1318.

- Two locally made electric leads for tests on
multiple pin plug of DME control unit and on
plug connections with the same female plug
version (timer contacts).


1   Highly flexible line approx. 50 cm (20 in.)
long

2 Insulated lead clip (standard)

3 Flat male plug 2.8 (N 17.457.2)
      N o t e :


Conform with the following safety measures to
avoid damage on DME system.


1.  Never start engine without a connected battery.


2. Reversing connections at battery could lead to
destruction of control unit.


3. Never start engine with a quick charger. Only
use a different 12 V battery to help starting.


4. Disconnect battery before quick charging.


5. Never disconnect battery while engine is running.


6. Disconnect or connect multiple-pin plug on
control unit only when ignition is off.


7. The ground wire between engine and body must
be connected before starting engine, e. g. after
reinstalling engine, since otherwise DME control
unit would be destroyed.


8. Disconnect multiple-pin plug on DME control
unit before welding (electric welding).


9. Pull off fuel pump relay for compression tests.


Also refer to page 28 - 3 for information on
dangers when working on electronic ignition
systems.


28 - 16 Troubleshooting DME I, 1982 - Printed in Germany
9 4 4 I g n i t i o n   S y s t e m       28


INSTALLATION OF DME COMPONENTS


1. Pressure regulator

2. Fuel distributor

3. Diaphragm damper

4. Ground terminals for DME

5. Speed and reference mark transmitters

6. Control unit (in passenger compartment)

7. Air clcaner

8. Air flow sensor

9. Throttle switch

10. Temperature sensor II (engine temperature)

11. High voltage distributor

12. Fuel injectors

13. Ignition coil


Printed in Germany - I, 1982 Troubleshooting DME       28 - 17
28 I g n i t i o n   S y s t e m 9 4 4


R e l a y   f o r   F u e l   P u m p   a n d   P o w e r   S u p p l y   -   D M E


28 - 18 Troubleshooting DME Printed in Germany
9 4 4 I g n i t i o n   S y s t e m       28


DME PLUG CONNECTIONS


T o p   V i e w   o f   3 5   P i n   P l u g
D i s c o n n e c t e d   o n   D M E
C o n t r o l   U n i t


A - Plug conn. for speed sensor

B - Plug conn. for altitude box


T o p   V i e w   o f   P l u g   C o n n e c t i o n s
f o r   P u l s e   T r a n s m i t t e r s


1 - Speed transmitter (DG)
2 - Reference mark transmitter (BG)
3 - Holder
      T o p   V i e w   o f   P l u g
D i s c o n n e c t e d   o n   T h r o t t l e
S w i t c h


Term. 2 - Idle contact
Term. 3 - Full throttle contact
Term. 18 - Ground


T o p   V i e w   o f   P l u g   D i s c o n n e c t e d
o n   A i r   F l o w   S e n s o r


Printed in Germany - I, 1982 Troubleshooting DME       28 - 19
28 I g n i t i o n   S y s t e m 9 4 4


T o p   V i e w   o f   9   P i n   R o u n d   P l u g
R e c e p t a c l e
( A b o v e   B r a k e   B o o s t e r )
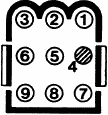


N o t e :

The fuel pump can be run by connecting battery on
terminal 4 of the 9-pin plug.


28 - 20 Troubleshooting DME Printed in Germany
9 4 4 I g n i t i o n   S y s t e m       28


Printed in Germany - I, 1982 Troubleshooting DME       28 - 21
28 I g n i t i o n   S y s t e m 9 4 4


N o t e :

The test points should be performed in the given
sequence, especially when the customer complaint
concerns an engine which cannot be started or is
hard to start.


TEST POINT 1


C h e c k i n g   G r o u n d   a n d   P l u g
C o n n e c t i o n s


1.  Check both ground connections next to pulse
transmitters for cleanliness and firm contact.


2.  Check ground connection between engine and
body.


3. Check plug connections Iisted below carefully
for tight fit, bent plug sleeves and corrosion.


3.1  Plug connection for DME control unit.
To remove, push catch toward right side and
at same time take oft plug forward.


3.2  Plug connection for speed and reference mark transmitters (check codes).


28 - 22 Troubleshooting DME Printed in Germany
9 4 4 I g n i t i o n   S y s t e m       28


3.3 Plug connection for air flow sensor.


3.4 Plug connection for throttle switch.


3.5  Plug connection for temperature sensor II
(engine temperature).


      3.6 Plug connection tor fuel injectors.


3.7 Plug connection above brake booster.


3.8 Relay socket of fuel pump relay.


N o t e :

Frequent removal and installation of the relay
could loosen and push back the catch for flat
female plugs.


Printed in Germany - I, 1982 Troubleshooting DME       28 - 23
28 I g n i t i o n   S y s t e m 9 4 4


TEST POINT 2


P o w e r   S u p p l y   f o r   D M E   C o n t r o l
U n i t   a n d   F u e l   P u m p


1.   D M E   C o n t r o l   U n i t


1.1  Turn off ignition and pull off multiple pin plug
on DME control unit.


1.2 Turn on ignition.


1.3 Measure voltage between term. 35 and term. 5
as well as between term. 18 and term. 5.


Specification: battery voltage.
(Always use extra wires to connect tester.)
If voltage deviates from specified value, check fuel
pump relay, 9-pin plug connection above brake
booster (term. 2 and term. 3) and corresponding
wires.


1.4  Turn off ignition and connect multiple pin plug
on DME control unit.
      2.   F u e l   P u m p


Check the folIowing points, if for example the
fuel pump does not run while starting the engine.


2.1 Check fuse 2 (16 amps) in auxiliary fuse box.


2.2 Check fuel pump relay.


2.3  Supply battery voltage to term. 4 of 9-pin
plug connection above brake booster, or bridge
term. 30 and 87 b on socket of fuel pump
relay.
Fuel pump should then run.


TEST POlNT 3


N o t e :

An oscilloscope should be used to check the speed
and reference mark transmitters.


S p e e d   T r a n s m i t t e r


1.  Turn off ignition and pull off multiple pin plug
on DME control unit.


2. Connect and adjust oscilloscope.


28 - 24 Troubleshooting DME Printed in Germany
9 4 4 I g n i t i o n   S y s t e m       28


SUN 1010


Cylinder selector switch
set to 2

Engine cylinder switch set
to 4-stroke


Voltage selector switch
for image screen scale set
to 50 V

Ignition coil polarity switch set
to +

Image selector switch set
to parade
SUN 1080


to 2


to 4-stroke


to 25 V


to +

Image selector switch super-
imposed or set to parade;
program switch set to pos. 2
to 5   ( n e v e r   t o   1 )
BOSCH MOT 002.01


Range selector switch set
to "special" pos.

Special wire connected on test
terminals off DME control
unit with help of auxiliary wire

Screen control lever moved
against left stop


Connect blue connection via locally made auxiliary
wire on term. 8 and black connection on term. 27 of
DME plug.


3.  Start engine.
Sine oscillation, the amplitude of which must be
more than 2.5 V from peak to peak, must be
displayed on the screen.


      If the transmitter signal is less than 2.5 V, check
distance between starter gear ring and transmitter.

Specification: 0.8 +- 0.05 mm (see page 28 - 14
in Repair Manual).


If a transmitter signal is not displayed in spite of
correct connection and correct adjustment of
tester, measure power flow and insulation of speed
transmitter.


Coil resistance term. 8 against term. 27.
Specification: 0.6 to 1.6 k-ohm.


Insulation resistance term. 8 against term. 5.
Specification: more than 1 M-ohm.

Replace speed transmitter, if necessary.


Printed in Germany - I, 1982 Troubleshooting DME       28 - 25
28 I g n i t i o n   S y s t e m 9 4 4


TEST POINT 4

R e f e r e n c e   M a r k   T r a n s m i t t e r


Adjust oscilloscope as described in point 3.
(If using SUN 1080, press one of "ignition coil test"
buttons for a better picture.)


Connect blue connection via locally made wire on term. 25 and black connection on term. 26 of DME plug.


If using Bosch tester. connect red clip of special lead
on term. 25.


S t a r t   E n g i n e


A single sine oscillation should be displayed on the
screen. It is important that the oscillation begins
with a   p o s i t i v e   slope and more than 2 V is
displayed on the screen scale with a starter speed of
at least 200 rpm (the signal amplitude depends on
the starter speed).


If the transmitter signal is less than 2 V, check
distance between transmitter and reference mark.

Specification: 0.8 +- 0.05 mm (see page 28 - 14 in
Repair Manual).
      If there is no transmitter signal, proceed as
described in test point 3 for speed transmitter.
The same specifications are applicable.


28 - 26 Troubleshooting DME Printed in Germany
9 4 4 I g n i t i o n   S y s t e m       28


TEST POINT 5


I g n i t i o n   S y s t e m


1.  Adjust secondary image on oscilloscope:
term. 1 and term. 15, trigger clip on cylinder
no. 1.


N o t e :

If a defect is displayed for all cylinders, it will be in the primary or secondary circuit from the ignition
coil to the distributor rotor. If a defect is displayed for only one cylinder, it will be after the
distributor rotor.


2.  Check distributor cap for damage, burnt spots
and dirt.
Retaining hooks must engage firmly when
installing.


3. Check distributor rotor.
Shielded resistance: 1 k-ohm.
Check visually for tight fit, damage and dirt.


4. Check spark plug caps and leads for damage or
traces of burning.
Shielded resistance: 3 k-ohm.
     
5.  Check ignition coil.
Primary resistance:
term. 1 against 15 = 0.4 - 0.6 ohm.
Secondary resistance:
term. 1 against 4 = 5 - 7.2 k-ohms.
Check visually for damage or burnt spots.


N o t e :

Avoid checking the ignition system via the spark gap
by pulling off the spark plug caps. This could cause
destruction of the ignition coil and control unit.

6.  Check ignition timing at idle speed and with engine having operating temperature.
Ignition timing at 800 + 50 rpm = 5 to 15° before TDC.


Printed in Germany - I, 1982 Troubleshooting DME       28 - 27
28 I g n i t i o n   S y s t e m 9 4 4


TEST POINT 6


A i r   F l o w   S e n s o r


1.  Push back protective sleeve of the air flow sen-
sor connector. The connector remains attached.
Connect voltmeter to terminal 9 and to terminal 6
on the rear of the connector.


Specification: more than 8 V.


2.  Remove air cleaner.
Connect voltmeter between term. 7 and ground.


Specification: approx. 150 to 250 mV.


3. Push sensor plate to full throttle position with a
not-to-hard, smooth item inserted through the
filter intake opening.
Voltage rises above 8 V with sensor plate fully
open (switch over test range).
The sensor plate must not stick and return to off
position on its own when released.
     
4.  Check temperature sensor I (intake air tempera-
ture). Turn off ignition and pull off plug on air
flow sensor. Connect ohmmeter between term. 6
and 22 on air flow sensor (both outer flat male
plugs).


Specification at 15 to 30° C: 1.45 - 3.3 k-ohms.


N o t e

Interruption on temperature sensor causes richer
mixture.
Short on temperature sensor causes leaner mixture.


28 - 28 Troubleshooting DEE Printed in Germany - XXIV, 1991
9 4 4 I g n i t i o n   S y s t e m       28


TEST POINT 7


F u e l   P r e s s u r e


1.  Open flap on distribution tube.
Unscrew capped nut on test connection.


N o t e :

Be careful that sealing ball does not fall out when
removing the capped nut.
Catch escaping fuel.
Electric sparks could cause fire!


2.  Connect pressure tester P 378 on distribution
tube.


3.  Start engine and measure fuel pressure at idle
speed.

Specification: approx. 2.0 bar (29 psi).


4. Pull off vacuum hose on pressure regulator.
Fuel pressure should rise.

Specification: 2.3 to 2.7 bar (33 to 39 psi).


5.  If fuel pressure deviates from specified values,
pinch return line shut slowly with a clamp.


Printed in Germany - I, 1982 Troubleshooting DME       28 - 29
28 I g n i t i o n   S y s t e m 9 4 4


Replace pressure regulator if pressure rises above
4 bar (58 psi).


If pressure remains below 4 bar (58 psi), check fuel
filter or replace fuel pump.


If engine does not run, supply battery voltage to
term. 4 of 9-pin plug or bridge terminals 30 and 87 b
on socket of fuel pump relay.


Fuel pump should run.

Specification: 2.3 to 2.7 bar (33 to 39 psi).


Tightening torque for capped nut:
22 Nm (16 ft lb).
      TEST POINT 8

F u e l   I n j e c t o r s   a n d   I n j e c t i o n
T i m i n g


l .   C h e c k i n g   F u e l   I n j e c t o r s


If engine can be run, disconnect plugs on
injectors separately.
If injectors are okay, the engine speed will drop
each time.

If engine cannot be run, measure voltage on one
plug connection of injectors against ground.
One of both terminals must have battery voltage;
if necessary perform test point 2.

Measure coil resistance on flat male plugs of fuel
injector.

Specification: 2 to 3 ohms.


28 - 30 Troubleshooting DME Printed in Germany
9 4 4 I g n i t i o n   S y s t e m       28


2.   C h e c k i n g   I n j e c t i o n   T i m i n g


Adjust oscilloscope as described in test point 3.

Connect adapter lead (Bosch "L-Jetronic",
No. 1684 463 093) between one fuel injector
and its matching plug.


SUN 1010:


SUN 1080:


BOSCH:
       Blue tester lead on red Bosch lead.
Black tester lead on black Bosch lead.
Ignition coil polarity set to - and trigger clip connected on
term. 4.

C a u t i o n !   Never let connections contact ground.

Make following connections if idle speed drops after making above connections
or engine stops.

Blue tester lead on black Bosch lead.
Black tester lead   n o t   connected on red Bosch lead!

C a u t i o n !   Never let connections contact ground.


Green tester lead (15) on red Bosch lead.
Blue tester lead (1) connected on black Bosch lead.


Special red lead on black Bosch lead.
Special black lead and red Bosch lead   n o t   connected.
Tester lead for ignition coil connected on term. 1 and 15 of ignition coil.

C a u t i o n !   Never let connections contact ground.


Printed in Germany - I, 1982 Troubleshooting DME       28 - 31
28 I g n i t i o n   S y s t e m 9 4 4


Start engine. The following oscillographs will be displayed on the oscilloscope when injection timing is
correct.


STARTER SPEED


IDLE SPEED


ACCELERATION


DECELERATION
(coasting)


ti = Injection time

Refer to test point 10 if injection signal does not switch off while decelerating.


28 - 32 Troubleshooting DME Printed in Germany
9 4 4 I g n i t i o n   S y s t e m       28


TEST POINT 9


T e m p e r a t u r e   S e n s o r   I I
( E n g i n e   T e m p e r a t u r e )


1.  Check plug for tight fit and plug receptacles for
cleanliness and contact.


2.  Connect ohmmeter between term. 13 on
disconnected DME plug and ground.

Specifications for 15 to 30 °C (59 to 86 °F):
1.45 to 3.3 k-ohms

Specifications for 80 °C (176 °F):
280 to 360 ohms


If measured values deviate from specified values,
repeat test on temperature sensor itself, replacing
temperature sensor if necessary.


N o t e :

Break on temperature sensor causes richer mixture.

Short on temperature sensor causes leaner mixture.
      TEST POINT 10


T h r o t t l e   S w i t c h


1.  Connect ohmmeter between term. 2 on DME
plug and ground.

Specifications with
throttle closed:
throttle open:
      zero ohm
infinite ohms

Switching over must take place even when
throttle is only slightly open (approx. 1°).


2. Connect ohmmeter between term. 3 of DME
plug and ground.

Specification with throttle closed:
infinite ohms.
Specification with throttle wide open:
zero ohm.

Switching must take plate immediately before
full throttle.

If switching points are not correct, repeat test
direct on throttle switch by connecting
ohmmeter term. 18 (ground; center flat plug on
throttle switch) and term. 2 or term. 3.


A d j u s t i n g   T h r o t t l e   S w i t c h


1. Remove throttle housing.


2. Unscrew throttle switch mounting screws.


Printed in Germany - I, 1982 Troubleshooting DME       28 - 33
28 I g n i t i o n   S y s t e m 9 4 4


3.  Hold throttle in closed position. Turn switch until
inner stop is felt. Throttle must not be moved.


4.  Tighten switch mounting screws.
Throttle must rest firmly on stop screw.


C h e c k i n g   C o a s t i n g   S h u t - o f f
( S t o p p i n g   o f   I n j e c t i o n   S i g n a l )


1.  Pull off plug on throttle switch.


2. Connect term. 2 (idle contact) and term. 18 on
disconnected plug with an auxiliary read. This will
simulate a closed throttle for the DME control
unit. (Only use suitable flat plugs on auxiliary
lead.)


3. Start engine and increase speed to about
1600 rpm. Engine should begin to surge, i. e. the
injection signal will be stopped above 1600 rpm.
      C h e c k   F u l l   T h r o t t l e   E n r i c h m e n t


1. Start engine and run at idle speed.


2.  Connect term. 3 (full throttle contact) and
term. 18 on disconnected plug. Engine speed
should drop.


28 - 34 Troubleshooting DME Printed in Germany
9 4 4 I g n i t i o n   S y s t e m       28


TEST POINT 11

C o l d   S t a r t   E n r i c h m e n t


Connect and adjust oscilloscope as described in test
point 8 (injection timing).


S t a r t   E n g i n e


The signal displayed on the oscilloscope must be
spread, but return immediately to the idle signal.


N o t e :


The spread signal will be very significant and only
visible briefly while starting the engine.
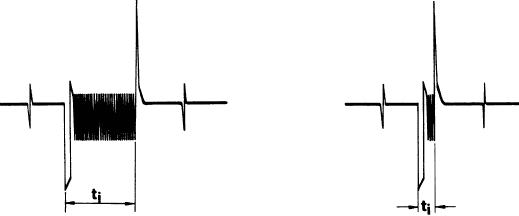


ENRICHMENT IDLE


Printed in Germany - I, 1982 Troubleshooting DME       28 - 35
28 I g n i t i o n   S y s t e m 9 4 4


TEST POINT 12


CO and idle speed adjustments (see Repair Manual
from page 25 - 7 on).


TEST POINT 13

A u x i l i a r y   A i r   R e g u l a t o r


1.  A hot auxiliary air regulator will be closed. Pinch
air hose = engine speed should only drop slightly.


2.  Pull off plug on auxiliary air regulator and measure
voltage between both plug receptacles.
Plug must have battery voltage.


3. Measure resistance on auxiliary air regulator with
an ohmmeter.

Specification:    30 to 65 ohms
(20 to 55 ohms since 8.82)
      TEST POINT 14

L e a k s   i n   I n t a k e   S y s t e m


1.  Check all hoses and connections after air
flow sensor for tight tit and leaks.


2. Tighten hose clamps.


TEST POINT 15

A l t e r n a t o r   a n d   R e g u l a t o r


Peak voltage of the alternator could trigger off
engine misfiring.


1. Remove drive belt and alternator.


2.  Start engine. If defect is eliminated. check
alternator and regulator.


28 - 36 Troubleshooting DME Printed in Germany
944 Ignition System       28


TESTING LAMBOA SENSOR OPERATION


(Short test)

Prerequisites:

- Engine at operating temperature

- Idle speed correctly set

1.  Connect exhaust tester at
bleed nozzle in engine
compartment.


2.  Detach lambda sensor plug con-
nection, wait for thermal equi-
librium, and no CO value.


3.  Pull off negative pressure line
from fuel pressure regulator and
close with suitable plug.


The CO value should rise signifi-.
cantly.


4.  Reconnect plug on lambda sensor.
The CO value should adjust itself
to the control value of 0.6 +- 0.2%.


If there is no change in the CO level,
there is a defect in the lambda sensor
or in the DEE control unit.


Printed in Germany - XV, 1987 Testing Lambda Sensor Operation       28 - 37
28 Ignition System 944


TESTING DEE CONTROL UNIT


(Lamba Control Function)


1.  Same prerequisites as for
"Testing Lambda Sensor Operation".

2. Disconnect lambda sensor plug.
Briefly connect term. 1 on the
plug half to the control unit
to ground with an auxiliary
lead.


The CO value should rise.


If there is no change in the
CO level, check connection to
DEE control unit (term. 24 green)
and if necessary, replace control
unit.


      TESTING LAMBDA SENSOR


(Sensor Voltage)


l.  Prerequisites as for "Testing
Lambda Sensor Operation".


2. Disconnect lambda sensor plug.


3. Clip voltmeter to term. 1 (plug
half to sensor) and to ground.


4. The voltage should lie in the
range from 0.1 V to 1.0 V (de-
pending on oxygen content in
exhaust).


Lambda sensor voltaae characteristic
for working temperature of 600° C.


rich mixture
(insufficient       
air)
lean mixture
(excess air)


28 - 38 Testing DEE Control Unit
Testing Lambda Sensor
Printed in Germany
944 Ignition System       28


REMOVING AND INSTALLING DEE CONTROL
UNIT IN MODELS AS OF 85/2


1.  Fold back mat in passenger's
side footwell. Unscrew and remove
footwell cover.


2.  Unscrew control unit bracket
and DEE control unit.


3.  Unlock and pull out
control unit plug


Printed in Germany - VII, 1985
Removing and Installing
DEE Control Unit in Models as
of 85/2
      28 - 39
28 944


28 - 40 Blank Page
944 Ignition System       28


DME CONTROL UNIT CODING, 924 S '86 MODELS ONWARD


1 - Plug for characteristic-map switch
2 - Plug for variant switch
     

1 - 944.612.525.01
2 - 944.612.421.00

Country DME Control Unit Impedance
Adapter
944.612.421.00
Coding plug
944.612.525.01
Rest of world 944.618.121.04 X -
Sweden,
Switzerland
944.618.121.04 X X
Rest of world
"stage A"
944.618.121.04 X X
M298 944.618.121.04 - -
USA/Canada/
California/
Japan
944.618.121.04 - X

Connect coding plug (1) to plug 1 of wire harness.

Connect impedance adapter (2) to plug 2 of wire harness.

See Technical Information Gr.2 No. 5/85 dated 11 August, 1986


Printed in Germany - XVII, 1988
DME Control Unit Coding,
924 S '86 Models Onward
      28 - 41
28 Ignition System 944


DME CONTROL UNIT CODING, 944 '85/2 MODELS ONWARD


1 - Plug for characteristic-map switch
2 - Plug for variant switch
     

1 - 944.612.525.01
2 - 944.612.421.00

Country DME Control Unit Impedance
Adapter
944.612.421.00
Coding plug

944.612.525.01
Rest of world 944.618.121.03 X -
Sweden,
Switzerland
944.618.121.03 X X
Rest of world
"stage A"
944.618.121.03 X X
USA/Canada/
Australia
M298
944.618.121.04 - -
California/
Japan
944.618.121.04 - X

Connect coding plug (1) to plug 1 of wire harness.

Connect impedance adapter (2) to plug 2 of wire harness.

See Technical Information Gr.2 No. 1/86 dated 20 March, 1986 and Technical
Information Gr.2 No. 5/85 dated 11 August, 1986


28 - 42 DME Control Unit Coding,
944 '85/2 Models Onward
Printed in Germany
944 Ignition System 28


DME control unit coding 944 2.7 l


1 - Connector for the performance
    characteristic switch
2 - connector for the variant switch
     

1 - 944.612.525.01
2 - 944.612.421.00


Country Resistance adapter
944.612.421.00
Coding connector
944.612.525.01
California. Japan
with catalytic converter
- X
R.o.w. with cat. converter   -
R.o.w. without cat. converter   -
If required.
(91 RON lead-free)
with catalytic converter
X X

The coding connector (1) is plugged on to connector 1 in the cableharness.

The resistance adapter (2) is plugged on to connector 2 in the cableharness.


DME control unit coding 944 2.7 l
Printed in Germany - XVII, 1988
28 - 42a
28 944


28 - 42b Blank Page
944 Ignition System       28


DME CONTROL UNIT CODING, 944 TURBO, '85 MODELS ONWARD


1 - Plug for characteristic-map switch
2 - Plug for variant switch


1 - 944.612.525.01
2 - 944.612.421.00

Country DME Control Unit Impedance
Adapter
944.612.421.00
Coding plug

944.612.525.01
Rest of world 944.618.121.02 X -
Sweden,
Switzerland
944.618.121.02 X X
USA/Canada/
Australia
M298
944.618.121.02 - -
California/
Japan
944.618.121.02 - X

Connect coding plug (1) to plug 1 of wire harness.

Connect impedance adapter (2) to plug 2 of wire harness.

See Technical Information Gr. 2 No. 5/85 dated 11 August, 1987


Printed in Germany - XVII, 1988
DME Control Unit Coding,
944 Turbo, '85 Models Onward
      28 - 43
28 944


28 - 44 Blank Page
944 Ignition System       28


CODING OF DEE CONTROL UNITS, 924 S, '88 MODELS ONWARD


1 - Plug for characteristic-map switch
2 - Plug for variant switch
     

1 - 944.612.525.01
2 - 944.612.421.00

Country DEE Control Unit Impedance Adapter
944.612.421.00
Coding plug
944.612.525.01
USA 944.618.121.05 - -
RoW with cat.
converter
944.618.121.05 - -
RoW without
cat. converter *
944.618.121.05 X -
California,
Japan
944.618.121.05 - X
Astralia
944.618.121.05 X X


*   In cars without catalytic converters, ensure that cable link 911.612.422.00
is inserted in the wire harness instead of the oxygen sensor. This protects
the DEE control unit from scatter.


Printed in Germany - XV, 1987
DME of Control Unit Coding,
924 S, '88 Models Onward
      28 - 45
28 Ignition System 944


CODING OF DEE CONTROL UNITS, 944, '88 MODELS ONWARD


1 - Plug for characteristic-map switch
2 - Plug for variant switch
     

1 - 944.612.525.01
2 - 944.612.421.00

Country DME Control Unit Impedance Adapter
944.612.421.00
Coding plug
944.612.525.01
USA 944.618.121.05 - -
RoW with cat.
converter
944.618.121.05 - -
RoW without
cat. converter *
944.618.121.05 X -
California,
Japan
944.618.121.05 - X
Astralia
944.618.121.05 X X


*   In cars without catalytic converters, ensure that cable link 911.612.422.00
is inserted in the wire harness instead of the oxygen sensor. This protects
the DEE control unit from scatter.


28 - 46 Coding of DME Control Unit,
944, '88 Models Onward
XVII, 1988 - Printed in Germany
944 Ignition System 28


Equipment Table


Engine type M 44.09/10


Type/Model Version Remarks
924 S Mod. '88
944
944.618.121.05 DME control unit


Engine type M 44.11/12


Type/Model Version Remarks
944 Mod. '89     944.618.121.06 DME control unit


Equlpment Table
Printed in Germany - XXV, 1992
28 - 47