Workshop Manual


Volume II - Transmission


DR. ING. h. c. F. PORSCHE Aktiengesellschaft
As webpage by http://www.uriarte.dk/porsche944
12.3.2018
WORKSHOP MANUAL 944


This Workshop Manual describes all of the important operations for which special instructions are required to assure proper completion. This manual is essential for shop foremen and mechanics, who need this information to keep the vehicles in safe operating condition. The basic safety rules, of course, also apply to repairs on vehicles without exception.


Only those repair jobs deviating from those of vehicle type 924 are described in the 944 Workshop Manual. Refer to the 924 Workshop Manual for all other information.


The information is grouped according to repair numbers which are identical to the first two digits of the warranty job codes.


The repair group index, list of contents and the register tabte are quick guides to find information in the manual. The layout drawings in this manual are numbered in the order of disassembling and, if necessary, also have information on assembly or installation and application of special tools.


Descriptions of design and function can be found in the service training course reference material.


This Workshop Manual will be kept up to date with Technical Information Bulletins, which will be made part of the manual from time to time. We recommend that these bulletins be filed in the standard type folder provided for this purpose.


Printed in Germany
List of Repair Groups 944

General Technical Data Page 0.1

Repair Groups   Group

  Maintenance, Self-diagnosis 03

Engine Engine, Crankcase
Engine, Crankshaft, Pistons
Engine, Cylinder Head and Valve Drive
Engine, Lubrication
Engine, Cooling
Fuel Supply
Air Flow Controlled Fuel Injection
Exhaust System/Emission Controls
Starter, Power Supply, Cruise Control
Ignition System
DME Diagnosis
10
13
15
17
19
20
24
26
27
28

Transmission Clutch, Controls
Torque Converter
Manual Transmission, Controis, Case
Manual Transmission, Gears, Shafts
Autornatic Transmission, Controls, Case
Automatic Transmission, Gears, Valve Body
Differential, Transaxle System
30
32
34
35
37
38
39

Chassis Front Wheel Suspension
Rear Wheel Suspension, Axle Shaft
Wheels, Tires, Alignment
Antiblock System
Brakes, Mechanical
Brakes, Hydraulics, Regulator, Booster
Steering
40
42
44
45
46
47
48

Body Body-Front Section
Body-Center Section
Body-Rear Section
Lids
Doors
Hardtop
Bumpers
Glasses, Window Control
Exterior Equipment
Interiør Equipment
Seats
Seat Covers
Airbag Diagnosis
50
51
53
55
57
61
63
64
66
68
72
74

Heating,
Ventilation,
Air Condition
Heater
Ventilation
Air Conditioner
80
85
87

Electrics Instruments, Fuel Gauge, Alarm System
Radio, Telephone
Windshield Wipers and Washer
Exterior Lights, Lamps, Switches
Interiør Lights
Wiring
90
91
92
94
96
97

Printed in Germany - XXI, 1989
  9 4 4


0 Blank Page
944 Table of contents volume II


General data

Technical data (Type 016 J and 016 K)
Technical data (Type 016Jand 016 K, Mod. 85/2 onward)
Technical data (Type 016J/K and 083 D)
Technical data(Type 083 F)
Tightening torques (Type 016 J and 016 K)
Technical data, clutch


Clutch, Control

Checking clutch play, adjusting clutch spring
Checking condition of clutch drive disk
Checking release travel, bleeding hydraulic clutch system
Clutch, removing and installing
Clutch control, disassembling and assembling
Checking drive disk
Checking pressure plate
Overhauling slave cylinder


Automatic clutch, Torque convertor

Checking convertor (Type 087 M and 087 N)
Draining convertor (Type 087 M and 087 N)
Installing convertor (Type 087 M and 087 N)


Manual transmission, Control, Housing

Gearbox, removing and installing (Type 016 J and 016 K)
Gearbox, removing and installing, Type 016 J and 016 K (Mod. 85/2 onward)
Adjusting shift
Checking oil level, replacing transmission oil
Transfer box, removing and installing (Type 016 J and 016 K)
Transfer box, disassembling and assembling (Type 016 J and 016 K)
Rear cover, disassembling and assembling (Type 016 J and 016 K)
End plate. disassembling and assembling (Type 016 J and 016 K)
Transmission case, disassembling and assembling (Type 016 J and 016 K)


Manual transmission, Gears, Shafts

Input shaft, disassembling and assembling (Type 016 J and 016 K)
Output shaft, disassembling and assembling (Type 016 J and 016 K)
     Page


30 - 01
30 - 02
30 - 03
30 - 04
30 - 05
30 - 07


30 - 1
30 - 2
30 - 3
30 - 5
30 - 13
30 - 16
30 - 17
30 - 19


32 - 1
32 - 2
32 - 3


34 - 1
34 - 4
34 - 5
34 - 7
34 - 9
34 - 15
34 - 27
34 - 31
34 - 39


35 - 1
35 - 7


Table of contents
Printed in Germany - XXII, 1989
1
volume II Table of contents 944


Automatic transmission

Technical data (Type 087 M and 087 N)
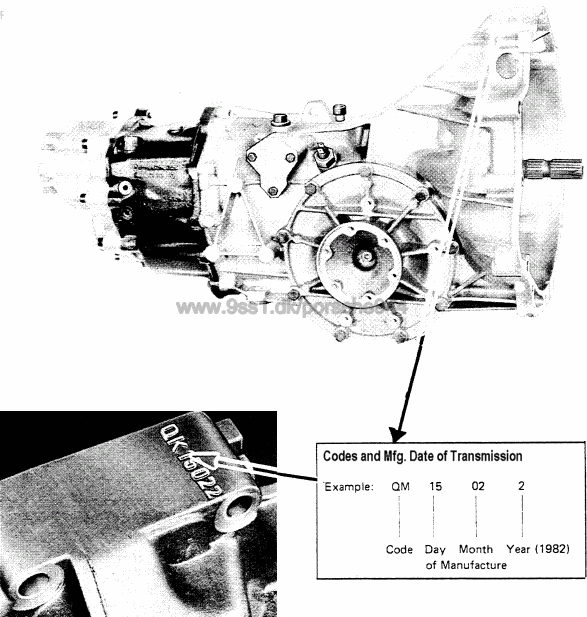
Identification code for transmission (Type 087 M and 087 N)
Technical data (Type 087 M and 087 N)
Position of the shift elements in the various selector lever positions or
gears (Type 087 M and 087 N)
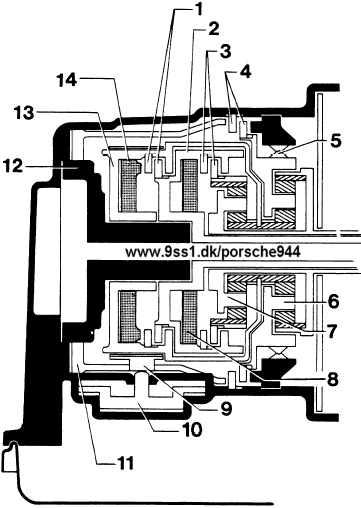
Planetary gear with shift elements (Type 087 M and 087 N)
Tightening torques (Type 087 M and 087 N)
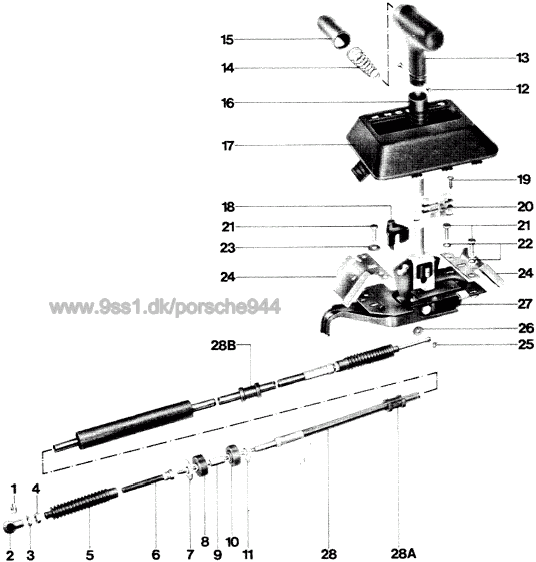
Selector lever cable, removing and instailing (Type 087 M and 087 N)
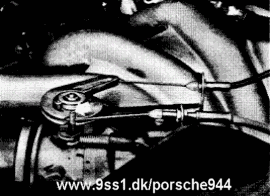
Throttle and control pressure cable, removing and installing (Type 087 M and 087 N)
Adjusting throttle and control pressure cable (Type 087 M and 087 N)
Functional test(Type 087 M and 087 N)
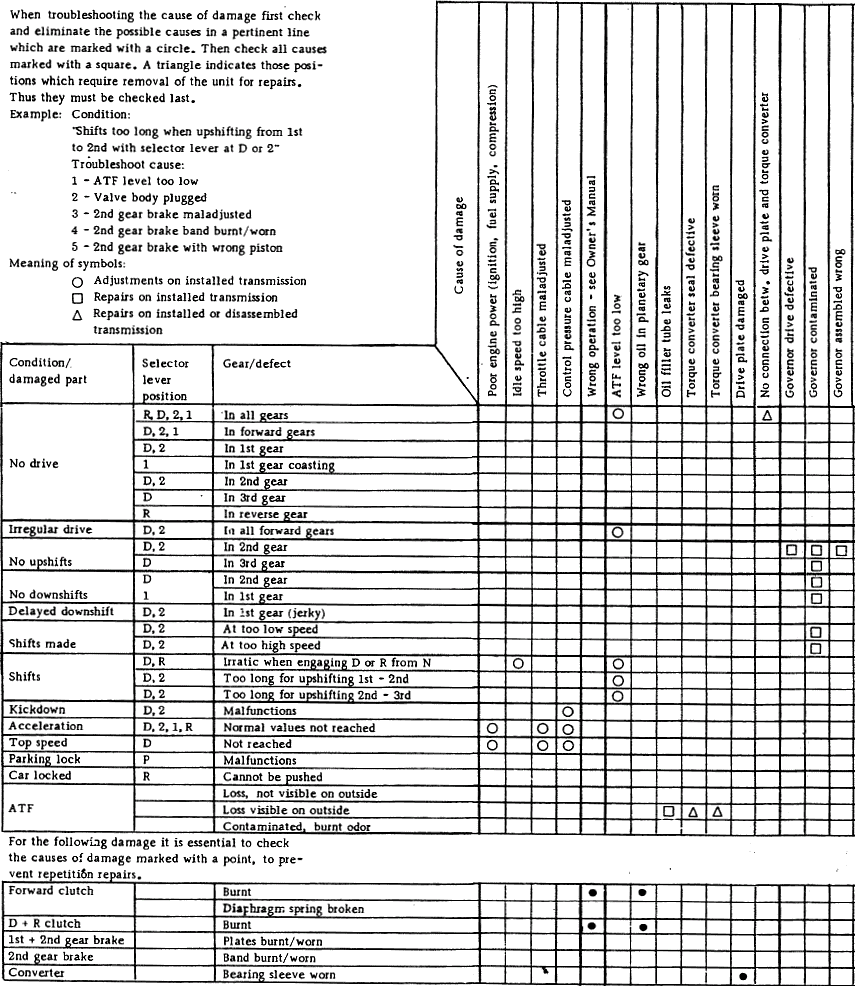
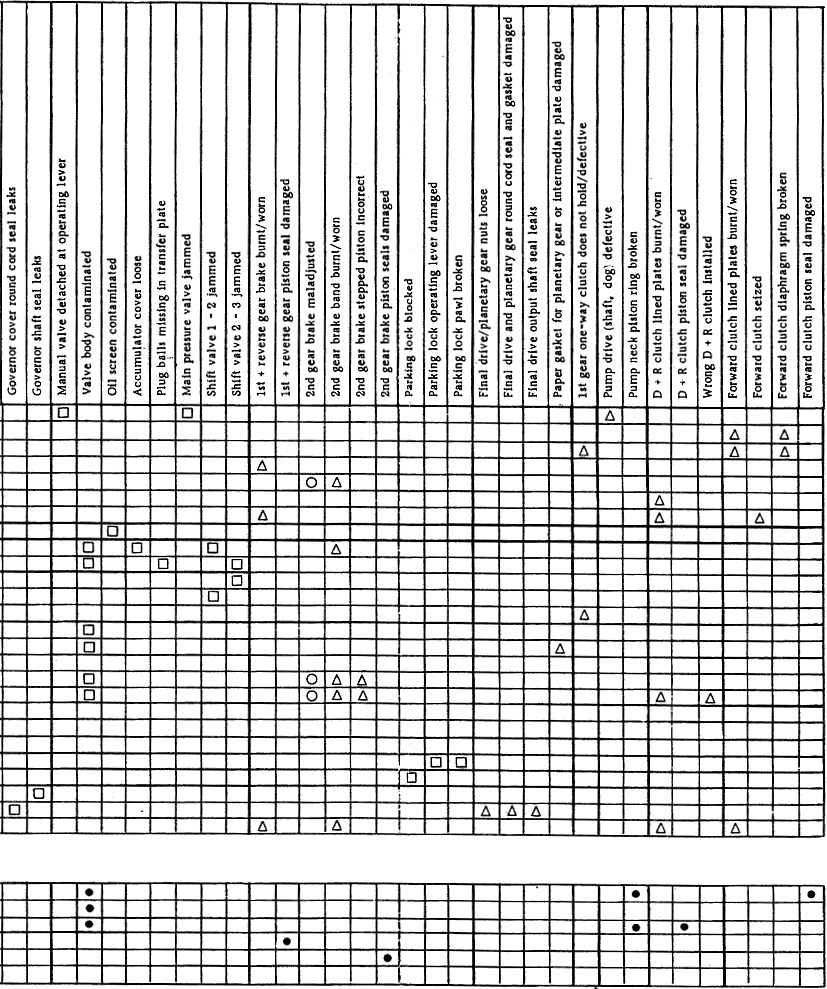
Troubleshooting table (Type 087 M and 087 N)
Transmission, removing and installing (Type 087 M and 087 N)


Automatic transmission, Gears, Regulation

Replacing ATF fluid, cleaning ATF filter (Type 087 M and 087 N)
Rushing ATF cooler and line system
Disconnecting and connecting planetary gear to final drive (Type 087 M and 087 N)
Turbine-shaft seal, removing and installing (Type 087 M and 087 N)
Adjusting axiaI play - planetary gear/final drive (Type 087 M and 087 N)
Planetary gear, disassembling and assembling (Type 087 M and 087 N)
Ring gear. disassembling and assembling (Type 087 M and 087 N)
Overrunning clutch, disassembling and assembling (Type 087 M und 087 N)
Overrunning clutch with plastic cage, disassembling and assembling
(Type 087 M and 087 N)
Forward clutch, disassembling and assembling (Type 087 M and 087 N)
Direct and reverse clutch, disassembling and assembling (Type 087 M and 087 N)
Oil pump, disassembling and assembling (Type 087 M and 087 N)
Valve body, removing and installing (Type 087 M and 087 N)
Transfer and intermediate plates, removing and installing (Type 087 M and 087 N)
Valve body, disassembling and assembling (Type 087 M and 087 N)
2nd gear brake, disassembling and assembling (Type 087 M and 087 N)
Regulator, disassembling and assembling (Type 087 M and 087 N)
Parking lock, disassembling and assembling (Type 087 M and 087 N)


Differential, Transaxle system

Differential. removing and installing (Type 016 J and 016 K)
Differential, disassembling and assembling (Type 016 J and 016 K)
     Page


37 - 01
37 - 02
37 - 03

37 - 04
37 - 05
37 - 07
37 - 1
37 - 8a
37 - 11
37 - 13
37 - 17
37 - 18


38 - 1
38 - 2c
38 - 3
38 - 7
38 - 9
38 - 11
38 - 19
38 - 21

38 - 22a
38 - 23
38 - 27
38 - 33
38 - 35
38 - 39
38 - 45
38 - 55
38 - 57
38 - 59


39 - 1
39 - 5


2 Table of contents
Printed in Germany - XXII), 1989
944 Table of contents volume II


Adjusting pinion and ring gear (Type 016 J and 016 K)
Tightening torques (Type 087 M and 087 N)
Checking oil level in rear final drive (Type 087 M and 087 N)
Final drive, disassembling and assembling (Type 087 M and 087 N)
Differential, disassembling and assembling (Type 087 M and 087 N)
Limited slip differential (40%), disassembling and assembling
Adjusting drive set (Type 087 M and 087 N)
Central pipe, removing and instaIling (Type 087, M and 087 N)
Central pipe, disassembling and assemblilig (Type 0,87 M and 087 N)
Checking central pipe (Type 087 M and 087 N)
Adjusting dampers (Type 087 M and 087 N)
     Page


39 - 11
39 - 101
39 - 103
39 - 105
39 - 119
39 - 122a
39 - 123
39 - 135
39 - 143
39 - 145
39 - 146


Table of contents
Printed in Germany - XXII, 1989
3
30 G e n e r e l 9 4 4


30 - 00 Blank Page
9 4 4 G e n e r e l       30


FIVE SPEED MANUAL TRANSMISSION 016 K


Transmission Types Built Beginning With 1982 Model:

Type Code Installed in Cars for
016 K QM Standard
016 K 8 Q Optional (with limited slip differential)


Printed in Germany Technical Data (Type 016 K)       30 - 01
30 General 944


5-speed manual transmission 016J and 016K (as from Model 85/2)


Type Identification
code
Equipment Installed in Model year
016J 5Y 5-speed without
limited slip differential
Rest of the world
Worldwide
85/2...88
88
016J 5Z 5-speed with
limited slip differential
Rest of the world
Worldwide
85/2...88
88
016K 5S 5-speed without limited slip diff. USA/Japan 85/2...87
016K 7V 5-speed with limited slip diff. USA/Japan 85/2...87
016J ASG 5-speed without limited slip diff. Worldwide 89...91
016J ASH 5-speed with limited slip diff. Worldwide 89...91


30 - 02 Technical Data - (Type 016 J / K, as from Mod. 85/2)
Printed in Germany - XVIV, 1991
9 4 4 G e n e r e l       30


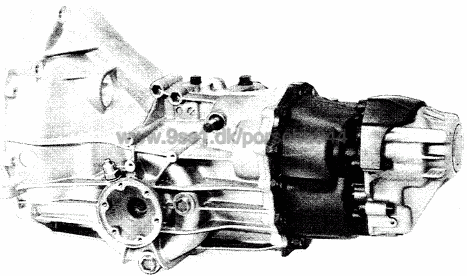
FIVE-SPEED MANUAL TRANSMISSION 083 D FOR 944 S ('87 MODELS ONWARD)


Type Code Installed in
083 D AGP Woldwide
083 D AGR Woldwide (with
limited-slip
differential)


With the exception of a few modifications in its design and as regards repair
the 083 D transmission is the same as the 016 R Turbo transmission.

The most important modifications are:

- no transmission-oil pump is available

- final drive ratio increased to 9 : 35

- transmission casing with machined recess for ring gear

- design distance "Ro" 58.15 mm


Printed in Germany - XIII, 1987 Technical Data
(Type 083 D)
      30 - 02a
30 General 944


Technical Data - Type 083 F


Type Code Equipment Installed in: Model Year
083F A0S 5-speed
without lock
944 S 2 worldwide
except Switzerland
1989/90/91
083F A0T 5-speed
with lock
944 S 2 worldwide
except Switzerland
1989/90/91
083F ASV* 5-speed without lock 944 S 2 Switzerland 1989/90/91
083F ASW* 5-speed with lock 944 S 2 Switzerland 1989/90/91


* with transmission enclosing and additional oil cooler.

Transmission 083 F is the same in design and repairing procedures as the 944 S transmission 083 D,
except for a few deviations.

Most Important Deviations:  
- Longer 5th gear 36 : 28 i = 0.778
- Final drive ratio    8 : 31 i = 3.875
- Design distance "Ro" = 59.65 mm
- Stronger differential


30 - 02b Technical Data - Type 083 F
Printed in Germany - XVIV, 1991
944 General Data 30


General Data 5 Speed Manual Transmission 083 F
016 J / 016K083 D (AGP/AGR)
Ratios
1st gear 10 : 36 i = 3,6000 10 : 35 i = 3.500
2nd gear 16 : 34 i = 2,1250 17 : 35 i = 2.059
3nd gear 24 : 35 i = 1,4583 25 : 35 i = 1.400
4nd gear 28 : 30 i = 1,0714 29 : 30 i = 1.034
5nd gear 35 : 29
(37 : 27
i = 0,8286
i = 0,7297)
35 : 29 i = 0.829
Reverse gear 12 : 42 i = 3,5000 12 : 42 i = 3.500
Final drive Hypoid pinion/ring gear with 12 mm offset
Final drive ratio 9 : 35 i = 3.889    
Power transmission Front-mounted engine and rear-mounted transmission connected via a
pipe to form a bolted drive unit. Front-mounted engine. clutch, rotationally
elastic shaft (25 mm dia.) running on 4 bearings in connecting pipe to the
transmission, rear-mounted transmission bolted on final drive, double drive
shafts to the rear wheels.
Filling capacity Approx. 2.0 liters hypoid transmission oil SAE 75 W 90 to API Class GL5 or
MIL-L 2105 B, or SAE 80 to API Class GL 4 or MIL-L 2105 (refer to page 34 - 7)


USA values in parentheses

Rest of the world and USA vehicles have the same transmission ratio as from model 88.


Technical Data - Type 083 F
Printed in Germany - XXIV, 1991
30 - 03
30 General 944


Technical Data - Type 083 F

General Data 5 Speed Manual Transmission 083 F
Ratios
1st gear 10 : 35 = 3.500
2nd gear 17 : 35 = 2.059
3nd gear 25 : 35 = 1.400
4nd gear 29 : 30 = 1.043
5nd gear 36 : 28 = 0.778
Reverse gear 12 : 42 = 3.500
Final Drive Hypoid pinion/ring gear with 12 mm offset
Final Drive ratio 8 : 31 = 3.875
Power transmission Front-mounted engine and rear-mounted transmission connected via a
pipe to form a bolted drive unit. Front-mounted engine, clutch, rotationally
elastic shaft (25 mm dia.) running on 4 bearings in connecting pipe to the
transmission, rear-mounted transmission bolted on final drive, double
drive shafts to the rear wheels.
Filling capacity Approx. 2.0 liters hypoid transmission oil SAE 75 W 90 to API Class GL5
or MIL-L 2105 B, or SAE 80 to API Class GL or MIL-L 2105 (refer to page 34 - 7).


30 - 04 Technical Data - Type 083 F
Printed in Germany - XVIV, 1991
944 General Data 30


Torque specifications for manual transmission


Location Description Threads Material class Tightening torque
Nm (ft.lb)
Oil filter plug in
transmission case

Oil drain plug in
transmission case

Gear shift shaft
cover to transmis-
sion case

End shield to trans-
mission case

Ball bearing to input
shaft

Cover to end shield


5th gear wheel to
pinion

Shift lock to end
shield and transmis-
sion housing

Shift travel stop to
end shield
Plug


Plug


Hexagon head
screw


Hexagon head
screw

Hexagon head
screw*

Fillister head
screw

Hexagon head
screw*

Threaded
bushing


Stop screw
M 24


M 24


M 6


M 8


M 10


M 8


M 10


M 18


M 14
-


-


8.8


8.8


8.8


8.8


8.8


-


8.8
24 (17)


24 (17)


8 (6)


24 (17)


70 (51)


24 (17)


70 (51)


30 (22)


30 (22)


* Screws are microencapsulated. Must only be used once.


Torque specifications (Typ 016 J/K)
Printed in Germany - XVII, 1988
30 - 05
30 General Data 944


Location Description Threads Material class Tightening torque
Nm (ft.lb)
Reversing lever to
end shield


Reverse gear bolt to
end shield


Stub shaft to diffe-
rential

Side transmission
cover to transmis-
sion case

Ring gear to diffe-
rential case

Back-up light switch
to transmission case

Speedometer
bushing to transmis-
sion case

Crankshaft to flange
Cross-reces-
sed fillister
head screw

Hexagon head
screw with
collar

Screw


Hexagon head
screw


Hexagon head
screw

Switch


Speedometer
bushing


Hexagon
socket screw
M 10


M 8


M 8


M 8


M 10


M 18


M 18


M 8
8.8


8.8


8.8


10.9


12.9


-


-


12.9
35 (25)


24 (17)


24 (17)


24 (17)


90 (66)


42 (42)


42 (30)


42 (30)


30 - 06 Torque specifications (Typ 016 J/K)
Printed in Germany - XVII, 1988
9 4 4 G e n e r a l       30


General Data Clutch
Design


Pressure plate


Clutch disc


Single plate, dry clutch with diaphragm springs,
pull release version, located on engine,
hydraulic operation

MFZ 225 contact pressure 6100 - 6800 N
(1370 - 1530 lb)

225 GUD (with rubber torsion damper)


Printed in Germany Technical Data       30 - 07
30 G e n e r a l 9 4 4


TlGHTENING TORQUE FOR CLUTCH, CENTRAL TUBE, TRANSMISSION SUSPENSION AND
SHIFT LINKAGE


Location Description Threads Material Torque
Nm (ft lb)
CLUTCH

Guide sleeve on clutch
housing

Clutch and gear ring
installation

Flywheel to crank-
shaft

Clutch housing to
engine

Guard and support
to clutch housing and
crankcase

Release lever shaft
with clutch housing


Reference mark and
speed sensors to
holder

Slave cylinder to
clutch housing

Master cylinder to
firewall

Clutch tube to clutch
hose or to master and
slave cylinders

Drive shaft to trans-
mission input shaft

Central tube flange
to clutch housing


Bolt


Bolt


Bolt


Bolt


Bolt


Bolt

Nut

Bolt


Bolt


Nut


Coupling


Clamp bolt


Bolt


M7


M8


M 10


M 12


M 10


M6 x 35

M6

M6


M8 x 28


M8


M 12


M 10 x 46


M 10 x 35


8.8


8


10.9


8.8


8.8


8.8

8

8.8


8.8


8


12.9


8.8


15 (11)


25 (18)


90 (65)


75 (54)


42 (30)


9.5 (7)

7.5 (6)

8 (6)


21 (15)


21 (15)


16 (11)


80 (58)


42 (30)


30 - 08 Technical Data Printed in Germany
9 4 4 G e n e r a l       30


Location Description Threads Material Torque in
Nm (kpm)
Central tube housing
to transmission case
Bolt M 12 x 75

M 12 x 80

M 10 x 60
10.9

10.9

8.8
85 (8.5)

85 (8.5)

42 (4.2)
TRANSMISSION SUSPENSION (Double Point Suspension)
Transmission mount
to body

Mount to bracket

Bracket to
transmission
Bolt


Bolt

Bolt
M 10


M 8

M 8
8.8


8.8

10.9
46 (4.6)


25 (2.5)

25 (2.5)
TRANSMISSION SUSPENSION (Single Point Suspension)
Transmission carrier
to body

Transmission mount
to transmission carrier

Bracket to transmis-
sion mount

Bracket to transm.
Bolt


Bolt


Bolt


Bolt
M 10


M 8


M 8


M 8
8.8


8.8


8


8
46 (4.6)


23 (2.3)


23 (2.3)


23 (2.3)
SHIFT
Joint rod to
transmission case

Joint rod to inter-
mediate shift lever

Shift rod

Shift lever plate to
central tube

Intermediate shift
lever to shift shaft
Ball-ended bolt


Nut


Bolt

Bolt


Bolt
M 8


M 8


M 8

M 8 x 12


M 8
9 S Mn 28 K


8.8


9 S Mn 28 K

8.8
14 (1.4)


21 (2.1)


21 (2.1)

21 (2.1)


22.5 (2.25)


Printed in Germany - V, 1985 Technical Data       30 - 09
30 Clutch/Controls 9 4 4


30 - 0 Blank Page
9 4 4 Clutch/Controls       30


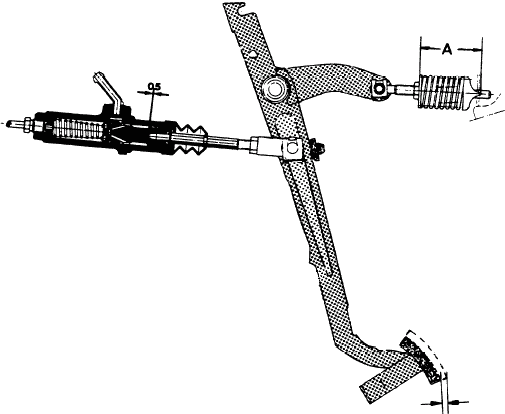
CHECKING CLUTCH PLAY

Automatic hydraulic clutch
adjustment means that clutch play
cannot be checked at the clutch
pedal.

Nevertheless, the clutch cannot
operate correctly unless there is
0.5 mm clearance between push rod
and master-cylinder piston.

This play cannot be measured; it is
about 3 mm at the pedal pad and
must be determined by feel.

If necessary, correct play by
adjusting piston rod.
ADJUSTING CLUTCH SPRING

A spring which reduces the pedal
force is installed to assist the
force applied to the pedal. For
this purpose, the spring must be
preloaded accordingly.

Measure distance A between outer
edge of plate and bearing with
clutch engaged (clutch pedal at end
stop).

Distance A for green color-coded
spring (no longer available as
spare part) 60 mm (75 mm*)

- Distance A for blue color-coded
spring (increased spring rate/in
use since February 1986)
= 55 mm (68 mm*)

If necessary, correct by turning the hex nut.

* Values of distance A in parentheses apply to spring when removed.
Reassemble servospring/guide rod with assembly wire (3 mm dia. split pin).


Printed in Germany - XIII, 1987
Checking Clutch Play
Adjusting Clutch Spring
      30 - 1
30 Clutch/Controls 9 4 4


CHECKING CLUTCH DRIVE PLATE FOR WEAR


Checking

Remove cap
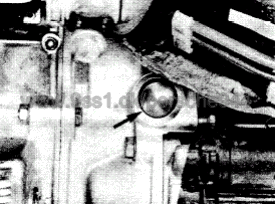


Measure distance "A" with
a suitable gage
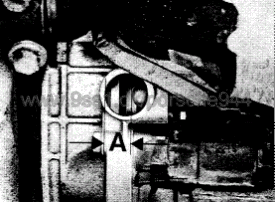


Size new
Wear limit


18 mm
34 mm


30 - 2 Checking Clutch Drive Plate Printed in Germany
9 4 4 C l u t c h   /   C o n t r o l s       30


CHECKING RELEASE TRAVEL

1. 

2.
Remove cap (see page 30 - 2).

Measure distance "B" with a
suitable measuring tool.

1   
2
3
B
Clutch slave cylinder
Push rod
Release lever
Release travel
Nominal value =
15 to 18 mm


If distance is less than 15 mm there can be no guarantee that clutch disengages fully.

Possible Causes:     -  
-
-
-
air in hydraulic system
clutch master and/or slave cylinders defective (cups)
no or insufficient clutch play
limited clutch pedal travel (e. g. bunched-up floor mats)


BLEEDING CLUTCH

G e n e r a l   I n f o r m a t i o n

The use of a pressure bleeder is recommended.

1.  Fill tank with brake fluid to upper edge.
Remove restrictor sleeve. Connect bleeder.


2.  Switch on bleeder and open bleeder screw on
clutch slave cylinder until escaping fluid is
without air bubbles. Operate clutch pedal
several times during this step.

3. If necessary because of residual air (release
traver less than 15 mm), unscrew slave cylinder
on clutch housing. Push rod against stop in
slave cylinder and release again (bleeder
switched off, brake fluid tank not filled to
upper edge). This will force the residual air
back into the clutch line or master cylinder/
brake fluid tank.

N o t e

Never operate clutch pedal as long as slave
cylinder is removed.


Printed in Germany Checking Release Travel, Bleeding Clutch       30 - 3
30 C l u t c h   /   C o n t r o l s 9 4 4


4.  Install slave cylinder again.
Repeat bleeding procedures.


30 - 4 Bleeding Clutch Printed in Germany
9 4 4 C l u t c h   /   C o n t r o l s       30


REMOVING AND INSTALLlNG CLUTCH


Note
When performing operations on the transaxle
system that involve rotating or shifting the
transaxle tuebe, always wear leather gloves
to avoid injuries.


R e m o v i n g

1.  Disconnect ground wire at battery. Disconnect
round wire connecting body with clutch housing.


2.  Disconnect ground wire on clutch housing I.
Unscrew socket head bolts and run reference
mark sensor II and speed sensor III for DEE
out of holder IV.
Disconnect wire harness for starter at upper
mounting point V.
If necessary, remove air cleaner for this step.

3.  Remove exhaust assembly. This requires
unscrewing exhaust pipe on exhaust manifold
and suspension mounting bolts. If car has oxygen
control, disconnect wires of oxygen sensor on plug.


Printed in Germany Removing and Installing Clutch       30 - 5
30 C l u t c h   /   C o n t r o l s 9 4 4


4.  Remove heat shield above catalytic converter.
Remove splash guard. Run out rear exhaust
pipe bracket together with bracket bolted on the
central tube.


5.  Push back dust cover. Remove lockwire on clamp
bolt of selector linkage. Unscrew bolt.


6.  Lift and fold down dust cover and sleeve on shift
lever. Remove shift lever knob retainer. Take off
shift lever knob.


7.  Remove circlip on shift lever. Pull off selector
rod and washer on bolt of shift lever.


8.  Remove insulator above shift lever console.
Remove shift lever, but first mark location of
console after removing the rear mounting bolt.


9.  Press down on insulation sheet and push selector
rod forward in cavity by about 300 mm
(12 in.).


30 - 6 Removing and Installing Clutch Printed in Germany
9 4 4 C l u t c h   /   C o n t r o l s       30


10.  Unscrew two upper mounting bolts of
clutch housing.


11.  Take off end cap on central tube
housing. Push back protective tube for
selector rod far enough, that it is
outside of the central tube housing.
This is done by inserting a large screw-
driver through assembly opening in
central tube housing and opening
retainer on protective tube.


12.  Unscrew and remove clamping sleeve
bolts through assembly openings.
Push clamping sleeve in direction of
transmission.


13.  Detach joint shafts on transmission end,
but do not let joint shafts hang down
to final stop in joint (instead suspend
from car with wire) to avoid damage.

14. Pull off wires on backup light switch.
Also pull off plug on speedometer drive
of cars since 1985/2 models (see page
34 - 4).


Printed in Germany - V, 1985 Removing and Installing Clutch       30 - 7
30 C l u t c h   /   C o n t r o l s 9 4 4


15.  Run in a workshop trolley jack fitted with
Special Tool 9115 or an universal trans-
mission jack underneath the transmission.
Lift transmission slightly to remove
pressure on suspension.

16. Remove transmission suspension bolts.


I n i t i a l   V e r s i o n


P r e s e n t   M o d i f i e d   V e r s i o n


17. 
Lower transmission with central tube
until central tube rests on the rear
axle cross tube.

18. Remove transmission/central tube
flange bolts. Remove transmission
downward.
19.  Remove starter. Unscrew clutch line
mounting clamp, Detach clutch slave
cylinder on clutch housing (do not
open hydraulic system).


20.  Disconnect starter wire harness on
clutch housing. Pull out release lever
shaft mounting bolt with a 8 mm
bolt. Unscrew the tour central tube/
clutch housing mounting bolts.


30 - 8 Removing and Installing Clutch Printed in Germany
9 4 4 C l u t c h   /   C o n t r o l s       30


21.  Pull back selector rod again, which had been
pushed forward for removal of the transmission,
so that nothing will be damaged when moving
the central tube.


22. Move back central tube far enough until central
tube housing rests on transmission carrier. If
central tube cannot be moved out of clutch
housing without applying force, hold engine
tight with transport eye mounted on
camshaft housing with Special Tool VW 10-222.

In this case the engine has excessive inclination
at rear - check engine suspension.

N o t e
Make sure brake lines are not damaged by the
central tube.


23. Unscrew guard on clutch housing. Remove right
support, insofar as car is fitted with supports.


24.  Unscrew two lower mounting bolts on clutch
housing, after unscrewing engine mount nuts
and pushing engine to the right


25.  Move out guard and clutch housing with release
lever.


26. Disconnect clutch on flywheel.


Printed in Germany Removing and Installing Clutch       30 - 9
30 C l u t c h   /   C o n t r o l s 9 4 4


I n s t a l l i n g


1.  Check flywheel, starter gear ring, pilot bearing in
flywheel, crankshaft seal, release bearing, guide
sleeve, release lever, pressure plate and clutch
disc for wear or damage.


2. Coat guide sleeve with multi-purpose MoS2 grease.
Give spline of drive shaft and area in pilot bearing/
flywheel a light coat of MoS2. Lubricate release
lever (pivot, ball socket and needle bearings) with
white solid lubricating pasta AOS 126 0006.


3. Install clutch. This requires that friction surfaces
be clean and without grease. Use short drive shaft
of a 928 (or a shortened drive shaft from a
damaged central tube) to center the clutch disc.
Screw in bolts uniformly crosswise. Tightening
torque = 25 Nm (18 ft Ib). Counterhold on hexa-
gon bolt of front pulley.


4.  Mount clutch housing and release lever together
on engine/release bearing.
This requires that the bolt glued on the flywheel
for the reference mark sensor faces down
(danger of damage).
Insert cover. Mount clutch housing with the
two lower bolts.


5. Move release lever until needle bearing and bore
in clutch housing align. Slide in release lever
shaft positioned correctly so that machined
surface faces mounting bolt against stop. If
necessary, move release lever back and forth -
but never use force!


6. 
Screw in mounting bolt for a correctly installed
release lever shaft and lock with out.


7. Bolt clutch housing, cover and, if applicable,
right support. Connect starter wire harness.
Mount start and reference mark sensors as well
as ground wires on clutch housing and body.


30 - 10 Removing and Installing Clutch Printed in Germany
9 4 4 C l u t c h   /   C o n t r o l s       30


8.  Check that insulation sheet on central tube is still
positioned correctly. Distance from flange inside
to insulation should be 500 mm (20 in.).


9. 
Push central tube forward and bolt on clutch
housing. Guide central tube with drive shaft into
clutch housing and clutch disc carefully (danger
of damage). Never apply force. Screw in mounting
bolts and loosen again by about 1 turn. (Never
tighten bolts fully, see note!)


N o t e

To avoid tension in engine, transmission and central
tube, when installing in car tighten central tube to
clutch housing mounting bolts only after bolting the
engine and transmission.


10. Install clutch slave cylinder. Mount clutch line.
11.  Place selector rod protective tube in trans-
mission case. Replace a selector rod protective
tube, if retainer is deformed excessively.
Install transmission.
Push selector rod protective tube forward until
retainer engages in transmission case.
Mount selector rod on intermediate shift lever.


12.  Tighten mounting nuts insofar as engine
mounted had been unscrewed.
Then bolt central tube on clutch housing to
specified torque (bolts had only been screwed
in finger tight. see point 9).


13. Repair any damage on splash guard caused by
removal of transmission or moving of central
tube. Install starter and exhaust assembly.


Printed in Germany Removing and Installing Clutch       30 - 11
30 C l u t c h   /   C o n t r o l s 9 4 4


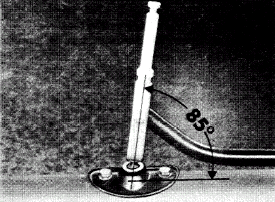
14.  Mount shift lever so that inclination in neutral is
85° (refer to mark).


30 - 12 Removing and Installing Clutch Printed in Germany
9 4 4 C l u t c h   /   C o n t r o l s       30


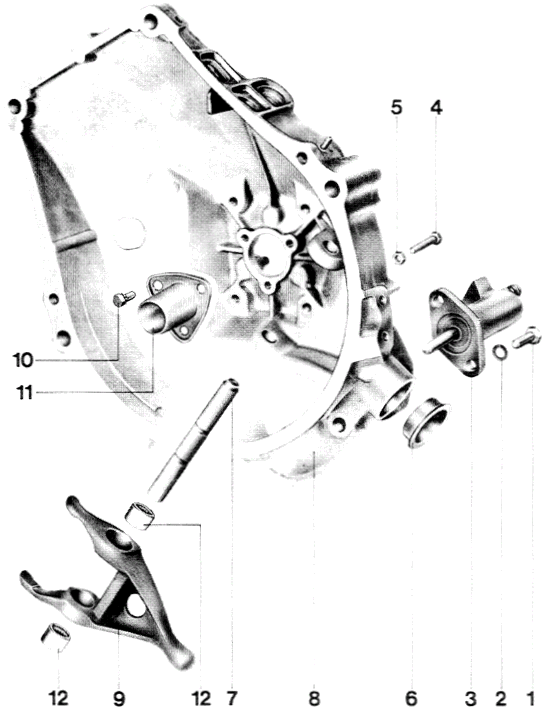
DISASSEMBLlNG AND ASSEMBLlNG CLUTCH CONTROLS


Printed in Germany Disassembling and Assembling Clutch Controls       30 - 13
30 C l u t c h   /   C o n t r o l s 9 4 4


No. Description Qty. Note When: Special
Instructions
Removing Installing
1


2


3


4


5

6

7


8


9
Bolt


Lockwasher


Slave cylinder


Bolt 6 x 35


Nut (locknut)

Cap

Release lever shaft


Clutch housing


Release lever
2


2


1


1


1

1

1


1


1


Do not operate
clutch pedal after
removing cylinder
(line connected)


Pull out with a
8 mm bolt (stud)
Torque:   21 Nm
(15ft lb)

Replace. if
necessary


Tighten after
pushing in release
lever shaft
correctly


Push in against
stop in correct
position - machined
surface faces
bolt 4


Mount clutch
housing and
release lever
together on engine/
release bearing
before installing
release lever
shaft

Lubricate
bearing surfaces
with a white
solid lubricating
paste
(AOS 126 0006)


Refer to point 8


Refer to point 8.
Do not use force!
Move release lever
back and forth
slightly through
sight hole


30 - 14 Disassembling and Assembling Clutch Controls Printed in Germany
9 4 4 C l u t c h   /   C o n t r o l s       30


No. Description Qty. Note When: Special
Instructions
Removing Installing
10


11


12
Bolt


Guide sleeve


Needle bearing
3


1


2
Torque:   9.5 Nm
(7 ft lb)

Coat sliding
surfaces with
multi-purpose
grease MoS2

Press in flush with
a suitable mandrel.
Lubricate with
white solid
lubricating paste
(AOS 126 0006)


Check for wear


Printed in Germany Disassembling and Assembling Clutch Controls       30 - 15
30 C l u t c h   /   C o n t r o l s 9 4 4


CHECKING DRIVE PLATES


1.
Inspect splines. Drive plate must slide easily on
input shaft in axial direction without radial play.

2. Check rivets and rubber torsion damper for cracks or
damage. Replace drive plate when in doubt.

3. Inspect clutch liners. If clutch liners are covered with
oil, burnt, damaged or worn at spots, install a new
drive plate.

4.  Check liner thickness of drive plates.
Drive plate with riveted liner:
Relaxed thickness: 8.1 +- 0.3 mm.
Relaxed wear limit: 6.3 mm for symmetrical wear.


N o t e

Clutch liners cannot be replaced.


5.  Check drive plate with liner for lateral runout.
Max. permissible lateral runout 0.6 mm measured
pprox. 2 to 3 mm from outside diameter.


30 - 16 Checking Drive Plates Printed in Germany
9 4 4 C l u t c h   /   C o n t r o l s 30


This page is missing


Blank Page 30 - 17
30 C l u t c h   /   C o n t r o l s 9 4 4


This page is missing


30 - 18 Blank Page
9 4 4 C l u t c h   /   C o n t r o l s       30


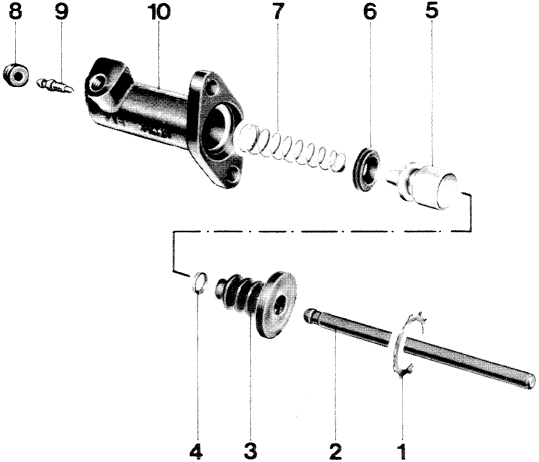
OVERHAULING CLUTCH SLAVE CYLINDER


Printed in Germany Overhauling Clutch Slave Cylinder       30 - 19
30 C l u t c h   /   C o n t r o l s 9 4 4


No. Description Qty. Note When: Special
Instructions
Removing Installing
1


2

3

4

5

6


7

8

9

10
Circlip


Push rod

Rubber cover

Retainer

Piston

Cup


Spring

Dust cap

Bleeder screw

Clutch slave
cylinder
1


1

1

1

1

1


1

1

1

1
Replace. curved
surface faces in.
Make sure of
perfect fit


Replace


Replace. apply
very thin coat of
brake cylinder
paste

Position correctly


Always clean
with alcohol. apply
very thin coat of
brake cylinder
paste in cylinder
bore


30 - 20 Overhauling Clutch Slave Cylinder Printed in Germany
9 4 4 T o r q u e   C o n v e r t e r       32


CHECKING TORQUE CONVERTER

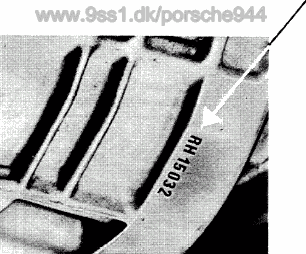
1.  Converter identification on lug:

K = USA/Japan


2.  Check hub of converter for signs of scoring
(arrow).


3.  Check free movement of turbine with the turbine
shaft inserted.
4.  Check bearing sleeve visually for damage.
measuring with an internat calipers if necessary.

Wear limit = max. 34.25 mm dia.
Out-of-round = max. 0.03 mm


N o t e :

The torque converter is a welded part and must be
replaced as a complete unit when damaged.


Printed in Germany - I, 1982
Checking Torque Converter
(Type 087 N)
      32 - 1
32 T o r q u e   C o n v e r t e r 9 4 4


DRAINING TORQUE CONVERTER

Drain the torque converter when ATF has abrasive
particles or for a general overhaul.


1.  Place converter at slight angle.


2.  Connect a suitable hose (max. outside dia. 8 mm
and small as possible inside diameter) on a plastic
suction bottle (2 liter /2 US qt capacity).


3.  Squeeze plastic bottle slightly and insert free end
of hose into converter hub until it touehes bottom.


N o t e :

Cut angle or notch end of hose before inserting, so
that ATF can flow into hose.
4.  . Release the bottle so that the vacuum effect will
draw in the ATF.


5. Unserew the cap slightly as soon as the ATF
runs to avoid pressure in the bottle.


32 - 2 Checking Torque Converter
(Type 087 N)
Printed in Germany
9 4 4 T o r q u e   C o n v e r t e r       32


INSTALLING TORQUE CONVERTER


1.  Make sure pump shaft is inserted fully in pump
spline.


       CORRECTWRONG


2.  Place converter on one-way clutch support care-
fully; not tilting the converter.


3. Engage converter in splines by turning back and
forth slightly.


N o t e :

The pump shaft has a tapered spline to make it
easier to engage the drive dog in the converter and
oil pump.


Printed in Germany - I, 1982
Checking Torque Converter
(Type 087 N)
      32 - 3
34 M a n u a l   T r a n s m i s s i o n / C o n t r o l s ,   C a s e 9 4 4


www.9ss1.dk/porsche944


34 - 0 Blank Page
9 4 4 M a n u a l   T r a n s m i s s i o n / C o n t r o l s ,   C a s e       34


REMOVING AND INSTALLlNG TRANSMISSION (TYPE 016 K)


R e m o v i n g


1. Remove catalytic converter together with muffler.

2.  Push back dust cover on selector rod, remove
locking wire on bolt and unscrew bolt.


3.  Remove holding clamp for shift lever knob and
take off knob.


4. Remove circlip on shift lever.
5.  Turn shift lever 180°. Push down on insulation
sheet and push selector rod forward in tunnel
cavity by about 300 mm (12 in.).


6.  Remove end cap on central tube housing and
push back selector rod far enough, that it is
outside of the central tube housing.
This requires pressing in the retainer on the
protective tube with a large screwdriver applied
through opening in central tube housing.


Printed in Germany
Removing and Installing Transmission
(Type 016 K)
      34 - 1
34 M a n u a l   T r a n s m i s s i o n / C o n t r o l s ,   C a s e 9 4 4


7.  Unscrew clamping sleeve bolts through openings
and push clamping sleeve in direction of
transmission.


8.  Detach axle shafts on transmission end and
suspend from car on wire in horizontal position.


9. Pull off wires on backup light switch.


10.  Place universal transmission jack underneath
the transmission and secure retaining strap.


11. Remove transmission/central tube housing
ounting bolts.


12. Remove bolts on transmission suspension
(rubber/metal mounts).


13.  Lower transmission with central tube until
central tube rests on rear axle cross tube.
Remove transmission from below.


I n s t a l l i n g


1.  Replace a selector rod protective tube if
retainer is deformed excessively.


2. Place selector rod protective tube in transmission
case. Tighten and bolt transmission. Tighten all
mounting bolts to specified torque (see page
30 - 08).


3. Push selector rod protective tube forward until
retainer engages in transmission case.


34 - 2 Removing and Installing Transmission (Type 016 K) Printed in Germany
9 4 4 M a n u a l   T r a n s m i s s i o n / C o n t r o l s ,   C a s e       34


4.  Mount selector rod on intermediate lever and
lock with steel wire.


Printed in Germany
Removing and Installing Transmission
(Type 016 J and 016 K)
      34 - 3
34 M a n u a l   T r a n s m i s s i o n / C o n t r o l s ,   C a s e 9 4 4


REMOVING AND INSTALLlNG TYPE 016 J AND 016 K TRANSMISSION
(SINCE 1985/2 MODELS)

R e m o v i n g

1.  Remove final muffler.

2. Unscrew joint shafts on transmission end
and suspend from car horizontally.

3. Pull off wires for backup light switch.


4. Pull off plug on speedometer drive.


5.  Push back dust cover on shift rod,
remove lock wire on bolt and unscrew bolt.


6.  Press leather cover for shift knob out
of center console carefully and push
up.


34 - 4 Removing and Installing Type 016 J and 016 K
Transmission (Since 1985/2 Models)
V, 1985 - Printed in Germany
9 4 4 M a n u a l   T r a n s m i s s i o n / C o n t r o l s ,   C a s e       34


7.  Remove mounting clamp for shift lever
knob and take off knob,


8.  Remove circlip on shift lever.


9. Turn shift lever 1800. Press down on
insulation sheet and push shift rod
forward into produced cavity by
about 300 mm.


10.  Unscrew clamping sleeve screws through
assembly openings and push clamping
sleeve toward transmission.


11.  Push back protective tube through large
opening in case far enough, that it is
outside of the central pipe housing.
Press in retainer with a large screwdriver
for this purpose.


12.  Hold transmission and central pipe in
installed position, placing proper size
wooden block between cross tube and
central pipe for this purpose.


13. Place universal transmission jack under-
neath the transmission and attach strap.


Printed in Germany - V, 1985
Removing and Installing Transmission
- Type 016 J and 016 K (Since 1985/2 Models)
      34 - 4 a
34 M a n u a l   T r a n s m i s s i o n / C o n t r o l s ,   C a s e 9 4 4


14.  Remove transmission suspension
mounting bolts.


15.  Remove transmission/central pipe
housing mounting bolts.

16. Pull back transmission and run out
downward carefully.

I n s t a l l i n g

1.  Install transmission with universal
transmission jack.


2.  Replace the shift rod protective tube
when retainers are deformed excessively.


3. Place shift rod protective tube in trans-
mission case. Run in transmission and
bolt. Tighten all mounting bolts to
specified torque (see page 30 - 08/09).


4. Push shift rod protective tube forward
until retainer engages in transmission
case.


5.  Mount shift rod on intermediate lever
and lock clamping bolt with steel wire.


34 - 4 b Removing and Installing Transmission
- Type 016 J and 016 K (Since 1985/2 Models)
Printed in Germany
9 4 4 M a n u a l   T r a n s m i s s i o n / C o n t r o l s ,   C a s e       34


ADJUSTlNG SHIFT LINKAGE


1.  Adjust shift lever to an inclination of 85° by
moving the shift lever console. Shift lever should
be in neutral for this adjustment.


2.  Shift lever in neutral. In this position a spring will
hold the lateral selector shaft I in the center shift
plane (3rd and 4th gear). When shift was adjusted
correctly, shift lever will not have lateral inclination.
Adjustments are made on intermediate shift lever
for joint rod.


Printed in Germany
Adjusting Shift Linkage
      34 - 5
34 M a n u a l   T r a n s m i s s i o n / C o n t r o l s ,   C a s e 9 4 4


www.9ss1.dk/porsche944


34 - 6 Blank Page
9 4 4 M a n u a l   T r a n s m i s s i o n / C o n t r o l s ,   C a s e       34


CHECKING OIL LEVEL - REPLACING MANUAL TRANSMISSION OIL


Capacity: Approx. 2 l hypoid transmission oil
SAE 75 W 90 to APl Class GL or MIL-L 2105
B, or SAE 80 to API Class GL 4 or MIL-L 2105.

1.  Clean outside of filler and drain plugs,
and unscrew.


1 - Drain plug
2 - Filler plug

2.  Drain transmission oil of a car parked
on level ground or floor and transmis-
sion having operating temperature.

3. Clean filler and drain plugs, and torque
to 24 Nm.

4. Pour in transmission oil with car parked
on level surface.
Note

The fluid level in the transmission housings
used in production is approx. 6 to 8 mm
below the filler neck when 2 liters of trans-
mission oil have been filled in.


Printed in Germany - XXIV, 1991
Checking Oil Level - Replacing Transmission Oil
      34 - 7
34 M a n u a l   T r a n s m i s s i o n / C o n t r o l s ,   C a s e 9 4 4


34 - 8 Blank Page
9 4 4 M a n u a l   T r a n s m i s s i o n / C o n t r o l s ,   C a s e       34


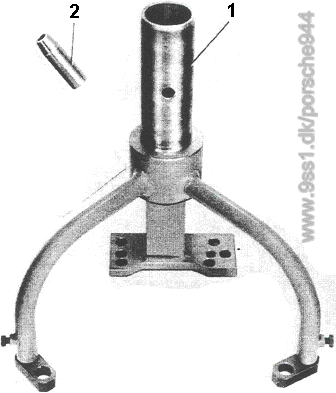
TOOLS


No. Description Special Tool Remarks
1

2
Assembly stand

Assembly sleeve
VW 540

9178


Printed in Germany
Removing and Installing Gear Carrier (Type 016 K)
      34 - 9
34 M a n u a l   T r a n s m i s s i o n / C o n t r o l s ,   C a s e 9 4 4


34 - 10 Removing and Installing Gear Carrier (Type 016 K) Printed in Germany
9 4 4 M a n u a l   T r a n s m i s s i o n / C o n t r o l s ,   C a s e       34


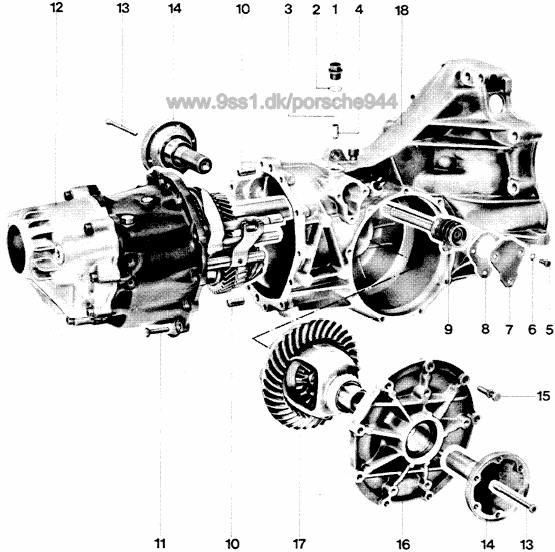
 No.
Description
 Qty. Note When:
Special
Instructions

Removing

Installing
1


2

3

4

5


6

7

8

9


10

11


12


13


14

15


16


17
Threaded sleeve


Gasket

Spring

Sleeve

Bolt


Washer

Cover

Gasket

Selector shaft
assembly

Dowel sleeve

Bolt


Gear carrier
assembly


Bolt


Flange shaft

Bolt with washer


Cover


Differential
1


1

1

1

3


3

1

1

1


2

12


1


2


2

9


1


1


Remove trans-
mission before
removing
Torque: 30 Nm
(22 ft lb)


Torque: 6 to 10 Nm
(4 to 7 ft lb)


Replace


Torque: 24 Nm
(17 ft lb)

Coat sealing
surface with
original VW D 3
sealing compound

Torque: 25 Nm
(18 ft lb)


Torque: 25 Nm
(18 ft lb)

Position correctly -
magnet faces
down

Light oil coat for
tapered roller
bearings and
pinion teeth


Printed in Germany
Removing and Installing Gear Carrier (Type 016 K)
      34 - 11
34 M a n u a l   T r a n s m i s s i o n / C o n t r o l s ,   C a s e 9 4 4


 No.
Description
 Qty. Note When:
Special
Instructions

Removing

Installing
18 Transmission case 1 If transmission case
has to be replaced
and deviation
"r" is not on ring
gear, check location
of drive pinion
before removing
gear carrier
(actual distance)


34 - 12 Removing and Installing Gear Carrier (Type 016 K) Printed in Germany
9 4 4 M a n u a l   T r a n s m i s s i o n / C o n t r o l s ,   C a s e       34


REMOVING AND INSTALLING GEAR CARRIER


R e m o v i n g


N o t e

The differential need not be removed for jobs on the
gear carrier.

If the transmission case or tapered roller bearing for
the drive pinion has to be replaced and deviation "r"
is not given on the ring gear, measure actual location
of drive pinion befare removing the gear carrier.


1.  Clamp transmission in assembly stand with
Special Tool VW 540 and drain oil.


2.  Remove threaded sleeve and locking parts for
reverse gear lock.

3. Unscrew selector lever bolts and remove complete
selector shaft (do not disassembly).

4. Drive back dowel sleeves on gear carrier.

5. Slide Special Tool 9178 on spline of input shaft.
6.  Unscrew gear carrier bolts and pull out gear
carrier with set of gears.


I n s t a l l i n g


N o t e

It is recommended to install input shaft seal after
installation of gear set (danger of damaging).


1.  Give gear carrier/transmission case sealing surface
a thin coat of original VW D 3 sealing compound.
Slide Special Tool 9178 on spline of input shaft
and install gear carrier with set of gears in
transmission case.


2. Drive in dowel sleeves and tighten mounting
bolts to specified torque.


3. Check by shifting through all gears with Special
Tool 9155.


Printed in Germany
Removing and Installing Gear Carrier (Type 016 K)
      34 - 13
34 M a n u a l   T r a n s m i s s i o n / C o n t r o l s ,   C a s e 9 4 4


34 - 14 Blank Page
9 4 4 M a n u a l   T r a n s m i s s i o n / C o n t r o l s ,   C a s e       34


Printed in Germany
Disassembling and Assembling Gear Carrier (Type 016 K)
      34 - 15
34 M a n u a l   T r a n s m i s s i o n / C o n t r o l s ,   C a s e 9 4 4


 No.
Description
 Qty. Note When:
Special
Instructions

Removing

Installing
1


2


3

4

5

6


7


8

9


10


11

12

13

14


15


16


17


18
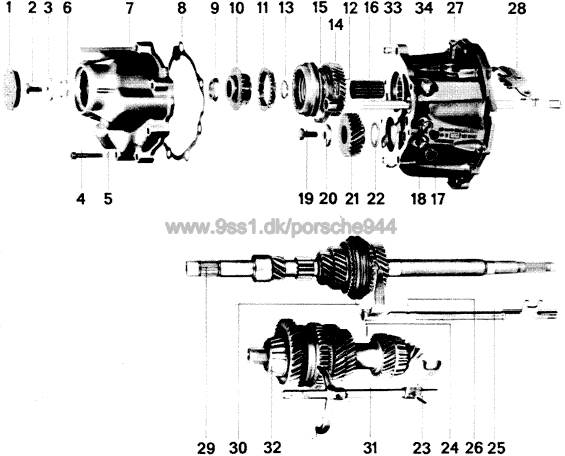
End cover


Bolt 10 x 22 *


Washer

Bolt 8 x 45

Washer

Ball bearing inner
race

Rear cover


Gasket

Ball bearing inner
race


Clutch body for
5th gear

Synchromesh ring

Dowel sleeve

Circlip

5th gear with
sliding sleeve and
synchronizer


5th gear selector
fork


Needle bearing


Stop bolt


Seal
1


1


1

7

7

1


1


1

1


1


1

1

1

1


1


1


2


2
Insert a large
screwdriver into
center of rubber
cover and pry out


Drive off with a
plastic hammer


Pull off with a
two-arm puller
Replace


Torque:  70 Nm
(51 ft lb)


Torque:  25 Nm
(18 ft lb)


Replace

Heat to about
120 °C (250 °F)
and drive on


Check for wear


Slide on sliding
sleeve with short
collar facing
gear

Only available
with selector rod
for 5th gear

Install with gear
lube

Torque:  30 Nm
(22 ft lb)

0.2 mm thick,
replace


34 - 16 Disassembling and Assembling Gear Carrier (Type 016 K) Printed in Germany - XVII, 1988
9 4 4 M a n u a l   T r a n s m i s s i o n / C o n t r o l s ,   C a s e       34


 No.
Description
 Qty. Note When:
Special
Instructions

Removing

Installing
19


20

21


22


23

24

25


26


27


28


29


30


31


32

33

34
Bolt 10 x 22 *


Washer

5th gear


Adjusting screw


Dowel sleeve

Dowel sleeve

Selector rod for 3rd
and 4th gear

Small lock pin


Bolt for operating
lever


Operating lever


Input shaft


Selector fork for
3rd and 4th gear

Selector rod and
selector fork for 1st
and 2nd gear

Drive pinion

Dowel sleeve

Gear carrier

1


1

1


1


1

1

1


1


1


1


1


1


1


1

2

1


Pull off with a
two-arm puller


Note thickness


Do not loose small
lock pin
Torque:  70 Nm
(51 ft lb)


Heat to about
120 °C (250 °F)
and install

If necessary,
determine new
thickness


Insert in selector
rod with a linie
grease

Adjust operating
lever and torque
bolt to 35 Nm
(25 h tb)

Adjust before
installing shafts

Press roller bearing
inner race off of
input shaft before
installing


Determine new shim
thickness when
replacing
 
   * Screws are microencapsulated. Must only be used once.


Printed in Germany - XVII, 1988
Disassembling and Assembling Gear Carrier (Type 016 K)
      34 - 17
34 M a n u a l   T r a n s m i s s i o n / C o n t r o l s ,   C a s e 9 4 4


DISASSEMBLING AND ASSEMBLING GEAR CARRIER


D i s a s s e m b l i n g


1.  Remove end cover by puncturing center of rubber
with a large screwdriver and prying off cover.


2. Clamp input shaft in a vise and unscrew input
shaft bolt. Fit vise with soft jaws!


3.  Clamp gear carrier in vise and unscrew rear
cover mounting bolts.


4.  Drive off rear cover with a plastic hammer and
remove 1st inner race/ball bearing (A).


34 - 18 Disassembling and Assembling Gear Carrier (Type 016 K) Printed in Germany
9 4 4 M a n u a l   T r a n s m i s s i o n / C o n t r o l s ,   C a s e       34


5.  Pull off clutch body and 2nd inner race/ball
bearing.


A -  Two-arm puller (standard),
e. g. Kukko 20/10


6. Remove 5th gear synchromesh ring.


7.  Drive out 5th gear selector fork dowel sleeve.
Hold with a hammer so that selector rod bore
in end bracket is not widened.


8. Remove circlip for synchronizer.


9.  Remove 5th gear with sliding sleeve and
synchronizer, needle bearing and 5th
gear selector fork.
Selector rod remains in gear carrier!


Printed in Germany
Disassembling and Assembling Gear Carrier (Type 016 K)
      34 - 19
34 M a n u a l   T r a n s m i s s i o n / C o n t r o l s ,   C a s e 9 4 4


10. Unscrew stop bolts for selector rods.


11.  Clamp 4th gear/drive pinion in a vise and
unscrew bolt for drive pinion.
Make sure vise is fitted with soft jaws!


12. Pull off 5th gear.


A -  Two-arm puller (standard)
e. g. Kukko 20/10, if necessary grind off
claws slightly or pry away gear slightly
with two tire irons.


13. Remove shim for 5th gear.


14. Clamp gear carrier with shafts forward in vise.


15.  Drive out dowel sleeve for dog on 1 st and 2nd
gear selector rod, while holding with a hammer.
Turn dog to face up.


16.  Drive out dowel sleeve for 3rd and 4th gear
selector fork, while holding with a hammer.


34 - 20 Disassembling and Assembling Gear Carrier (Type 016 K) Printed in Germany
9 4 4 M a n u a l   T r a n s m i s s i o n / C o n t r o l s ,   C a s e       34


17.  Pull out selector rod for 3rd and 4th gears
(selector fork remains in sliding sleeve).
Do not loose small lock pin!


18. Unscrew bolt for operating lever.


19. Pull drive pinion and input shaft forward
slightly. Remove input shaft with 3rd and
4th gear selector fork.

N o t e: For transmissions with reverse gear syn-
chronization disconnect spring clamp for reverse
gear on pinion shaft end and turn aside.


20.  Pull drive pinion forward far enough so that
selector rod and selector fork for 1st and
2nd gears can be removed.


21. Swing out drive pinion.


A s s e m b l i n g


1. Position lock pin in bore correctly.


2.  Insert springs and sleeves for gear interlock
(1st through 4th gears).


Printed in Germany - I, 1982
Disassembling and Assembling Gear Carrier (Type 016 K)
      34 - 21
34 M a n u a l   T r a n s m i s s i o n / C o n t r o l s ,   C a s e 9 4 4


3. Adjust operating lever (see page 34 - 35).

4.  Swing in drive pinjon, engaging reverse gear for
this purpose.


5.  Insert selector fork and selector rod for 1st and
2nd gears, and push in drive pinion fully.
6.  Slide in 3rd and 4th gear selector fork positioned
correctly on selector rod for 5th and reverse
gears.


7. Install input shaft, insert 3rd and 4th gear
selector fork in sliding sleeve and push in
input shaft completely.


N o t e

Press roller bearing inner race off of input shaft to
make installation easier.


8.  Adjust selector rods to neutral position and
make sure rocks are positioned correctly
(see page 34.36).


9. Slide in 3rd and 4th gear selector rod with
small lock (held in position with grease).


10. Lock 3rd and 4th gear selector fork on selector
rod with a pin, holding with a hammer.


34 - 22 Disassembling and Assembling Gear Carrier (Type 016 K) Printed in Germany
9 4 4 M a n u a l   T r a n s m i s s i o n / C o n t r o l s ,   C a s e       34


11.  Lock dog for 1st and 2nd gear selector rod on
selector rod with a pin, while holding with a
hammer.


12.  Instalt stop bolts with new seals and tighten to
specified torque.


13. Clamp 4th gear/drive pinion in a vise.


14. Determine thickness of shim for 5th gear.

Measure distance "a" with a depth gauge and
refer to foltowing table for thickness and part
number of shim.


Distance "a"
(mm)
Shim
Thickness (mm) Part Number    
8.35 . . . 8.64
8.65 . . . 8.94
8.95 . . . 9.24
9.25 . . . 9.54
9.55 . . . 9.84
1.1
1.4
1.7
2.0
2.3
016 311 391
016 311 391 A
016 311 391 B
016 311 391 C
016 311 391 D


15.  Heat 5th gear/drive pinion to about 120 °C
and install gear with collar facing drive pinion.
If necessary, knock on against stop with a
suitable mandrel.


16.  Tighten bolt for drive pinion to specified
torque.


Printed in Germany
Disassembling and Assembling Gearbox
(Type 016 J and 016 K)
      34 - 23
34 M a n u a l   T r a n s m i s s i o n / C o n t r o l s ,   C a s e 9 4 4


17.  Clamp input shaft in a vise that shafts are
vertical.

18. Lubricate cylindrical rollers of input
shaft bearing with a little grease and
press outward.

19. Center input shaft in bearing and slide
on inner race of cylindrical roller
bearing.


20.  Determine thickness of circlip for
cylindrical roller bearing inner race.
Use and install the thickest possible
circlip. Axial play may be max.
0.05 mm.

The following circlips are available.

Part Number     Thickness (mm)
N 900.606.01
N 900.606.02
N 900.606.03
1.35
1.40
1.45


21.  Mount 5th gear with synchronizer and
sliding sleeve, needle bearing and
selector fork. Lock selector fork on
selector rod with a pin, holding with
a hammer.


22. Insert circlip for synchronizer.

23. Insert 5th gear synchromesh ring.


34 - 24 Disassembling and Assembling Gearbox
(Type 016 J and 016 K)
V, 1985 - Printed in Germany
9 4 4 M a n u a l   T r a n s m i s s i o n / C o n t r o l s ,   C a s e       34


24.  Heat clutch to about 120 °c (250 °F) and
mount, driving it on against stop with a
suitable pjece of pipe if necessary.


25.  Heat 2nd ball bearing inner race to about
120 °C (250 °F) and install.


26. Install dowel sleeves, position gasket and mount
rear cover.


27. Heat 1st ball bearing inner race to about 120 °C
(250 °F) and install.


28. Tighten bolt for input shaft to specified torque.


29. Tighten cover/gear carrier bolts to specified
torque.


30 Press in new end cover.


Printed in Germany
Disassembling and Assembling Gear Carrier (Type 016 K)
      34 - 25
34 M a n u a l   T r a n s m i s s i o n / C o n t r o l s ,   C a s e 9 4 4


34 - 26 Blank Page
9 4 4 M a n u a l   T r a n s m i s s i o n / C o n t r o l s ,   C a s e       34


Printed in Germany
Disassembling and Assembling Rear Cover (Type 016 K)
      34 - 27
34 M a n u a l   T r a n s m i s s i o n / C o n t r o l s ,   C a s e 9 4 4


 No.
Description
 Qty. Note When:
Special
Instructions

Removing

Installing
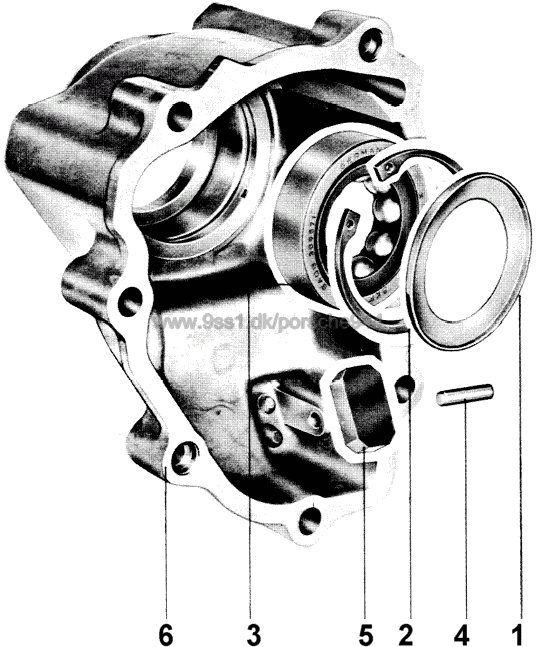
1


2

3


4

5

6
Baffle plate


Circlip

Ball bearing


Cylindrical pin

Magnet

Cover


1


1

1


1

1

1
Drive out with a
suitable mandrel


Press out with inner
race
Punch lock at three
points


Press in with
30-205


DISASSEMBLING AND ASSEMBLING REAR COVER


D i s a s s e m b l i n g


1.  Drive out baffle plate with a suitable mandrel
and remove circlip.


2. Press out ball bearing, inserting inner race of ball
bearing for this purpose.


A - Inner race of ball bearing


34 - 28 Disassembling and Assembling Rear Cover (Type 016 K) Printed in Germany
9 4 4 M a n u a l   T r a n s m i s s i o n / C o n t r o l s ,   C a s e       34


A s s e m b l i n g

1.  Press in hall bearing against stop with a
suitable pressing tool (e. g. 30-205).


2.  Insert circlip in groove. Press in baffle plate and
punch at three points to lock.


Printed in Germany
Disassembling and Assembling Rear Cover (Type 016 K)
      34 - 29
34 M a n u a l   T r a n s m i s s i o n / C o n t r o l s ,   C a s e 9 4 4


34 - 30 Blank Page
9 4 4 M a n u a l   T r a n s m i s s i o n / C o n t r o l s ,   C a s e       34


TOOLS


No. Description Special Tool Remarks
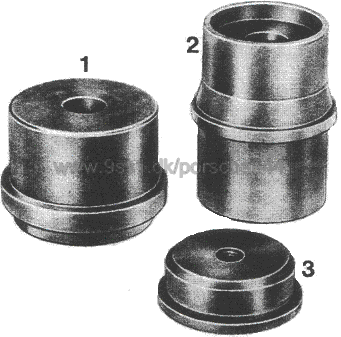
1

2

3
Pressing tool

Pressing tool

Pressing tool
VW 472

VW 473

P 254 b


Printed in Germany
Disassembling and Assembling End Bracket
(Type 016 J and 016 K)
      34 - 31
34 M a n u a l   T r a n s m i s s i o n / C o n t r o l s ,   C a s e 9 4 4


34 - 32 Disassembling and Assembling End Bracket
(Type 016 J and 016 K)
VII, 1986 - Printed in Germany
9 4 4 M a n u a l   T r a n s m i s s i o n / C o n t r o l s ,   C a s e       34


 No.
Description
 Qty. Note When:
Special
Instructions

Removing

Installing
1


2

3

4

5

6

7

8

9

10

11


12

13

14

15

16

17


18

19

20
  1


1

1

1

1

2

2

2

2

2

1


1

1

1

1

1

1


1

1

1
  Only available as
complete spare
part

Torque: 30 Nm

Replace


Torque: 30 Nm


Adjust operating
lever and torque
bolt to 35 Nm

Adjust


Torque: 24 Nm


Connect single
angled end in
recess of synchro-
mesh ring. Turn
double angled
end to left and
eonnect in end
bracket through
opening.


Since Aug.
1984 bolt
with collar,
spacer
omitted


Printed in Germany - XXIV, 1991
Disassembling and Assembling End Bracket
(Type 016 J and 016 K)
      34 - 33
34 Manual Transmission/Operation Housing 9 4 4


 No.
Description
 Qty. Note When:
Special
Instructions

Removing

Installing
21*

22

23


24


25


26
Synchromesh ring

Reverse gear

Cylinder roller
bearing, outer
race

Tapered roller
bearing, outer
race


Shim S4


End plate
1

1

1


1


X


1


Press out
with 254 b


Press out
suitable
pipe section
(e.g. VW 473)

Note thick-
ness for re-
installing
Check for wear


Press in to
correct position
with 254 b

Press in with
VW 472


Determine new
thickness if
necessary

If replaced,
determine new
thickness for
shim S4
 
*Install in correct position.    Flattened side must face gear set.

INSTRUCTIONS FOR DISASSEMBLY AND ASSEMBLY

D i s a s s e m b l y

1.  Press out cylindrical roller
bearing outer race with P 254b.

2.  Press out tapered roller
bearing outer race with
suitable pipe section
(e.g. VW 473).


34 - 34 Disassembling and Assembling
End Plate (Type 016 J and 016 K)
VII, 1986 - Printed in Germany
9 4 4 M a n u a l   T r a n s m i s s i o n / C o n t r o l s ,   C a s e       34


A s s e m b l i n g


1.  Press in cylindrical roller bearing outer race to
correct position with P 254 b.

Pressed depth a = 8.5 to 9.0 mm.


2.  Press in tapered roller bearing outer race with
VW 472.

3.  Check synchromesh ring.
Press synchromesh ring on cone of gear and
measure clearance "a" with a feeler gage blade.

Clearance "a" New Installed
Distance
Wear
Limit
Reverse gear 0.75 - 2.3 mm 0.2mm


4. Adjust operating lever.

Insert reverse gear lock.

Insert selector rod for 5th and reverse gears as
well as operating lever in correct position.

Press operating lever in direction of arrow until
it rests on selector rod and dog of gear.


Screw in adjusting screw against stop on threaded
sleeve.


Printed in Germany - I, 1982
Disassembling and Assembling Gear Carrier Housing
(Type 016 K)
      34 - 35
34 M a n u a l   T r a n s m i s s i o n / C o n t r o l s ,   C a s e 9 4 4


Press operating lever against bolt and loosen bolt
until beginning of threads is heard to mesh in
threaded sleeve (loosen at least 1/4 turn).


Screw in bolt and tighten to specified torque.

Engage reverse gear several times and check that all
points of reversing mechanism mave easily.


N o t e:

Operating lever has been adjusted correctly when it
is centered exactly above bushing for reverse gear
lock.


5. Installed position of locks and 5th gear detent.


6.  Installed position of gear detents (1st. . .4th
gears).


7. Installed position of reverse gear detent.


34 - 36 Disassembling and Assembling Gear Carrier Housing
(Type 016 K)
Printed in Germany
9 4 4 M a n u a l   T r a n s m i s s i o n / C o n t r o l s ,   C a s e       34


D e t e r m i n i n g   T h i c k n e s s   o f   S h i m
" S4 "


This procedure will be necessary after replacing the
gear carrier housing. It provides preload for the drive
pinion's tape red roller bearings.


Measure case depth "a" of old and new gear carrier
housing and determine difference.


Example:

Old gear carrier housing
depth "a"
= 119.10 mm
New gear carrier housing
depth "a"
= 119.35 mm
Difference 0.25 mm

New gear carrier housing is deeper =
install thicker shim S4.

Old gear carrier housing is deeper =
install thinner shim S4.


Example:

Old shim =   0.95 mm
+ difference =   0.25 mm
New shim S4 =   1 .20 mm
Shims available as spare parts:


Thickness (mm)
0.24
0.27
0.30
0.33
0.36
0.39
0.42
0.45
0.69
0.93
1.17
1.4


Printed in Germany - XVII, 1988
Disassembling and Assembling Gear Carrier Housing
(Type 016 K)
      34 - 37
34 M a n u a l   T r a n s m i s s i o n / C o n t r o l s ,   C a s e 9 4 4


34 - 38 Blank Page
9 4 4 M a n u a l   T r a n s m i s s i o n / C o n t r o l s ,   C a s e       34


TOOLS


No. Description Special Tool Remarks
1

2

3

4

5

6

7

8

9

10

11

12
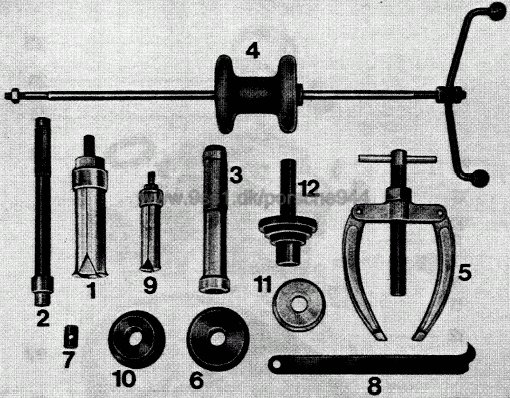
Internal puller 46 - 56 mm

Mandrel

Mandrel

Slide hammer

Spindle

Thrust pad

Threaded sleeve

Puller

Intenal puller 30 - 37 mm

Thrust pad

Thrust pad

Mandrel
US 1037

VW 295

VW 30 - 21

VW 171

US 1039

VW 2050

VW 771/15

VW 681

US 1108

VW 511

VW 30 - 205

VW 2062
Standard. e. g. Kukko 21/7


Standard, e. g. Kukko 22/2


Standard. e. g. Kukko 21/5


Printed in Germany
Disassembling and Assembling Transmissions Case
      34 - 39
34 M a n u a l   T r a n s m i s s i o n / C o n t r o l s ,   C a s e 9 4 4


34 - 40 Disassembling and Assembling Transmission Case
(Type 016 J and 016 K)
V, 1985 - Printed in Germany
9 4 4 M a n u a l   T r a n s m i s s i o n / C o n t r o l s ,   C a s e       34


 No.
Description
 Qty. Note When:
Special
Instructions

Removing

Installing
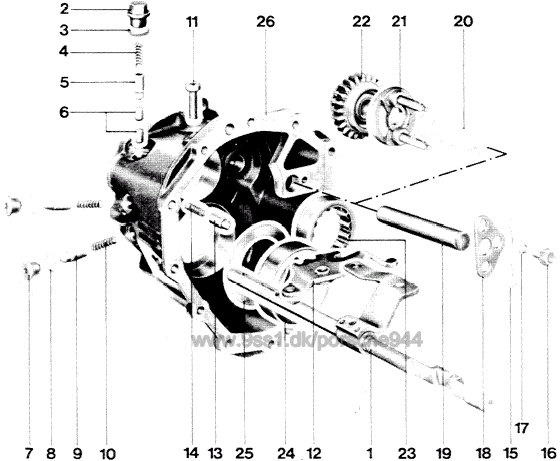
1

2


3


4

5

6


7

8

9

10

11

12

13


14
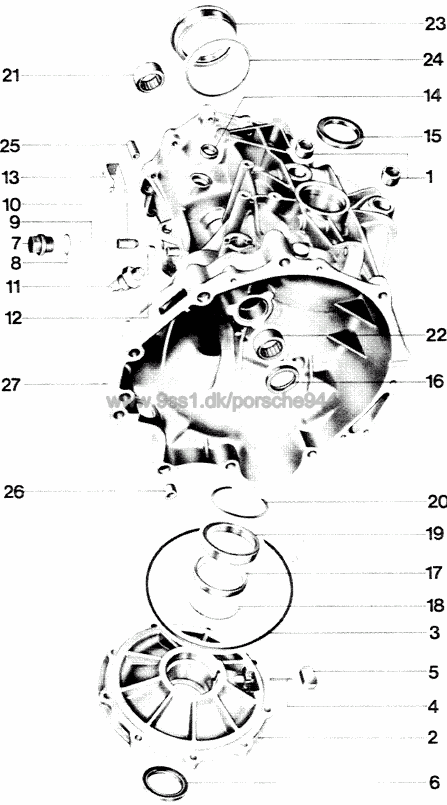
Plug

Final drive cover


Seal


Clamping sleeve

Magnet

Seal


Threaded sleeve

Gasket

Spring

Bushing

Backup light switch

Cap

Deflector


Seal
2

1


1


1

1

1


1

1

1

1

1

1

1


1


Pult out with
VW 681


Pult off

Press down retainer
with a smalt screw-
driver applied in
vent pipe and pull
out deflector.

Pult out with
VW 681.
Torque: 25 Nm

Adjust after re-
placing gear ring

Replace, give a
light coat of oil


Clean

Drive in to stop
with VW 2062.
Pack space betw.
sealing tips with
multi-purpose
grease.

Torque: 30 Nm

Replace


Torque: 30 Nm


Engage retainer
in pipe of vent.


Replace; pack
space between
sealing tips with
multi-purpose
grease.


Page 34 - 43


Printed in Germany - V, 1985
Disassembling and Assembling Transmission Case
(Type 016 J and 016 K)
      34 - 41
34 M a n u a l   T r a n s m i s s i o n / C o n t r o l s ,   C a s e 9 4 4


 No.
Description
 Qty. Note When:
Special
Instructions

Removing

Installing
15


16


17


18


19


20


21


22
Seal


Seal


Tapered roller bearing
outer race

Shim S2


Tapered roller bearing
outer race


Shim S1


Needle bearing


Needle bearing
1


1


1


X


1


X


1


1
Pull out with
VW 681


Pull out with
VW 681


Pull out with
internal puller

Note thickness for
installation later

Pull out with
internal puller

Note thickness for
installation later


Drive out with
VW 771


Drive out with
VW 771
Drive in to stop
with VW 2062.
Pack space betw.
sealing lips with
multi-purpose
grease.

Give sealing lip a
light coat of oil
drive into case to
depth of 1.5 mm
with a suitable
pipe. First install
gear set to avoid
damaging seal.

Press in with
VW 30-205

Determine new
thickness if
necessary

Drive in with
VW511 and
VW 295

Determine new
thickness if
necessary

Do not mix up
with needle
bearing no. 23.
Drive in flush
with VW 30-21.

Do not mix up
with needle
bearing no. 21.
Drive in to stop
with VW 30-21.


34 - 42 Disassembling and Assembling Transmission Case
(Type 016 J and 016 K)
Printed in Germany
9 4 4 M a n u a l   T r a n s m i s s i o n / C o n t r o l s ,   C a s e       34


 No.
Description
 Qty. Note When:
Special
Instructions

Removing

Installing
23


24


25

26

27
Tapered roller bearing
outer race


Shim S3


Dowel sleeve

Dowel sleeve

Transmission case
1


1


2

2

1
When replacing,
measure installed
position (actual
distance) of drive
pinion befare
removing. Drive
out with VW 2050
and VW 771.

Note thickness for
installation later


When replacing,
measure installed
position (actual
distance) of drive
pinion befare
disassembling.


Heat case and
press in with
VW 2050 and
VW 295.


Determine new
thickness if
necessary


N o t e

The seal (No. 3) and its groove in the cover have been omitted since June, 1984.
Sealing is now accomplished with Loctite No. 573 or 574.


Printed in Germany - V, 1985
Disassembling and Assembling Transmission Case
(Type 016 J and 016 K)
      34 - 43
34 M a n u a l   T r a n s m i s s i o n / C o n t r o l s ,   C a s e 9 4 4


DISASSEMBLING AND ASSEMBLING TRANSMISSION CASE


D i s a s s e m b l i n g


1.  Pull out seal for flange shaft with Special Tool
VW 681.


2.  Pull out seal for selector shaft with Special Tool
VW 681.


3.  Pull out seal for input shaft with Special Tool
VW 681.


4.  Remove front needle bearing for input shaft
with an internal claw puller, e. g. Kukko 21/5,
Special Tool VW 771 and Special Tool
VW 771/15.


A = Internal claw puller


34 - 44 Disassembling and Assembling Transmission Case
(Type 016 J and 016 K)
Printed in Germany
9 4 4 M a n u a l   T r a n s m i s s i o n / C o n t r o l s ,   C a s e       34


5.  Remove rear needle bearing for input shaft with
an internal claw puller, e. g. Kukko 21/5.
Special Tool VW 771 and Special Tool VW 771/15.


A - Internal claw puller


6.  Drive out tapered roller bearing outer race for
drive pinion with Special Tools VW 2050 and
VW 771.


N o t e

Heat case for removal of outer race, since tapered
roller bearing outer race has a tight press-fit in the
case.


7.  Pult out outer race for smalt tapered roller
bearing. Use a 46 to 56 mm internal claw puller
and spindle for this step.


8.  Pult out outer race of large tapered roller
bearing with a 46 to 56 mm internat claw puller
and spindle.


A s s e m b l i n g


N o t e

It is essential to heat the transmission case
thoroughly prior to installation of the outer race,
since the tapered roller bearing outer race for the
drive pinion must be installed in the case with a
very tight press-fit. In order to be able to install
the outer race without problems, case temperature
must be at least 150 °C (300 °F). Temperatures
up to 180 °C (350 ° F) will not damage the case.
Heat from hot water stream or washing machine
will not be sufficient.


Printed in Germany
Disassembling and Assembling Transmission Case
(Type 016 K)
      34 - 45
34 M a n u a l   T r a n s m i s s i o n / C o n t r o l s ,   C a s e 9 4 4


1.  Install tapered roller bearing outer race for drive
pinion in the heated case. Always work with a
press to avoid tilted.
Use Special Tools VW 2050 and VW 295. Hold
preload under press about 2 more minutes until
heat has been transferred.


2.  Drive in rear needle bearing for input shaft
flush. Use Special Tool VW 30 - 21.


3.  Drive in front needle bearing for input shaft
against stop. Use Special Tool VW 30 - 21.


Installed position: lettering on needle bearing
faces special tool.


N o t e

Do not mix up needle bearings for input shaft,
since they differ in outside diameter and number
af needles.


4.  Press in outer race for large tapered roller
bearing. Use Special Tools VW 511 and VW 295.


34 - 46 Disassembling and Assembling Transmission Case
(Type 016 K)
Printed in Germany
9 4 4 M a n u a l   T r a n s m i s s i o n / C o n t r o l s ,   C a s e       34


5.  Press in outer race for small tapered roller
bearing (in side cover). It is recommended to
heat to cover. Use Special Tools VW 30 - 205
and VW 295.


6.  Drive in seal for flange shaft against stop with
Special Tool VW 2062.


N o t e

It is recommended to install the seals for flange
shafts only after installation of the differential
to avoid damage.


7.  Drive in seal for selector shaft against stop with
a suitable mandrel (e. g. VW 423).


Printed in Germany
Disassembling and Assembling Transmission Case
(Type 016 K)
      34 - 47
35 M a n u a l   T r a n s m i s s i o n / G e a r s,   S h a f t s 9 4 4


Web code by Anders Nissen, Denmark


35 - 00 Blank Page
9 4 4 M a n u a l   T r a n s m i s s i o n / G e a r s   a n d   S h a f t s       35


TOOLS


No. Description Special Tool Remarks
1

2

3

4

5

Circlip pliers

Feeler blade gauge

Press plate

Pipe

Separator
VW 161 a


VW 401

VW 519

US 1103


Standard


e. g. Kukko 15 - 17 Gr. 1


Printed in Germany
Disassembling and Assembling Input Shaft
(Type 016 K)
      35 - 1
35 M a n u a l   T r a n s m i s s i o n / G e a r s   a n d   S h a f t s 9 4 4


35 - 2 Disassembling and Assembling Input Shaft
(Type 016 K)
Printed in Germany
9 4 4 M a n u a l   T r a n s m i s s i o n / G e a r s   a n d   S h a f t s       35


 No.
Description
 Qty. Note When:
Special
Instructions

Removing

Installing
1

2
3
4

5


6

7


7a
7b
7c
7d
8


9


10

11


12


13
Circlip

Thrust ring *
Fourth gear
Needle bearing

Synchromesh ring
for 4th gear


Circlip

Synchronizer with
sliding sleeve for
3rd and 4th gears

Sliding sleeve
Synchonizer
Spring
Lock
Synchromesh ring
for 3rd gear


Third gear


Needle bearing

Circlip


Inner race


Input shaft
1

1
1
1

1


1

1


1
1
2
3
1


1


1

1


1


1


Press off with
3rd gear
Determine new
thickness

Adjust axial play
Lubricate with
gear lube
Spray molybde-
num on friction
surface. Check
for wear.

Determine new
thickness
Position correctly
Check axial play


Position correctly

Spray molybde-
num on friction
surface. Check
for wear.
Check axial play
betw. 2nd and
3rd gears
Lubricate with
gear tube
Measure and in-
stall only after
installing input
shaft and inner
race.
Install only after
installing input
shaft
 

Since September, 1983 the thrust ring (No. 2) has been omitted. The circlip (No. 1) and
recess in the input shaft were also changed.
Old and new parts or vice versa may not be installed with each other for repairs.
Adjusting the axial play on the fourth gear has been omitted.


Printed in Germany - V, 1985
Disassembling and Assembling Input Shaft
(Type 016 J and 016 K)
      35 - 3
35 M a n u a l   T r a n s m i s s i o n / G e a r s   a n d   S h a f t s 9 4 4


DISASSEMBLING AND ASSEMBLING INPUT SHAFT


D i s a s s e m b l i n g


1.  Press off sliding sleeve/synchronizer
with third gear.


A s s e m b l i n g


1.  Assemble sliding sleeve and synchronizer
for 3rd and 4th gears. It is not necessary
to have a pair in a certain position, how-
ever, groove in synchronizer or wide
collar of hub must face 4th gear.


2.  Mount springs with 120° offset.
Angled end of spring must engage in
hollow lock.


35 - 4 Disassembling and Assembling Input Shaft
(Type 016 J and 016 K)
V, 1985 - Printed in Germany
9 4 4 M a n u a l   T r a n s m i s s i o n / G e a r s   a n d   S h a f t s       35


3.  Press on sliding sleeve with synchronizer body
in correct position, turning synchromesh ring
so that grooves are aligned with locks.


N o t e

Groove in synchronizer body or wide collar of
hub faces 4th gear.


4.  Measure axial play of synchronizer body with
a feeler gauge blade and adjust by selecting a
pertinent circlip. It should be between 0 and
0.05 mm, whereby the lower value would be
ideal.


Circlips available:

Part Number Thickness (mm)
088 311 317
088 311 317 B
088 311 317 C
1.50
1.56
1.62


5.  Measure play between 2nd and 3rd gears.
Nominal value: 0.1 to 0.35 mm.
If this tolerance cannot be reached, recheck
adjustment of synchronizer.


Printed in Germany
Disassembling and Assembling Input Shaft
(Type 016 K)
      35 - 5
35 M a n u a l   T r a n s m i s s i o n / G e a r s   a n d   S h a f t s 9 4 4


6.  Measure axial play on 4th gear with a feeler gauge
blade and adjust with a pertinent circlip. Play
should be between 0.20 and 0.35 mm, whereby
lower value would be ideal.


Circlips available:

Part Number Thickness (mm)
088 311 287
088 311 287 A
088 311 287 B
1.65
1.70
1.75
C h e c k i n g   S y n c h r o n i z e r   R i n g s


1. Clean synchronizer rings and gears.


2.  Press dried synchronizer rings on tapers of gears
and measure clearance "a" with a feeler gauge
blade.


Clearance "a" I New Distance
(mm)
Wear Limit
(mm)
3rd and 4th gear
5th gear
1.0 to 1.7
1.0 to 1.9
0.5
0.5


35 - 6 Disassembling and Assembling Input Shaft
(Type 016 K)
Printed in Germany
9 4 4 M a n u a l   T r a n s m i s s i o n / G e a r s   a n d   S h a f t s       35


TOOLS


No. Description Special Tool Remarks
1

2

3

4

5

6

Support rail

Pipe

Thrust pad

Feeler blade gauge

Separator

Thrust pad
VW 457

VW 519

VW 401

-

US 1103

VW 454


Standard

e. g. Kukko 15 - 17 Gr. 1


Printed in Germany
Disassembling and Assembling Pinion Shaft
(Type 016 K)
      35 - 7
35 M a n u a l   T r a n s m i s s i o n / G e a r s   a n d   S h a f t s 9 4 4


35 - 8 Disassembling and Assembling Pinion Shaft
(Type 016 K)
Printed in Germany
9 4 4 M a n u a l   T r a n s m i s s i o n / G e a r s   a n d   S h a f t s       35


 No.
Description
 Qty. Note When:
Special
Instructions

Removing

Installing
1


2

3


4


5


6


6a

6b

6c

6d

7


8

9


10
Tapered roller
bearing


1st gear

Needle bearing


Synchronizer ring
for 1st gear


Circlip


Synchronizer with
sliding sleeve for 1st
and 2nd gears

Sliding sleeve

Synchronizer body

Spring

Lock

Synchronizer ring
for 2nd gear


2nd gear

Needle bearing


Circlip
1


1

1


1


1


1


1

1

2

3

1


1

1


1
Press off with
VW 457
If necessary,
replace both bearings
together. Use same
make

Check axial play

Lubricate with gear
lube

Angle 110°.
Identification: each
3 x 1 tooth missing.
Friction surfaces
coated with
molybdenum and
spiral groove. Check
for wear

Determine new
thickness


Position correctly


Angle 115°, friction
surface coated with
molybdenum and
spiral groove


Lubricate with
gear lube

Determine new
thickness


Printed in Germany
Disassembling and Assembling Pinion Shaft
(Type 016 K)
      35 - 9
35 M a n u a l   T r a n s m i s s i o n / G e a r s   a n d   S h a f t s 9 4 4


 No.
Description
 Qty. Note When:
Special
Instructions

Removing

Installing
11


12


13


14


15


16
3rd gear *


Circlip *


Circlip *


4th gear *


Tapered roller
bearing

Pinion shaft *
1


1


1


1


1


1


Press off with
separator
Check for wear.
Install warm and press
on. Large collar faces
2nd gear. Adjust axial
play.

Thickness always
2.4 mm

Determine new
thickness

Check for wear. Install
warm and press on.
Large collar faces
3rd gear. Adjust axial
play.

If necessary. replace
both together.
Use same make.

Check for wear.
Paired with ring gear.
Adjust pinion/ring
gear after replacing
parts.


 *  Beginning with 1983 models the 4th gear was changed from press-fit to spline-fit.
This change also affected 3rd gear, pinion shaft and circlips.


35 - 10 Disassembling and Assembling Pinion Shaft
(Type 016 K)
I, 1982 - Printed in Germany
9 4 4 M a n u a l   T r a n s m i s s i o n / G e a r s   a n d   S h a f t s       35


DISASSEMBLING AND ASSEMBLING PINION SHAFT


N o t e

When replacing tapered roller bearings, check
installed position of pinion shaft (actual location)
before removing the gear carrier.


D i s a s s e m b l i n g

1.  Press off inner race of tapered roller bearing
with 1st gear. Use Special Tool VW 457.


2.  Press off sliding sleeve and synchronizer with
2nd gear. Use Special Tool VW 457.


3. Press off 3rd gear.


Printed in Germany
Disassembling and Assembling Pinion Shaft
(Type 016 K)
      35 - 11
35 M a n u a l   T r a n s m i s s i o n / G e a r s   a n d   S h a f t s 9 4 4


4.  Press off 4th gear with a separator, e. g. Kukko
15 -17 Gr. 1.

106

5.  Press off inner race for tapered roller bearing
with a separator, e. g. Kukko 15 - 17 Gr. 1.

106

A - Separator
A s s e m b l i n g


1.  Heat inner race for tapered roller bearing to
about 120 °C (250 °F) and press on.

Page 106


2.  Press on 4th gear, whereby collar faces 3rd
gear.

106


35 - 12 Disassembling and Assembling Pinion Shaft
(Type 016 K)
Printed in Germany
9 4 4 M a n u a l   T r a n s m i s s i o n / G e a r s   a n d   S h a f t s       35


N o t e


It is essential to keep to the following procedures,
since the press-fit gear takes the engine torque.


Clean gear and shaft with a greaseless cleaning
solution to remove all oil and grease, and heat
gear on a hot plate to about 120 °C (250 °F).


Press on gear and press again after transfer of heat
(approx.3 minutes).


3.  Adjust axial play on 4th gear (gear must be
cold and pressed against stop).
Measure and install the thickest possible
circlip. Axial play may be max. 0.02 mm.


N o t e

Perform work very conscientiously, since otherwise
service life of tapered roller bearings could be
impaired.
Circlips available:


Part Number Thickness (mm)
016 311 363
016 311 363 A
016 311 363 B
016 311 363 C
016 311 363 D
016 311 363 E
016 311 363 F
016 311 363 G
016 311 363 H
2.24
2.26
2.28
2.30
2.32
2.34
2.36
2.38
2.40


4. Press on 3rd gear with collar facing 2nd gear.


N o t e

Clean gear and shaft with a greaseless cleaning
solution to remove all oil and grease, and heat
gear on a hot plate to approx. 120 °C (250 °F).


Printed in Germany
Disassembling and Assembling Pinion Shaft
(Type 016 K)
      35 - 13
35 M a n u a l   T r a n s m i s s i o n / G e a r s   a n d   S h a f t s 9 4 4


5.  Adjust axial play on 3rd gear. Measure axial play
on 3rd gear with a feeler gauge blade and correct
to 0 . . . 0.04 mm by selecting a pertinent circlip.
Lower value would be ideal.

 108


Circlips available:

Part Number Thickness (mm)
016 311 287
016 311 287 A
016 311 287 B
1.65
1.70
1.75


6.  Assemble sliding sleeve and synchronizer body for
1st and 2nd gears. It is not necessary to have a
pair in a certain position. Insert locks and install
springs with 120° offset. Spring must have its
angled end engaging in hollow lock.
 108


N o t e

Coat molybdenum coated synchromesh rings with
an approved transmission oil.


7.  Press on sliding sleeve with synchronizer body.
Turn synchronizer ring so that grooves are
aligned with locks.


108


35 - 14 Disassembling and Assembling Pinion Shaft
(Type 016 K)
Printed in Germany
9 4 4 M a n u a l   T r a n s m i s s i o n / G e a r s   a n d   S h a f t s       35


8.  Adjust axial play on synchronizer body. Measure
axial play of synchronizer body with a feeler
gauge blade and correct to a value between
0 and 0.04 mm by selecting pertinent circlip.
Lower value would be ideal.


     109


Circlips available:

Part Number Thickness (mm)
016 311 327
016 311 327 A
016 311 327 B
1.50
1.55
1.60
9. Press on inner race for tapered roller bearing.

 109


10.  Measure play on 1st gear. Play should be
between 0.10 and 0.40 mm. Recheck adjust-
ment of synchronizer body if necessary.
Parts must be pressed on against stop!


109


Printed in Germany
Disassembling and Assembling Pinion Shaft
(Type 016 K)
      35 - 15
35 M a n u a l   T r a n s m i s s i o n / G e a r s   a n d   S h a f t s 9 4 4


C h e c k i n g   S y n c h r o n i z e r   R i n g s


1. Clean synchronizer rings and gears.


2.  Press dried synchronizer rings on tapers of gears
and measure clearance "a" with a feeler gauge
blade.


Clearance "a" I New Distance
(mm)
Wear limit
(mm)
1st and 2nd gears 1.0 to 1.7 0.5


 Page 110


35 - 16 Disassembling and Assembling Pinion Shaft
(Type 016 K)
Printed in Germany
9 4 4 A u t o m a t i c   T r a n s m i s s i o n       37


AUTOMATIC TRANSMISSION (Type 087)

Page 111


Printed in Germany
Technical Data (Type 087 M and 087 N)
      37 - 01
37 A u t o m a t i c   T r a n s m i s s i o n 9 4 4


TRANSMISSION IDENTIFICATION

Code Letters and Mfg. Date of Transmission
Example: RH 15 03 2
 
Code Letters Day Month Year (82)


37-02 Transmission Identification (Type 087 M and 087 N) VII, 1986 - Printed in Germany
944 Automatic Transmission, Operation, Construction, Housing       37


TRANSMISSION - TYPES 944/924 S

Transmission Type Code Letters installed in
087 M RH 944 Eur., R.d.W. until
September 82
087 M RCA 944 Eur., R.d.W. from
October 82...12.21.83
087 M RCD 944 Eur.,R.d.W. from
December 83...
12.18.84
924 S - Eur./R.d.W.
from Mod. 86
087 M RCE 944 Eur., R.d.W. from
12.19.84
087 N RCB 944 USA / Jap. from
February 82...
12.18.84
924 S - USA/Jap. from
87 Model
087 N RCF 944 USA/Jap. from
12.19.84


Printed in Germany - VII, 1986
Technical Data
(Type 087 M and 087 N)
      37 - 02a
37 Automatic Transmission, Operation, Construction, Housing 944


37 - 02b Blank Page
944      944 Automatic Transmission/Operation Assembly Housing       37


TECHNICAL DATA

Internal code


Number of gears


Ratios


Driving position 1
Driving position 2
Driving position D
Driving position R

Clutch

Converter ratio

Converter code

Stall speed


Final drive

Hypoid displacement

Final drive ratio


Filling Capacities

Final drive


Automatic transmission


USA - values in parentheses


087 M
(087 N)

3 forward, 1 reverse and
parking lock

Type 087 M
and N
Code letter
RCA, RCB,
RCD, RCE, RCF
Type 087 M
Code letter
RH
i = 2.7143
i = 1.5000
i = 1.0000
i = 2.4286
i = 2.5517
i = 1.4483
i = 1.0000
i = 2.4615

Hydrodynamic torque converter

2.08 (2.5)

J       (K)

2200 +- 200 rpm
(2800 +- 200 rpm)

Hypoid/ring gear

44 mm

12/37 (11/38)


Approx. 1 liter hypoid gear
lube SAE 90 of APl classifi-
cation GL5, or MIL - L 2105 B

Total volume with ATF coolant
approx. 6.5 liters of ATF
Dexron
Change volume 2.8 liters ATF


Printed in Germany - VII, 1986
Technical Data
(Type 087 M and 087 N)
      37 - 03
37 A u t o m a t i c   T r a n s m i s s i o n 9 4 4


POSITION OF SHIFT PARTS IN DIFFERENT SELECTOR LEVER RANGE OR
GEAR POSITIONS

When complaints are received concerning insufficient acceleration and speed values or general drive problems,
this table shows which shift parts ars operated in the different gears or ranges. This could point out which
shift parts are malfunctioning.
Example: no power transmission in 3rd and reverse gears.
Possible causa: D + R clutch malfunctioning (must be closed).


Gear 1st
Gear
1st
Gear
2nd
Gear
3rd
Gear
Reverse
Gear
Selector lever pos. "1" "2" + "D" "2" + "D" "D" "R"
Forward clutch

D + R clutch

1st and revene gear brake

2nd gear brake

One-way clutch
closed

open

applied

released

no power
trans-
mission
closed

open

released

released

holds
closed

open

released

applied

no power
trans-
mission
closed

closed

released

released

no power
trans-
mission
open

closed

applied

released

no power
trans-
mission


37 - 04      Position of Shift Parts in Different Selector Lever Range
or Gear Positions (Type 087 M and 087 N)
I, 1982 - Printed in Germany
9 4 4 A u t o m a t i c   T r a n s m i s s i o n       37


PLANETARY GEARS WITH SHIFT PARTS


  1 - Plates for direct and reverse gear clutch
  2 - Forward clutch
  3 - Plates for forward clutch
  4 - Plates for 1st and reverse brake
  5 - 1st gear one-way clutch
  6 - Reverse planetary gear set
  7 - Forward planetary gear set
  8 - Piston for forward clutch
  9 - 2nd gear brake band
10 - Piston for 2nd gear brake band (shown offset 90°)
11 - Piston for 1st gear and reverse gear brake
12 - Oil pump
13 - Direct and reverse gear clutch
14 - Piston for direct and reverse gear clutch


Printed in Germany
Planetary Gears with Shift Parts (Type 087 N)
      37 - 05
37 A u t o m a t i c   T r a n s m i s s i o n / C o n t r o l s ,   C a s e 944


37 - 06 Blank Page
9 4 4 A u t o m a t i c   T r a n s m i s s i o n / C o n t r o l s ,   C a s e       37


TORQUE SPECIFICATIONS FOR AUTOMATIC TRANSMISSION

Location Description Threads Material Torque Value
Nm (ft lb)
Plug for test connection


ATF filter tube to oil pan


ATF supply tank to holder


ATF supply tank holder
to transmission

Automatic transmission to
final drive

Intermediate plate to
transmission case

Pump to transmission case


Cover to pump body


2nd gear brake band
adjustment

Oil pan to transmission case


Oil filter screen to valve
body

Valve body to transmission
case

End plate to valve body


Support to transfer plate


Separation and transfer
plates to valve body

Manual valve lever to
transmission case
Plug


Coupling


Bolt


Bolt


Nut


Bolt


Bolt


Bolt


Nut


Bolt


Bolt


Bolt


Bolt


Screw


Screw


Bolt
M 10 x 1


M 24 x 1.5


M 6


M 10


M 8 x 1.25


M 5 x 0.8


M 6 x 1


M 4 x 0.7


M 12 x 1.5


M 8 x 1.25


M 5 x 0.8


M 6 x 1


M 5 x 0.8


M 5 x 0.8


M 5 x 0.8


M 6 x 1
5.6


9SMn 28 K


8.8


8.8


12.9


5.8


8.8


5.8


8.8


8.8


5.8


8.8


5.8


5.8


8.8


5.8
15
(11)

80
(58)

7
(5)

42
(30)

29
(21)

3.5
(2.5)

7.0
(5)

1.4
(1)

19.6
(14)

20.5
(15)

3.5
(2.5)

3.5
(2.5)

3.5
(2.5)

3.5
(2.5)

3.5
(2.5)

3.5
(2.5)


Printed in Germany - I, 1982
Torque Specifications (Type 087 N)
      37 - 07
37 A u t o m a t i c   T r a n s m i s s i o n / C o n t r o l s ,   C a s e 9 4 4


Location Description Threads Material Torque Value
Nm (ft lb)
Shift segment to manual
valve lever

Kickdown valve lever to
throttle shaft

Shift segment spring to
transmission case

Control cable lever to
shaft

Governor cover to final
drive case

Governor shaft to
governor housing

Flanged shaft to
differential

Lockplate to adjusting
ring

Pinion cover to final
drive case

Final drive case cover
to final drive case

Ring gear to
differential

Oil filler opening in
transmission case

ATF line adapter to final
drive case

Converter to drive plate
Nut


Nut


Bolt


Nut


Bolt


Screw


Bolt


Bolt


Bolt


Bolt


Bolt


Plug


Adapter


Bolt
M 16 x 1.5


M 8 x 1.25


M 8 x 1.25


M 10 x 1


M 8 x 1.25


M 5 x 0.8


M 8 x 1.25


M 6 x 1


M 10 x1.5


M 8 x 1.25


M 10 x 1


M 24 x 1.5


M 16 x 1.5


M 8
9SMn 28 K


9SMn 28 K


8.8


9SMn 28 K


8.8


5.8


8.8


8.8


10.9


10.9


12.9


UO-St36-2


9SMn 28 K


12.9
20.5
(15)

17
(12)

20.5
(15)

18
(13)

9
(7)

3.5
(2.5)

25
(18)

8
(6)

42
(30)

25
(18)

78 - 93
(56 - 67)

20
(14)

80
(58)

40
(29)


37-08 Torque Specifications (Type 087 N) Printed in Germany
9 4 4 A u t o m a t i c   T r a n s m i s s i o n / C o n t r o l s ,   C a s e       37


TORQUE SPECIFICATIONS FOR ATF COOLlNG AND ATF SUPPLY TANK
(AUTOMATIC TRANSMISSION)


Location Description Threads Material Torque Value
Nm (ft lb)
Pipe lines to connector


Line to transmission
outlet

Line to transmission
inlet

Line to radiator intet


Line to radiator outlet


Lines to central tube
housing

Lines to central tube


Lines to camshaft
housing

Adapter to radiator


ATF supply tank holder
to transmission

ATF supply tank to
holder

ATF filter tube to
oil pan
Coupling nut


Hollow bolt


Coupling nut


Hollow bolt


Coupling nut


Bolt


Clamp


Bolt


Adapter


Bolt


Bolt


Coupling bolt
M 16


M 12


M 16


M 14


M 16


M 6


-


M 6


M 14


M 10 x 22


M 6 x 15


M 24
5.8


6.8


5.8


6.8


5.8


8.8


-


8.8


9SMn 28 K


8.8


8.8


9SMn 28 K
30
(22)

22.5
(16)

30
(22)

22.5
(16)

30
(22)

5
(3.6)

3
(2.2)

5
(3.6)

30
(22)

42
(30)

7
(5)

80
(58)


Printed in Germany - I, 1982
Torque Specifications (Type 087 N)
      37 - 09
37 A u t o m a t i c   T r a n s m i s s i o n 9 4 4


37 - 010 Blank Page
9 4 4 A u t o m a t i c   T r a n s m i s s i o n       37


TIGHTENING TORQUE FOR SHIFT CONTROLS {AUTOMATIC TRANSMISSION)


Location Description Threads Material Torque Value
Nm (ft lb)
Selector Iever guide to
shift base

locking element to
shift base

Shift mechanism and
guide strip

Bracket to trans-
mission

Cable to console


Cable to bracket


Ball socket to cable
Nut


Bolt


Bolt


Bolt


Coupling nut


Coupling nut


Nut
M 6


M 6


M 6


M 8


M 8


M 8


M 5
8


8.8


8.8


8.8


9SMn 28 K


9SMn 28 K


8
9
(7)

8.2
(6)

8.2
{6)

21
(15)

8
(6)

8
(6)

5
(3.6)


Printed in Germany - I, 1982
Torque Specifications (Type 087 N)
      37 - 011
37 A u t o m a t i c   T r a n s m i s s i o n 9 4 4


37 - 012 Blank Page
9 4 4 A u t o m a t i c   T r a n s m i s s i o n       37


TIGHTENING TORQUE FOR THROTTLE CONTROLS (AUTOMATIC TRANSMISSION)


Location Description Threads Material Torque Value
Nm (ft lb)
Control cable to bracket
(engine)

Control cable to trans-
mission

Control cable to central
tube

Bonded rubber mount
to intermediate lever
(accelerator pedal)

Accelerator pedal to
floor prate


Nut


Nut


Hose damp


Lock nut


Nut
M 8


M 10


M 4


M 6


M 6
04


17 H - 2


-


6


8
5
(3.6)

20
(15)

3
(2.2)

9
(7)


5
(3.6)


Printed in Germany - I, 1982
Tightening Torque (Type 087 N)
      37 - 013
37 A u t o m a t i c   T r a n s m i s s i o n / C o n t r o l s ,   C a s e 9 4 4


37 - 0 Blank Page
9 4 4 A u t o m a t i c   T r a n s m i s s i o n / C o n t r o l s ,   C a s e       37


Printed in Germany - I, 1982
Removing and Installing Selector Lever Cable
(Type 087 N)
      37 - 1
37 A u t o m a t i c   T r a n s m i s s i o n / C o n t r o l s ,   C a s e 9 4 4


 No.
Description
 Qty. Note When:
Special
Instructions

Removing

Installing
1

2


3

4

5

6


7

8


9

10


11

12

13

14

15

16

17


18

19
Lockplate

Ball socket


Washer

Nut

Dust cover

Mounting tube


Washer

Rubber washer


Sleeve

Rubber washer


Washer

Bolt

Selector grip

Spring

Push button

Sleeve

Cover


Bulb holder

Screw


1

1


1

1

1

1


1

1


1

1


1

2

1

1

1

1

1


1

2
 

Do not mix up with
ball socket for control
cable


Torque:
8 Nm (6 ft Ib)


Stepped end faces
bracket


Stepped end faces
bracket


Squeeze retaining
tabs on sides and
remove


37 - 2 Removing and Installing Selector Lever Cable
(Type 087 N)
Printed in Germany
9 4 4 A u t o m a t i c   T r a n s m i s s i o n / C o n t r o l s ,   C a s e       37


 No.
Description
 Qty. Note When:
Special
Instructions

Removing

Installing
20


21


22

23

24

25

26

27

28


Contact plate


Bolt


Small washer

Large washer

Strip guide

Lock washer

Rubber washer

Shift mechanism

Selector lever cable
1


3


2

1

2

1

1

1

1


Do not bend.
Installation mark
must align with
contact. Engine must
start only in position
"N" or "P", Coat
contact surface with
Molykote paste.

Torque:
8.2 Nm (6 ft lb)


Do not bend. Adjust.


Printed in Germany - I, 1982
Removing and Installing Selector Lever Cable
(Type 087 N)
      37 - 3
37 A u t o m a t i c   T r a n s m i s s i o n / C o n t r o l s ,   C a s e 9 4 4


REMOVING AND INSTALLING SELECTOR LEVER CABLE


R e m o v i n g

1.   Unscrew battery ground strap.

2. Remove exhaust assembly and center shield.

3. Disconnect cable on transmission lever and bracket.
Remove mounting parts.


N o t e :

Cable is locked on ball socket with a lockpin to
prevent jumping out.


4.   Bend open cable clip on center tunnel with a
suitable tool (e. g. tire iron).


5.   Remove selector lever knob, pull cover out of
center console and remove sleeve.


6. Remove right for alluminated dial and contact
plate.


7. Mark location of shift control on center tunnel
for reinstallation.


8. Unscrew bolts and remove guide plates.


37 - 4 Removing and Installing Selector Lever Cable
(Type 087 N)
Printed in Germany
9 4 4 A u t o m a t i c   T r a n s m i s s i o n / C o n t r o l s ,   C a s e       37


  9. Lift shift control forward slightly and only pull
out forward far enough so that selector lever
cable can be disconnected on shift base and
selector lever.


10.   Mount wire on cable and pull cable toward rear
through insulation sheet carefully.


I n s t a l l i n g

1.   Slide rubber grommet (see position 28 B in layout
drawing) on to cable sleeve and coat front dust
cover with an assembly paste (e. g. rubber lubricant).


2. Mount wire, pulled back during removal, on cable
and pull cable forward through insulation sheet
carefully.


N o t e :

For this job one person in the passenger compart-
ment should pull the wire and a second person should
guide it through the insulation sheet from underneath.


3.   Mount cable on shift control and install shift base.
Tightening torque for cable sleeve to shift control:
8 Nm (6 ft lb).


A - Rubber washer


4.   Install contact carrier so that the installation
mark is aligned with the contact.


Printed in Germany - I, 1982
Removing and Installing Selector Lever Cable
(Type 087 N)
      37 - 5
37 A u t o m a t i c   T r a n s m i s s i o n / C o n t r o l s ,   C a s e 9 4 4


5.   Push cable through opening in suspension
console and mount on bracket as well as
transmission lever.


N o t e :

Use a rubber grommet in opening of suspension
console to reduce the noise level.
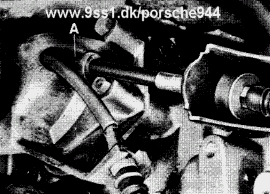


A - Rubber grommet (position 28 A)


6.   Mount cable sleeve on center tunnel with a clamp.


7. Adjust rubber grommet (position 28 B in layout
drawing) so that cable sleeve cannot contact
center tunnel.


8. Adjust cable (see page 37 - 7).


37 - 6 Removing and Installing Selector Lever Cable
(Type 087 N)
Printed in Germany
9 4 4 A u t o m a t i c   T r a n s m i s s i o n / C o n t r o l s ,   C a s e       37


ADJUSTlNG SELECTOR LEVER CABLE

1.   Place selector lever in "P".


2. Place operating lever on transmission in "P"
(push back against stop).


3. Adjust ball socket on cable so that installation
without tension is possible.


N o t e :

Use lockpin to prevent ball socket from popping out.


C h e c k i n g   A d j u s t m e n t


Place selector lever in "N", Run engine at fast idle
speed.
Pull up parking brake lever and brake car with brake
pedal for following tests.


1.   Place selector lever in "R", Power transmission
must be indicated by drop in engine speed.


2. Place selector lever in "P". Reverse gear
disengages as indicated by rise in engine speed.
3.   Repeat test in point 1.


4. Place selector lever in "N", Interruption of
power transmission should be indicated by
rise in engine speed.


5. Place selector lever in "D". Power transmission
should be indicated by drop in engine speed.


6. It should only be possible to start engine in "P"
and "N",


7. Backup lights must be on in "R",


Printed in Germany - I, 1982
Adjusting Selector Lever Cable
(Type 087 N)
      37 - 7
37 A u t o m a t i c   T r a n s m i s s i o n / C o n t r o l s ,   C a s e 9 4 4


REMOVING AND INSTALLING THROTTLE AND CONTROL PRESSURE CABLE


1.   Disconnect cable on accelerator pedal
intermediate lever (is only inserted).


2. Disconnect cable sleeves on bracket.


3.   Press rubber guide out of firewall with a suitable
screwdriver.


4.   Open damps for cable sleeve on engine and front
bell housing.


5. Remove exhaust assembly as well as front and
center cross members.
6.   Remove front bracket for exhaust assembly
on holder.


7. Disconnect ball socket on transmission lever
and disconnect cable sleeve on bracket.


N o t e :

A lockpin prevents the ball socket from popping
out.


8.   Mark location of hose clamp and cable sleeve
for installation later and remove clamp.


37-8a Removing and Installing Throttle and Control Pressure Cable
(Type 087 N)
I, 1982 - Printed in Germany
9 4 4 A u t o m a t i c   T r a n s m i s s i o n / C o n t r o l s ,   C a s e       37


9. Press cable sleeve out of hose holder.


10.  Pull out cable downward carefully (between
insulation sheet and body) with a wire hook.


N o t e :

Press insulation sheet away from body with a
putty knife to avoid damaging sheet.


I n s t a l l i n g


N o t e :

Cable must not be bent excessively.
1.  Push in cable in correct position toward rear
to transmission lever and forward to cam plate.


2. Coat cable in area of insulation sheet with an
assembly paste (e. g. rubber lubricant) and pull
cable carefully to correct installed position
between insulation sheet and body. Press
insulation sheet away from body with a
suitable putty knife for this step.


3.  Align cable sleeve according to removal marks
and tighten hose clamp.


4. Press cable sleeve into holder.


5.  Mount cable correctly on transmission, cam
plate and accelerator pedal intermediate lever.


6. Adjust cable (see page 37 - 11).


Printed in Germany
Removing and Installing Throttle and Control Pressure Cable
(Type 087 N)
      37 - 8b
37 A u t o m a t i c   T r a n s m i s s i o n / C o n t r o l s ,   C a s e 9 4 4


37 - 8c Blank Page
9 4 4 A u t o m a t i c   T r a n s m i s s i o n / C o n t r o l s ,   C a s e       37


REMOVING AND INSTALLlNG THROTTLE AND CONTROL PRESSURE CABLE
(SERVICE SOLUTION)


R e m o v i n g


1.  Disconnect cable on transmission lever and
unscrew ball socket.


N o t e :

A lockpin prevents ball socket from popping out.


2.  Disconnect control cable on accelerator pedal
and press rubber guide out of firewall.


3. Disconnect short cable sleeve on holder.


4. Pinch and pull out control cable toward rear.
I n s t a l l i n g


1.  Assemble cable by sliding short cable sleeve,
clamping nipple and protective cap on to cable.


2.  Push cable through sleeve from behind carefully
and place around cam prate correctly (nipple in
opening).


3. Mount cable sleeve on holder and firewall.


4. Mount cable on accelerator pedal.


5. Install dust cover and clamp.


Printed in Germany - I, 1982
Removing and Installing Throttle and Control Pressure Cable
(Service Solution) (Type 087 N)
      37 - 9
37 A u t o m a t i c   T r a n s m i s s i o n / C o n t r o l s ,   C a s e 9 4 4


6.  Connect ball socket on transmission lever without
tension.


7. Mount clamping nipple and check both full throttle
and kickdown positions (see page 37 - 12).


8. If necessary, adjust cable (see page 37 - 11).


37-10 Removing and Installing Throttle and Control Pressure Cable
(Service Solution) (Type 087 N)
Printed in Germany
9 4 4 Automatic Transmission/Controls, Case       37


ADJUSTING THROTTLE AND CONTROL PRESSURE CABLE


Note

The positioning of the throttle to
the valves in the transmission is
extremely important for perfect
transmission operation and
unimpaired driving of car.


Basic Setting

1.  Install cable sleeve on
transmission bracket at distance
"A" = 29 mm and tighten to
torque of 20 Nm.


2.  Screw on plastic socket for
transmission lever completely and
secure on transmission lever with
securing clip.


3.  Set accelerator pedal and cam to
neutral position

4. Make sure short cable sleeve fits
correctly in firewall.


Up to Mod. '85


Printed in Germany - XVI, 1987
Adjusting Throttle and Control
Pressure Cable
(Types 087 M and 087 N)
      37 - 11
37 Automatic Transmission/Controls, Case 9 4 4


From Mod. '85/2


5.  Up to Mod. '85 adjust short cable
sleeve on firewall to dimension
"B" = 8 mm


From Mod. '85/2, adjust short cable
sleeve on holder to shortest length.


6.  Place cable around cam plate in
correct position and secure short
cable sleeve on holder with
circlip. From Mod. 85/2, cable
sleeve screwed onto holder.


7. Install long cable sleeve on
holder without tension (don't
pull tight).


8. Adjust short cable sleeve until
clamping nipple of cable can be
placed in opening of cam plate
without tension.
Tighten nut for cable sleeve
adjustment to torque of 5 Nm.


Note

It is very essential that the
control pressure (accelerator
side) cable be without tension, since
the throttle switch (idle contact)
will already be operated in a 1°
throttle range.


37 - 12 Adjusting Throttle and Control
Pressure Cable
(Types 087 M and 087 N)
Printed in Germany
9 4 4 Automatic Transmission/Controls, Case       37


  9.  Adjust long cable sleeve on
holder in the area of the cam
until a prestress of 2...3 mm is
achieved on control pressure
cable.

10. If cable has been adjusted
correctly, cam and accelerator
pedal will be in neutral
position and transmission
operating lever will be in
prestress position (2).


1 = Basic position
2 = Prestress position
3 = Full throttle position
4 = Kickdown start
5 = Kickdown end
6 = Final stop
A = 0...2.5 mm
B = 10 mm
Full Throttle Test


Press down on accelerator pedal to
first noticeable pressure point
(full throttle point) and check,
whether throttle is wide open.

In this position, the dog in the cam
plate's slot will not yet have
lifted off.
Operating lever on transmission will
be 10 mm away from final stop
(dimension "B").


Kickdown Test


1.  Depress accelerator pedal past
full throttle up to kickdown
point. In this position, check
whether dog in cam plate's slot
has lifted (against stop).


Printed in Germany - XVI, 1987
Adjusting Throttle and Control
Pressure Cable
(Types 087 M and 087 N)
      37 - 12a
37 Automatic Transmission/Controls, Case 9 4 4


2.  Adjust stop bolt for accelerator
pedal in this position (kickdown)
so that bolt touches the
accelerator pedal. Then unscrew
bolt one half turn.


3.  In kickdown position, the
operator lever on the
transmission must be 0...2.5 mm
away from final stop (dimension
"A").


Note

If lever is more than 2.5 mm away
from final stop, the long cable
sleeve on the holder must be
readjusted in the area of the cam
plate.


37 - 12 b Adjusting Throttle and Control
Pressure Cable
(Types 087 M and 087 N)
Printed in Germany
9 4 4 A u t o m a t i c   T r a n s m i s s i o n / C o n t r o l s ,   C a s e       37


C h e c k i n g   F u n c t i o n

The cause of damage or defect can be pinpointed
with help of the troubleshooting card (page 37-17)
and the following tests before repairing an
automatic transmission.

A -  General Test
B - Automatic Transmission and Final Drive Oil
level Test
C - Stall Speed Test
D - Road Test
E - Pressure Test


I m p o r t a n t !

All jobs, which require the engine to be running,
should only be performed with the selector lever in
"N" or "P" and the parking brake applied.

Exceptions: tests, which require a different selector
lever position briefly.


A   -   G e n e r a l   T e s t

The following procedures must be carried out prior
to each transmission test and, if any faults are
discovered, they must be eliminated before
continuing work on the transmission.

1.  Check engine tuning (ignition timing, idle speed
and transition).

2. Check for external dam age, e. g. leaks on trans-
mission (ATF) or final drive (hypoid oil!) and
missing or loose mounting bolts.


B   -   A u t o m a t i c   T r a n s m i s s i o n   a n d
F i n a l   D r i v e   O i l   l e v e l   T e s t

The specified oil level is extremely important for
perfect operation of an automatic transmission, and
therefore it is important to carry out the following
test conscientiously.
C h e c k i n g   A T F   l e v e l   i n
A u t o m a t i c   T r a n s m i s s i o n

1.  Car must be parked on level floor or ground.

2. Selector lever in "N" and parking brake applied.

3. Engine running at idle speed during test.

4. ATF hand warm (40 to 60 °C/104 - 140 °F).

5. ATF level between both marks of supply tank.
Difference between upper and lower marks is
approx. 0.4 liter/US qt.

6. Clean upper section of tank as well as cover
prior to filling with ATF to avoid dirt in the
supply tank.


I m p o r t a n t !

Oil level can be higher or lower depending on
temperature (heat expansion of ATF).
Consequently an accurate check can only be
made in the specified temperature range.

Do not add too much ATF, since an excessive
amount would impair automatic transmission
operation.


Contaminated oil could impair transmission
control.


I m p o r t a n t !

Only fill automatic transmission with ATF
Dexron.

ATFs of different makes with the designation
"Dexron" may be mixed with each other.


Printed in Germany - XVI, 1987
Checking Function (Type 087 N)
      37 - 13
37 A u t o m a t i c   T r a n s m i s s i o n / C o n t r o l s ,   C a s e 9 4 4


C h e c k i n g   F i n a l   D r i v e   O i l   l e v e l


1.  Oil level should reach edge of oil filler plug. An
excessively high oil level indicates an oil leak
between the automatic transmission and final
drive.

In this case the governor drive seal could be
defective.


C   -   S t a l l   S p e e d   T e s t


This test provides information on operation of the
torque converter, plate clutches and brakes as
well as one-way clutch for 1st gear.


I m p o r t a n t !

The stall speed test must be carried out with the
engine and transmission at operating temperature
and must not last longer than the time required to
read the tachometer (max. 5 seconds) to avoid
damage from excessive heat.


1.  Connect tachometer on engine. Start engine and
hold car by applying service and parking brakes.
Move selector lever to "D" and press down briefly
on accelerator pedal to full throttle. The engine
will adjust to a certain speed, the so-called stall
speed.


Stall Speed:

2800 +- 200 rpm


The following points could be causing deviations
in stall speed.
Engine speed faster
than stall speed:


Stall speed not reached:

- about 200 rpm less than
   specified value


- about 400 rpm less than
   specified value
Forward clutch
slips.
1st gear one-way
clutch slips.


Poor engine power
(ignition, fuel
injection,
compression)

One-way clutch in
torque converter
defective


N o t e :

Stall speed will be reduced by about 125 rpm for
each 1,000 meters (3,300 f t) above sea level.

The stall speed could also drop slightly with
high outside temperatures.


37 - 14 Checking Function (Type 087 N) Printed in Germany
9 4 4 Automatic Transmission/Operation Assembly Housing       37


D   -   R o a d   t e s t

Road test car (only when there is
no obvious transmission damage).
It is important to drive the car
in as many driving conditions as
possible, and in all the driving
ranges of the automatic trans-
mission. Careful observation is
a must. Pay particular attention
to shifting points for upshifts and
downshifts, as well as the kickdown
shift points with reference to
speed and gear transitions.
All shifts must be made
quickly and without inter-
ruption of power flow. Par-
ticular attention should be
paid to whether the engine
races suddenly while shifting.
This could indicate a slipping
brake or clutch.

After the road test, check
transmission for leakage.


S h i f t   p o i n t s   in KM/H 944/924 S

Transmission Version Shifts Full Throttle* Kickdown*
Transmission type
087 M
Code letter
RH
1 - 2
2 - 3
3 - 2
2 - 1
40 - 56
96 - 120
68 - 94
28 - 31
89 - 92
155 - 156
148 - 150
81 - 83

Transmission Version Shifts Full Throttle* Kickdown*
Transmission type
087 M
Code letter
RCA, RCD, RCE
1 - 2
2 - 3
3 - 2
2 - 1
40 - 55
96 - 120
69 - 95
28 - 32
83 - 88
149 - 152
142 - 146
76 - 81

Transmission Version Shifts Full Throttle* Kickdown*
Transmission type
087 N
Code letter
RCB, RCF
1 - 2
2 - 3
3 - 2
2 - 1
35 - 48
84 - 105
60 - 83
25 - 28
73 - 77
130 - 133
124 - 128
67 - 71

* Note that during testing the speedometer can deviate from the specified
   values within permissible tolerances.


Printed in Germany - VII,1986
Cheeking Operation
(Type 087 M and 087 N)
      37 - 15
37 Automatic Transmission/Controls, Case 944


Function Test (Type 087 M and 087 N)

E - Pressure Test

Pressure test will supply information about dis-
turbances in the hydraulic control system.

It should only be carried out, if all other tests
have not produced any indication of possible
causes for the damage.

Remarks

It is always necessary to loosen the control
cable to test the main pressure. This means
maladjusting the cable sleeve on the mount in
the area of the cam plate. Preload must be
readjusted after finishing the pressure test
(see page 37 - 11).
1.  Connect pressure tester V 90 on the test
connection.


A = Special Tool 9250

2.  Check main pressure with different testing
conditions as described below.


944 Europe / Rest of World and USA/Japan

Selector Lever
Position
Accelerator Pedal
Position
Main Pressure
in bar
Testing Conditions
D Idle
(no acceleration)
2.90...3.00 Read speed faster
than 50 km/h*
D Full throttle 7.3...7.40  
R Idle (no acceleration) 9.5 +- 0.3 Car stopped
R Full throttle more than 20 At stall speed

Road speed faster than 140 km/h for Europe models (transmissions RCD and RCE) since Decem-
ber, 1983.

This test should be performed on a dynamometer whenever possible. For the pressure test in idle, ac-
celerate the car to specified read speed, take foot off of the accelerator pedal and read the pressure.


37 - 16 Function Test (Type 087 M and 087 N)
Printed in Germany - XXI, 1989
944 Automatic Transmission/Controls, Case 37


It is not possible to adjust the main pressure. There could be the following causes for deviation from
the specified values.


Cause Correction
Oil pump faulty Check oil pump for wear, replace.
Oil loss on gasket/seal-
ing surfaces or due to
leak in body
Check for leaks.
in particular installation of valve body transfer plate.
Seized control valve Disassemble and clean valve body. Check movement of control valve.


Function Test (Type 087 M and 087 N)
Printed in Germany - XXI, 1989
37 - 16a
37 A u t o m a t i c   T r a n s m i s s i o n / C o n t r o l s ,   C a s e 9 4 4


37-17a Troubleshooting chart Printed in Germany - I, 1982
9 4 4 A u t o m a t i c   T r a n s m i s s i o n / C o n t r o l s ,   C a s e       37


Printed in Germany - I, 1982
Troubleshooting chart
      37 - 17b
37 A u t o m a t i c   T r a n s m i s s i o n / C o n t r o l s ,   C a s e 9 4 4


37 - 18 Blank Page
9 4 4 A u t o m a t i c   T r a n s m i s s i o n / C o n t r o l s ,   C a s e       37


A = Universal transmission jack


Printed in Germany - I, 1982
Removing and Installing Transmission
(Type 087 M and 087 N)
      37 - 19
37 A u t o m a t i c   T r a n s m i s s i o n / C o n t r o l s ,   C a s e 9 4 4


REMOVING AND INSTALLING TRANSMISSION


R e m o v i n g


1.  Remove final muffler.


2.  Disconnect drive shafts on transmission end and
take off of flanges.


N o t e :

Suspend drive shafts from car with pieces of wire in
horizontal position to prevent damaging dust covers.


3.  Detach support on rear transmission cover.


4. Disconnect selector lever cable and control
pressure cable on levers and brackets.
Pull cables forward out of suspension console.


N o t e :

Cables are locked in ball sockets to prevent popping out.


5.  Open inspection hole in rear bell housing and
unscrew mounting bolts for torque converter
(hold pulley if necessary).


37 - 20 Removing and Installing Transmission (Type 087 M and 087 N) Printed in Germany
9 4 4 A u t o m a t i c   T r a n s m i s s i o n / C o n t r o l s ,   C a s e       37


6.  Place universal transmission jack underneath
transmission and secure retaining strap.


7. Unscrew transmission suspension/transmission
member mounting beats.


8.  Remove right flange shaft and right transmission
suspension.
9.  Unscrew ATF lines on transmission case. Use an
angled open-end wrench (e. g. Hazet 329 - 5)
for coupling nut on transmission inlet.


10.  Unscrew transmission case/transmission bell
housing mounting bolts.


11. Lower transmission slightly and run back far
enough so that torque converter can be secured
to prevent falling out.


12.  Lower transmission carefully on universal
transmission jack.


Printed in Germany - I, 1982
Removing and Installing Transmission
(Type 087 N)
      37 - 21
37 A u t o m a t i c   T r a n s m i s s i o n / C o n t r o l s ,   C a s e 9 4 4


37 - 22 Blank Page
9 4 4 A u t o m a t i c   T r a n s m i s s i o n / C o n t r o l s ,   C a s e       37


C o r r e c t   T o r q u e   C o n v e r t e r   I n s t a l l a t i o n


Converter is inserted against stop.
a = approx. 10 mm.
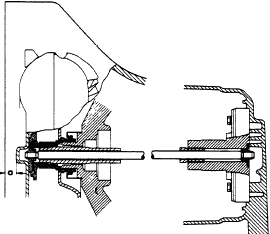


W r o n g   T o r q u e   C o n v e r t e r   I n s t a l l a t i o n


Converter has slipped forward (left arrow) and has
pulled pump shaft out of drive dog/pump shaft
splines A (right arrow).
Bolting the transmission on the central tube in this
position would destroy the drive dog.
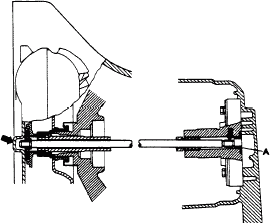


Printed in Germany - I, 1982
Removing and Installing Transmission
(Type 087 N)
      37 - 23
38 A u t o m a t i c   T r a n s m i s s i o n / G e a r s ,   R e g u l a t i o n 9 4 4


38 - 0 Blank Page
9 4 4 A u t o m a t i c   T r a n s m i s s i o n / G e a r s ,   R e g u l a t i o n       38


TOOLS


No. Description Special Tool Remarks
  Filler   Commercial item,
e. g. Dresser-Wayne Model 3009


Printed in Germany - III, 1983
Changing ATF, Cleaning ATF Filter Screen
(Types 087 M and 087 N)
      38 - 1
38 Automatic Transmission/Gears, Regulations 9 4 4


CHANGING ATF AND CLEANING ATF FILTER SCREEN


Note

ATF liquid
(ATF-Dexron II D) is no longer red
and transparent, but brown and
becomes completely black after short
operation.


Oil volume:
New filling with ATF cooler =
approx. 6.5 liters
Oil change:
approx. 2.8 liters

Oil grade:
ATF-Dexron II D


Tightening torques:

Oil filler tube to oil sump =
80 Nm

Oil sump to transmission case =
21 Nm

Oil filter screen to va1ve body =
4 Nm

Car must be parked on level surface
and transmission should have
operating temperature when changing
ATF.
1.  Unscrew oil filler tube at oil
sump and filling tank, and drain
ATF.


2.  Remove oil sump and oil filter
screen when ATF stops running out
of transmission


38 - 2 Changing ATF, Cleaning ATF Filter
Screen (Types 087 M and 087 N)
XVI, 1987 - Printed in Germany
9 4 4 A u t o m a t i c   T r a n s m i s s i o n / G e a r s ,   R e g u l a t i o n       38


3.  Clean all parts thoroughly and reinstall.
Replace gasket for oil filter screen and oil
sump.


4. Add ATF with filler.


5. First add approx. 2.5 liters of ATF.


N o t e :

Clean upper section of tank and cover prior
to adding ATF, to prevent dirt from entering
filling tank.


6.  Start engine and move selector lever through
all positions on stationary car.


7. Check ATF level and, if necessary, fill to
lower mark.


8. Test drive car briefly to warm up ATF
hand warm.
9.  Then check and correct ATF level as
described below.


C h e c k i n g   A T F   l e v e l


N o t e :

The specified ATF level is extremely
important for perfect operation of the
automatic transmission.


1.  Car must be on level surface.


2. Move selector lever to N and apply
parking brake.


3. Run engine at idle speed during check.


4. ATF must be hand warm (approx.
40 to 60 °C). Heat expansion will cause
deviation in ATF level at higher or lower
temperatures.


Printed in Germany - III, 1983
Changing ATF, Cleaning ATF Filter Screen
(Types 087 M and 087 N)
      38 - 2a
38 A u t o m a t i c   T r a n s m i s s i o n / G e a r s ,   R e g u l a t i o n 9 4 4


5.  Difference between upper and lower marks
is 0.4 liters.


6. Don't add too much ATF!
Excessive ATF would also cause disturbances
and must be drained again.


38 - 2 b Changing ATF, Cleaning ATF Filter Screen
(Types 087 M and 087 N)
Printed in Germany
9 4 4 A u t o m a t i c   T r a n s m i s s i o n / G e a r s ,   R e g u l a t i o n       38


FLUSHING ATF COOLER AND LINES


N o t e :

If ATF smells burnt and contains friction
liner abrasion, the transmission has to be
repaired, the torque converter drained and
the cooler flushed.
The torque converter has to be replaced,
if there are metal burrs in the ATF sump.


Mount auxiliary hose from ATF filler (see
Special Tool Catalog, Workshop Equipment
Group) and adapter, Part No. 087.409.057 B,
on return line and flush cooler with ATF.
Catch ATF running out of feed line.


A =  Adapter
Part No. 087.409.057 B
N o t e :

A sealing surface must be made on the
adapter subsequently. Open standard bore
to 10 mm diameter and drill approx. 5 mm
deep. Then counter bore sealing surface with
a 90° countersink.


Printed in Germany - III, 1983
Flushing ATF Cooler and Lines
      38 - 2c
38 A u t o m a t i c   T r a n s m i s s i o n / G e a r s ,   V a l v e   B o d y 9 4 4


38 - 2d Blank Page
9 4 4 A u t o m a t i c   T r a n s m i s s i o n / G e a r s ,   V a l v e   B o d y       38


TOOLS


No. Description Special Tool Remarks
1

2
Holder

Hole plate
VW 351

-


Made locally
(10 mm thick)


Printed in Germany - I, 1982
Disconnecting and Connecting Automatic Transmission on Final Drive
(Type 087 N)
      38 - 3
38 A u t o m a t i c   T r a n s m i s s i o n / G e a r s ,   V a l v e   B o d y 9 4 4


38 - 4       Disconnecting and Connecting Automatic Transmission on Final Drive
(Type 087 N)
Printed in Germany
9 4 4 A u t o m a t i c   T r a n s m i s s i o n / G e a r s ,   V a l v e   B o d y       38


 No.
Description
 Qty. Note When:
Special
Instructions

Removing

Installing
1

2


3

4


5

6


7

8

9


10
Torque converter

Nut


Spring washer

Automatic trans-
mission

Gasket

Shim

Seal


Final drive

Oil pump shaft


Turbine shaft
1

4


4

1


1

X


1

1

1


1


Can only be
removed after
disconnecting
automatic trans-
mission


Torque:
29 Nm (22 ft lb)

Replace. if necessary


Replace

Different thicknesses.
adjust axial play

Replace


Check length. Insert in
pump splines to touch
bottom before
installing torque con-
verter. Be careful not
to damage seal in
turbine shaft.

Check length;
check piston rings


Printed in Germany - I, 1982
Disconnecting and Connecting Automatic Transmission
on Final Drive (Type 087 N)
      38 - 5
38 A u t o m a t i c   T r a n s m i s s i o n / G e a r s ,   V a l v e   B o d y 9 4 4


DISCONNECTING AND CONNECTING AUTOMATIC TRANSMISSION ON FINAL DRIVE


D i s c o n n e c t i n g

Mount automatic transmission on assembly stand
with holder VW 351 and disconnect final drive.


1 - Hole plate (made locally - sketch on page 38 - 3)


C o n n e c t i n g

N o t e :

Check axiaI play. adjusting if necessary, after
repairing final drive or automatic transmission.


1. Length of front studs; a = 31.5 mm.

2.  Check length of pump shaft.
a = 513 mm.


3.  Check length of turbine shaft.
a = 424.5 mm.


4.  Make sure piston rings for turbine shaft are
positioned correctly.


A - Wire ring


38 - 6      Disconnecting and Connecting Automatic Transmission
on Final Drive (Type 087 N)
Printed in Germany
9 4 4 A u t o m a t i c   T r a n s m i s s i o n / G e a r s ,   V a l v e   B o d y       38


REMOVING AND INSTALLING SEAL FOR TURBINE SHAFT


A seal is installed in the turbine shaft to prevent oil
from running out of torque converter when engine is
stopped.
These shafts have a groove all around for identification.


R e m o v i n g


Drive out seal with a standard internal-claw puller
and an old oil pump shaft. A suitable round rod
could also be used instead of pump shaft.


A - Pump shaft
B - Internal-claw puller
C - identification (groove)
I n s t a l l i n g


Drive in seal carefully with Special Tool 30 - 24.
Sealing lip faces out.


Printed in Germany - I, 1982
Removing and Installing Seal for Turbine Shaft
(Type 087 N)
      38 - 7
38 A u t o m a t i c   T r a n s m i s s i o n / G e a r s ,   V a l v e   B o d y 9 4 4


REMOVING AND INSTALLING TORQUE CONVERTER SEAL


R e m o v i n g


Remove seal as shown in picture.


I n s t a l l i n g


Drive in seal with VW 192 or US 4450.


N o t e :

Extreme care is required for installation of seal.
The material is very soft and consequently easy
to damage. Never let seal come in contact with
gasoline or cleaning solutions.


38 - 8       Removing and Installing Torque Converter Seal
(Type 087 N)
Printed in Germany
9 4 4 A u t o m a t i c   T r a n s m i s s i o n / G e a r s ,   V a l v e   B o d y       38


ADJUSTING AXIAL PLAY OF AUTOMATIC TRANSMISSION / FINAL DRIVE


Axial play "y" between automatic transmission and
final drive has to be adjusted to limit the axial
travel of the ring gear.


Measuring Points:

a -  Final drive:
case sealing surface to bushing for seals.

b - Automatic transmission:
bearing collar for shim to intermediate
plate with gasket.


1 - Final drive
2 - Automatic transmission
3 - Ring gear
4 - Gaskets
5 - Intermediate plate
6 - Drive pinion
7 - Shim
P r o c e d u r e s


1.  Measure distance "a" on final drive.
Place straight-edge on case and measure
distance to bushing for seals.


2.  Measure distance from straight-edge to case
sealing surface.


Example:

Straight-edge to bushing
Straight-edge to sealing surface
Case distance "a" =
18.7 mm
-    8.0 mm
10.7 mm
========


Printed in Germany - I, 1982
Adjusting Axial Play of Automatic Transmission/
Final Drive (Type 087 N)
      38 - 9
38 A u t o m a t i c   T r a n s m i s s i o n / G e a r s ,   V a l v e   B o d y 9 4 4


3.  Measure distance "b" on automatic transmission.
Place straight-edge on case and measure distance
to gasket.


4.  Measure distance from straight-edge to bearing
collar for shim.


Example:

Straight-edge to gasket
Straight-edge to bearing collar
Distance "b" =
19.2 mm
-  10.0 mm
9.2 mm
=======


Determine distance "x":

Distance "b" subtracted from distance "a" =
distance "x".
Example:

Distance "a"
Distance "b"
Distance "x"
10.7 mm
-    9.2 mm
1.5 mm
=======


5. Select shim size according to table.


Distance "x" (mm) Shim (mm)
0.23 . . . 0.84
0.85 . . . 1.24
1.25 . . . 1.64
1.65 . . . 2.04
2.05 . . . 2.44

2.45 . . . 2.84

2.85 . . . 3.24
3.25 . . . 3.64

3.65 . . . 3.88
none
1 x 0.4
2 x 0.4
1 x 1.2
1 x 0.4
1 x 1.2
2 x 0.4
1 x 1.2
2 x 1.2
1 x 0.4
2 x 1.2
2 x 0.4
2 x 1.2


Shims are available in thicknesses of 0.4 mm and
1.2 mm.


38 - 10 Adjusting Axial Play of Automatic Transmission/
Final Drive (Type 087 N)
Printed in Germany
9 4 4 Automatic Transmission/Gears, Valve Body       38


DISASSEMBLING AND ASSEMBLING AUTOMATIC TRANSMISSION
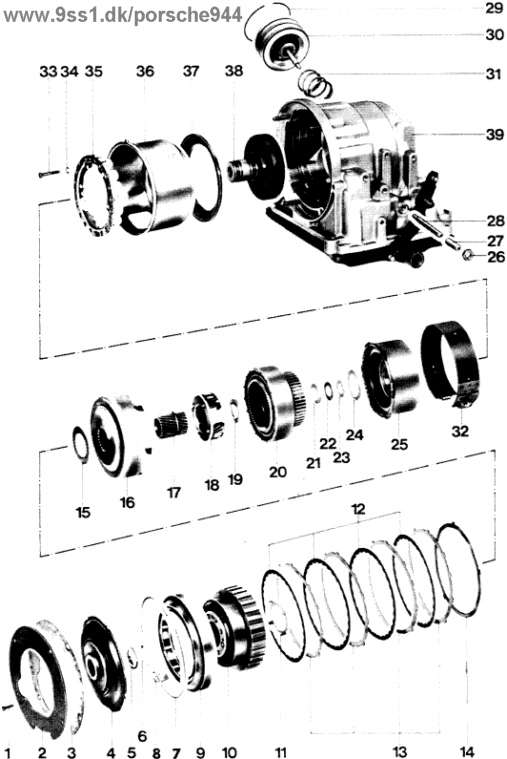


Printed in Germany - XVI, 1987
Disassembling and Assembling
Automatic transmission
(Types 087 M and 087 N)
      38 - 11
38 Automatic Transmission/Gears, Valve Body 9 4 4


 No.
Description
 Qty. Note When:

Removing

Installing
1


2


3

4

5

6

7


8


9


10


11


12


13
Screw


Intermediate plate


Gasket

Ring gear (2-piece)

Axial needle bearing

Thrust washer

Circlip


Holding wedge


One-way clutch


Reverse planetary
gear set

Thrust washer


Inner plate (1st and
reverse gear brake)


Outer plate (1st and
reverse gear brake)
1


1


1

1

1

1

1


1


1


1


1


4


4


Remove with reverse
planetary gear set
Torque:
3.5 Nm

Check, adjusting if
necessary, axial play
of automatic trans-
mission/final drive
af ter installation

Replace


Position correctly,
push in with end of
hammer handle if
necessary

Opening must be
opposite holding
wedge. Automatic
transmission is
assembled correctly
when groove for
circlip is accessible.

Turn planetary gear
set and press on one-
way clutch simulta-
neously. It should not
be possible to turn it
anticlockwise.

Insert before instal-
ling plates

Hold on planetary gear
set with grease

Check identification.
Place in ATF 15 min.
before installing.


38 - 12 Disassembling and Assembling Automatic
Transmission (Types 087 M and 087 N)
XVI, 1987 - Printed in Germany
9 4 4 Automatic Transmission/Gears, Valve Body       38


 No.
Description
 Qty. Note When:

Removing

Installing
14

15


16

17


18


19

20


21


22

23

24


25


26


27

28

29


Corrugated washer *

Thrust washer
(steel)

Drive shell

Sun gear


Forward planetary
gear set

Axial needle bearing

Forward clutch


Bearing ring


Bearing cage

Bearing ring

Thrust washer


Direct and reverse
clutch


Nut


Adjusting screw

Support

Circlip
1

1


1

1


1


1

1


1


1

1

1


1


1


1

1

1


Short halt faces for-
ward planetary gear
set


Assemble with D and R
clutches and install
together

Hollow side faces
bearing cage


Tabs face bearing cage

Hold on D and R clutch
with a little grease

Assemble with forward
clutch and install
together

Torque:
20 Nm

* See change on Page 38 - 18a


Printed in Germany - XVI, 1987
Disassembling and Assembling Automatic
Transmission (Types 087 M and 087 N)
      38 - 13
38 Automatic Transmission/Gears, Valve Body 9 4 4


 No.
Description
 Qty. Note When:

Removing

Installing
30


31

32


33


34

35


36


37


38


39

Cover with piston


Spring

Brake band
(2nd gear brake)

Bolt
M 6 x 35

Lock washer **

Spring retainer with
20 springs

Shell *


Piston (1st and
reverse gear brake)*

Pump with thrust
washer

Transmission case
1


1

1


5


5

1


1


1


1


1
Remove before
removing brake
band. Remove by
applying light
taps from rubber
hammer on cover
surface.


Adjust


Torque:
7.0 Nm

Replace, if necessary


Check length,
position correctly

Sealing lips face case
floor, check function

  * See change on Page 38 - 18a

** Dropped as from October 1982


38 - 14 Disassembling and Assembling Automatic
Transmission (Types 087 M and 087 N)
XVI, 1987 - Printed in Germany
9 4 4 A u t o m a t i c   T r a n s m i s s i o n / G e a r s ,   V a l v e   B o d y       38


DISASSEMBLING AND ASSEMBLING AUTOMATIC TRANSMISSION


D i s a s s e m b l i n g


1. Take circlip out of groove.


2.  Remove circlip and end cover as well as piston for
2nd gear brake by applying light taps on base of
cover with a rubber hammer.


A s s e m b l i n g


1.  Slide piston for 1st and reverse gear brake on to
pump housing and install both together. Thin rib
(arrow) faces up. Place pump shaft in drive dog
and turn pump. It should be possible to turn
pump by hand without resistance.


Printed in Germany - I, 1982
Disassembling and Assembling Automatic Transmission
(Type 087 N)
      38 - 15
38 A u t o m a t i c   T r a n s m i s s i o n / G e a r s ,   V a l v e   B o d y 9 4 4


2.  Install shell for 1st and reverse gear brake
in correct position (see arrow).


N o t e :

Shell length distance "a" = 94.9 mm.


3.  Place springs on spring retainer and install spring
retainer with springs in case from underneath.
Tighten bolts.

4.  Check function of 1st and reverse gear brake.
Apply compressed air in pressure bore (arrow).
Piston should compress the springs. Without
compressed air the piston should return to
starting position.


5.  Install piston and end cover for 2nd gear brake
and mount circlip. Press down piston and end
cover with a suitable tool.


38 - 16 Disassembling and Assembling Automatic Transmission
(Type 087 N)
Printed in Germany
9 4 4 A u t o m a t i c   T r a n s m i s s i o n / G e a r s ,   V a l v e   B o d y       38


6.  Install clutches. Assemble direct and reverse
clutch with forward clutch outside of transmission
and then slide clutch on to neck of oil pump with
case opening facing down at an angle. Swing
case to have opening facing up again.


7.  Check function of 2nd gear brake by applying
compressed air in the pressure bore (arrow).
Piston should compress the brake band (D + R
clutch). Piston must return to its starting position
without compressed air.


8.  Install reverse planetary gear set. Then install
corrugated washer and plates.


9.  Install pre-assembled one-way clutch by turning
planetary gear set in direction of arrow and
pressing in one-way clutch at same time.


Printed in Germany - I, 1982
Disassembling and Assembling Automatic Transmission
(Type 087 N)
      38 - 17
38 A u t o m a t i c   T r a n s m i s s i o n / G e a r s ,   V a l v e   B o d y 9 4 4


C h e c k i n g   O n e - w a y   C l u t c h


It should not be possible to turn planetary gear
set anticlockwise.


10.  Install retaining wedge for one-way clutch,
pressing in with end of hammer handle if
necessary, and mount circlip with opening
opposite the retaining wedge.


Parts have been assembled correctly, if groove
for circlip is accessible.


11.  Recheck function of 1st and reverse gear brake by applying compressed air (see point 4).
12.  Adjust 2nd gear brake. Tighten adjusting screw
to initial torque of 10 Nm (7 ft Ib). loosen
again and tighten finally to 5 Nm (3.6 ft lb).
Now turn adjusting screw exactly two turns
from this position and rock screw.


N o t e :

Only adjust brake band with transmission positioned
horizontally, since otherwise brake band would
jam.


38 - 18 Disassembling and Assembling Automatic Transmission
(Type 087 N)
Printed in Germany
9 4 4 Automatic Transmission/Gears, Regulation       38


MODIFICATIONS


Corrugated washer for first gear
brake dropped.


Note

From March 1983, corrugated washer
(Item 14) has been dropped, length
of shell (Item 36) changed and
piston (Item 37) equipped with a
ball valve.

Wet piston with ATF and insert in
transmission case so that ball valve
of piston (arrow 2) is flush with
transmission case bore (arrow 1).


Insert shell. Bore (arrow) must be
flush with ball valve.


Pay attention to length of shell
Dimension "a" = 97.2 mm

The new piston with ball valve and
the shell with bore can also be
installed later without corrugated
washer, even in previous
transmissions.


Printed in Germany - XVI, 1987
Disassembling and Assembling
Planet Gears (087 M and 087 N)
      38 - 18 a
38 A u t o m a t i c   T r a n s m i s s i o n / G e a r s ,   V a l v e   B o d y 9 4 4


38 - 18b Blank Page
9 4 4 A u t o m a t i c   T r a n s m i s s i o n / G e a r s ,   V a l v e   B o d y       38


 No.
Description
 Qty. Note When:
Special
Instructions

Removing

Installing
1

2

3
Circlip

Hub for ring gear

Ring gear
1

1

1


Check catches for
parking lock for wear


Printed in Germany - I, 1982
Disassembling and Assembling Ring Gear
(Type 087 N)
      38 - 19
38 A u t o m a t i c   T r a n s m i s s i o n / G e a r s ,   V a l v e   B o d y 9 4 4


38 - 20 Blank Page
9 4 4 A u t o m a t i c   T r a n s m i s s i o n / G e a r s ,   V a l v e   B o d y       38


 No.
Description
 Qty. Note When:
Special
Instructions

Removing

Installing
1

2

3

4


5

6
Roller

Spring

Circlip

Cage


Circlip

Outer race

10

10

1

1


1

1


Drive out carefully
with a hammer
Position correctly

Guide lug faces roller


Heat outer race to
approx. 150 °C
(300 °F) and install


Printed in Germany - I, 1982
Disassembling and Assembling One-way Clutch
(Type 087 N)
      38 - 21
38 A u t o m a t i c   T r a n s m i s s i o n / G e a r s ,   V a l v e   B o d y 9 4 4


DISASSEMBLING AND ASSEMBLING ONE-WAY CLUTCH


D i s a s s e m b l i n g


Drive out cage carefully with a hammer.


A s s e m b l i n g


1. Install lower circlip.


2.  Insert cage for one-way clutch. Heat outer race to
approx. 150 °C (300 °F), which requires that the
hotplate itself has a temperature of 190 °C
(375 °F). Take hold of cage on upper collar with
2 pliers, remove quickly from hotplate and install
in outer race. Make sure short sides of cage
retaining tabs are aligned with matching contours
in outer race (arrow). If necessary, turn
accordingly immediately after installing.


N o t e :


The cage will take on the heat of the outer race
quickly and then fit tight. If cage does not fit
correctly on lower circlip and in contour of outer
race, do not attempt to force it into correct position.
Instead drive it out carefully, let it cool down and
install it again.


3.  Install springs and rollers. Check for correct
installed position. Seen clockwise the spring
will be in front of the roller.


38 - 22 Disassembling and Assembling One-way Clutch
(Type 087 N)
Printed in Germany
9 4 4 Automatic Transmission/Gears, Regulation       38


DISASSEMBLING AND ASSEMBLING FREEWHEEL WITH PLASTIC CAGE
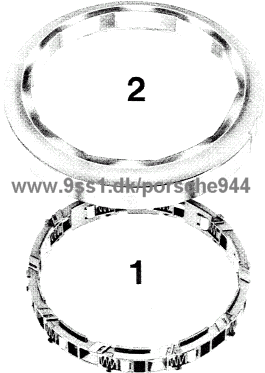


 No.
Description
 Qty. Note When:

Removing

Installing
1


2
Cage with rollers
and springs


Outer race
1


1
Turn and remove
downwards
Insert into
outer race in
correct position
from below. Lock
by turning


Printed in Germany - XVI, 1987
Disassembling and Assembling
Freewheel with Plastic Cage
      38 - 22a
38 Automatic Transmission/Gears, Regulation 9 4 4


ASSEMBLY NOTES FOR DISASSEMBLY AND ASSEMBLY


Disassembly

Unlock cage by turning in direction
of arrow and remove downwards.


Assembly

1. Combine 10 segments in one ring.


2.  Install springs and rollers. Pay
attention to correct installation
position. In clockwise direction,
spring is located before roller.
Install guide lug (arrow) as shown
with respect to rollers.


3.  Insert cage with rollers into
outer race in correct position from
below (arrow direction A).


1 =  Small retaining lugs pointing
upwards

2 = Large retaining lugs pointing
downwards


38 - 22b Disassembling and Assembling
Freewheel with Plastic Gage
Printed in Germany
9 4 4 Automatic Transmission/Gears, Regulation       38


4.  Lock cage by turning in
direction of arrow.


Printed in Germany - XVI, 1987
Disassembling and Assembling
Freewheel with Plastic Cage
      38 - 22c
38 A u t o m a t i c   T r a n s m i s s i o n / G e a r s ,   V a l v e   B o d y 9 4 4


38 - 22d Blank Page
9 4 4 A u t o m a t i c   T r a n s m i s s i o n / G e a r s ,   V a l v e   B o d y       38


TOOLS


No. Description Special Tool Remarks
1

2


Dial gauge holder

Dial gauge
VW 387

-


Standard


Printed in Germany - I, 1982
Disassembling and Assembling Forward Clutch
(Type 087 N)
      38 - 23
38 A u t o m a t i c   T r a n s m i s s i o n / G e a r s ,   V a l v e   B o d y 9 4 4


38 - 24 Disassembling and Assembling Forward Clutch
(Type 087 N)
Printed in Germany
9 4 4 A u t o m a t i c   T r a n s m i s s i o n / G e a r s ,   V a l v e   B o d y       38


 No.
Description
 Qty. Note When:

Removing

Installing
1

2


3


4


5


6


7


8


9


10
Circlip

Pressure plate


Inner plate


Outer plate


Ring gear


Pressure plate


Circlip


Diaphragm spring


Piston


Clutch drum
1

X


5


4


1


1


1


1


1


1
 

Different thicknesses,
adjust axial play

Install only plates with
specified lining. Place
new plates in ATF 15
minutes before
installing

Check for wear, slight
blue discoloration is
not significant

Insert pressure plate
and one inner plate
before installing (below
retaining edge in
external spline)

Smooth surface faces
plate assembly

Diaphragm spring
should already get
slight preload from
installed circlip;
replace diaphragm
spring if necessary

Curved surface (small
diameter) faces base
of clutch

Sealing tips are vulcan-
ized; coat sealing lips
with ATF before install-
ing

Measure position of
groove for circlip.
Check ball valve - in
direction of arrow =
tight, in opposite
direction of arrow =
open


Printed in Germany - I, 1982
Disassembling and Assembling Forward Clutch
(Type 087 N)
      38 - 25
38 A u t o m a t i c   T r a n s m i s s i o n / G e a r s ,   V a l v e   B o d y 9 4 4


DISASSEMBLING AND ASSEMBLING FORWARD CLUTCH


D i s a s s e m b l i n g

1.  Remove circlip and take all parts out of clutch
drum.


A s s e m b l i n g

1.  Measure location of groove for circlip. Distance "a"
= 29.8 mm. There are different version, con-
sequently only install a clutch drum with correct
distance "a".


2.  Only install inner plates, the linings of which have grooves as shown in the picture. Place new lined plates in ATF 15 minutes before installing.


3.  Measure axial play of forward clutch.
Specification: 0.50 . . . 0.90 mm.
The following pressure plates are available for
adjustments.
2.30 mm, 2.70 mm, 3.10 mm, 3.50 mm and
3.90 mm thick.


4.  Check function of assembled forward clutch.
This is done by placing both clutches (forward
and D + R clutches) with thrust washers on an
oil pump and applying compressed air in pressure
bore (arrow A). Piston should be heard to
compress the plate assembly. Piston must return
to its starting position when supply of
compressed air is stopped.


38 - 26 Disassembling and Assembling Forward Clutch
(Type 087 N)
Printed in Germany
9 4 4 A u t o m a t i c   T r a n s m i s s i o n / G e a r s ,   V a l v e   B o d y       38


TOOLS


No. Description Special Tool Remarks
1

2

3

4

5

6

7
Bridge

Thrust pad

Feeler blade gauge

Thrust plate

Thrust plate

Punch

Drift
VW 460/3

VW 433

-

VW 402

VW 401

VW 411

VW 295


Standard tool


Printed in Germany - I, 1982
Disassembling and Assembling Direct and Reverse Clutch
(Type 087 N)
      38 - 27
38 A u t o m a t i c   T r a n s m i s s i o n / G e a r s ,   V a l v e   B o d y 9 4 4


38 - 28 Disassembling and Assembling Direct and Reverse Clutch
(Type 087 N)
Printed in Germany
9 4 4 A u t o m a t i c   T r a n s m i s s i o n / G e a r s ,   V a l v e   B o d y       38


 No.
Description
 Qty. Note When:
Special
Instructions

Removing

Installing
1


2

3


4


5


6

7


8

9


10


11
Circlip


Pressure plate

Inner plate


Outer plate


Circlip


Spring retainer

Spring


Spring retainer

Piston


Bushing


Clutch drum
X


1

4


4


1


1

16


1

1


1


1


Remove with
VW 460/3


Remove with a
standard puller
(e. g. Kukko No.
21/6 - 37 . . . 46 mm)
and VW 295
Different thicknesses.
adjust axial play


Only install plates with
specified lining. Place
new plates in ATF for
15 minutes before
installing

Check for wear;
replace even if wear is
only slight (blue dis-
Coloration)

Install with VW 460/3.
Make sure of correct
Fit


Distribute around cir-
cumference uniformly
in 4 groups of 4 each


Coat sealing lips with
ATF

Press in with VW 295
and VW 433


Check Ball valve with
compressed air - in
direction of arrow =
closed, in opposite
direction of arrow =
open. Apply compress-
ed air in direction of
arrow.


Printed in Germany - XVII, 1988
Disassembling and Assembling Direct and Reverse Clutch
(Type 087 N)
      38 - 29
38 A u t o m a t i c   T r a n s m i s s i o n / G e a r s ,   V a l v e   B o d y 9 4 4


DISASSEMBLING AND ASSEMBLING DIRECT AND REVERSE CLUTCH


D i s a s s e m b l i n g

1.  Remove circlip by pressing down spring retainer
with VW 460/3 and taking circlip out of groove.


2. Remove piston by turning and pulling out.
3.  Remove bearing bushing with VW 295 and a
standard puller, e.g. Kukko No. 21/6
(37 . . . 46 mm).


A -  Standard internal-claw puller
e.g. Kukko No. 21/6 (37 - 46 mm)


Assembling

1.  Check the ball valve for leakage (see page
38-29, Item 11).


38 - 30 Disassembling and Assembling Direct and Reverse Clutch
(Type 087 M and 087 N)
Printed in Germany - XVII, 1988
9 4 4 A u t o m a t i c   T r a n s m i s s i o n / G e a r s ,   V a l v e   B o d y       38


2.  Press in bearing bushing flush at first with VW 433.
Then press in new bushing to correct depth
(1.7 mm below upper edge) with an old bushing.


A - Old bushing (applied on new bushing)


N o t e :

Only install inner plates, the linings of which are
identified as shown in the picture.


3.  Adjust axial play of D + R clutch.

Specification: 2.05 . . . 2.50 mm.


Different size circlips are available for adjustment.

Thickness: 1.5 mm, 1.7 mm, 2.0 mm, 2.3 mm
and 2.5 mm.


4.  Check function of assembled D + R clutch.
This is done by placing both clutches (forward
and D + R clutches) with thrust washers on an
oil pump and applying compressed air in pressure
bore (arrow BI. Piston must be heard to compress
the prate assembly. Piston should return to its
starting position when stopping the supply of
compressed air.


Printed in Germany - I, 1982
Disassembling and Assembling Direct and Reverse Clutch
(Type 087 N)
      38 - 31
38 A u t o m a t i c   T r a n s m i s s i o n / G e a r s ,   V a l v e   B o d y 9 4 4


38 - 32 Blank Page
9 4 4 A u t o m a t i c   T r a n s m i s s i o n / G e a r s ,   V a l v e   B o d y       38


Printed in Germany - I, 1982
Disassembling and Assembling Oil Pump
(Type 087 N)
      38 - 33
38 A u t o m a t i c   T r a n s m i s s i o n / G e a r s ,   V a l v e   B o d y 9 4 4


 No.
Description
 Qty. Note When:
Special
Instructions

Removing

Installing
1


2

3

4

5

6


7


8


9


10


11

Screw


Cover

Valve ball 11 mm dia.

Valve spring

Drive dog

Inner gear


Outer gear


Piston ring (small)


Piston ring (large)


Thrust washer


Body
2


1

1

1

1

1


1


2


2


1


1
Valve springs push
against cover


Ends are connected
together; disconnect
and remove carefully

Ends are connected
together; disconnect
and remove carefully

Remove after
removing piston rings
Torque:
1.4 Nm (1 ft lb)

Check for scoring


lubricate lightly with
oil before installing

lubricate lightly with
oil before installing.
Manufacturing codes
face cover


Install before installing
piston rings


ASSEMBLING OIL PUMP

1.  Place thrust washer (arrow) on pump neck and
then install piston rings carefully.

2. Check movement of pump. It should be possible
to turn it with the inserted pump shaft by hand
without resistance.


38 - 34 Disassembling and Assembling Oil Pump
(Type 087 N)
Printed in Germany
9 4 4 A u t o m a t i c   T r a n s m i s s i o n / G e a r s ,   V a l v e   B o d y       38


Printed in Germany - I, 1982
Removing and Installing Valve Body
(Type 087 N)
      38 - 35
38 A u t o m a t i c   T r a n s m i s s i o n / G e a r s ,   V a l v e   B o d y 9 4 4


 No.
Description
 Qty. Note When:
Special
Instructions

Removing

Installing
1


2

3

4

5


6

7

8

9

10


11

12

13

14
Bolt


Lock washer

Oil sump

Gasket

Screw


Spring washer

Cover

Oil filter screen

Gasket

Bolt


Spring washer

Valve body

Spring for accumulator

Piston for
accumulator

4


4

1

1

2


2

1

1

1

11


11

1

1

1


Unscrew bolt shown
in drawing last
Torque:
20.6 Nm (15 ft lb)

Replace if necessary


Replace

Torque:
3.5 Nm (2.5 ft lb)


Replace

Torque:
3.5 Nm (2.5 ft lb)


38 - 36 Removing and Installing Valve Body
(Type 087 N)
Printed in Germany
9 4 4 A u t o m a t i c   T r a n s m i s s i o n / G e a r s ,   V a l v e   B o d y       38


REMOVING AND INSTALLING VALVE BODY


R e m o v i n g


N o t e :

The valve body can be removed from a transmission
installed in the car.


I n s t a l l i n g


1.  Connect manual valve (arrow A) and kickdown
valve (arrow B).


FROM 1983 MODEL ON

2.  Tighten bolts alternately to torque of 3.5 Nm
(2.5 ft lb).


N o t e :

Never run engine or have car towed when trans-
mission oil sump has been removed or oil drained.


Printed in Germany - I, 1982
Removing and Installing Valve Body
(Type 087 N)
      38 - 37
38 A u t o m a t i c   T r a n s m i s s i o n / G e a r s ,   V a l v e   B o d y 9 4 4


REMOVING AND INSTALLING TRANSFER AND SEPARATION PLATE
(FROM 1983 MODEL ON)
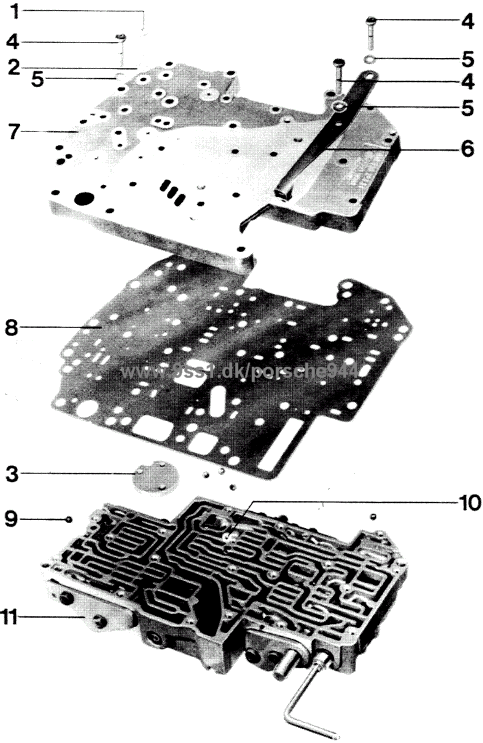


38 - 40 Removing and Installing Transfer and Separation Plate
(Type 087 N)
Printed in Germany
9 4 4 A u t o m a t i c   T r a n s m i s s i o n / G e a r s ,   V a l v e   B o d y       38


 No.
Description
 Qty. Note When:
Special
Instructions

Removing

Installing
1


2

3


4


5

6

7

8

9

10

11

Oval head screw


Washer

Support plate for
accumulator

Oval head screw


Washer

Shift segment spring

Transfer plate

Separation prate

Ball (6 mm dia.)

Ball (3 mm dia.)

Valve body
3


3

1


19


19

1

1

1

5

1

1
  Torque:
3.5 Nm (2.5 ft lb)

Replace if necessary


Tighten uniformly to
torque of 3.5 Nm
(2.5 ft lb)

Replace if necessary


Note marks

Note marks

Note arrangement

Note arrangement

Note marks


Printed in Germany - I, 1982
Removing and Installing Transfer and Separation Plates
(Type 087 N)
      38 - 41
38 Automatic Transmission /Gears, Valve Body 9 4 4


REMOVING AND INSTALLING TRANSFER AND SEPARATION PLATES


1.  Identification of transfer plate:


Part No. 010.325.283 J cast in
part (arrow).


2.   Identification of separation
plate:

Transmission type RH
Arrow l = 3 notches
Arrow 2 = 2 notches


3.  Identification of separation
plate:

Transmission types RCA, RCB
and RCF
Arrow 1 = 2 notches
Arrow 2 = 3 notches
Arrow 3 = 1 notch


4.  Identification of separation
plate:

Transmission types RCD and RCE
Arrow 1 = 2 notches
Arrow 2 = 4 notches
Arrow 3 = 1 notch


38 - 42 Removing and Installing Transfer
and Separation Plates
(Types 087 M and 087 N)
XVI, 1987 - Printed in Germany
9 4 4 Automatic Transmission /Gears, Valve Body       38


5.  Arrangement of valve balls in
valve body:

5 balls of 6 mm dia.
1 ball of 3 mm dia. (arrow A)


6.  Identification of valve body up
to December 83:

BB = Transmission RH
FB = Transmissions RCA and RCB


7.  Identification of valve body as
from December 83:

FMP = Transmission RCD and RCE
FBP = Transmission RCF


Identification is by means of a
coding vane (arrow), screwed on to
the transfer plate.


Note

The coding vane must remain pointing
to valve body during repair.


Printed in Germany - XVI, 1987
Removing and Installing Transfer
and Separation Plates
(Types 087 M and 087 N)
      38 - 43
38 A u t o m a t i c   T r a n s m i s s i o n / G e a r s ,   V a l v e   B o d y 9 4 4


38 - 44 Blank Page
9 4 4 A u t o m a t i c   T r a n s m i s s i o n / G e a r s ,   V a l v e   B o d y       38


Parts must be removed from a valve body to clean a very dirty valve body. These parts should be placed
in a special tray to guarantee re-installation in original position. Outside shape of tray matches that of
valve body to facilitate insertion of valves and springs.
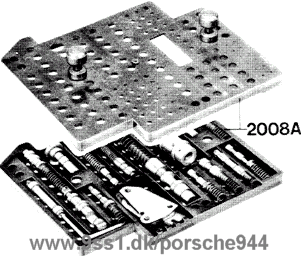


D i s a s s e m b l i n g


Normally, valve body is only disassembled when
transmission damage is from burnt friction linings
or ATF is excessively dirty. As long as ATF is
relatively clean, in most cases it will be sufficient
to flush assembled valve body in clean cleaning
fluid. Then dry with compressed air.

1.  Remove end plates on one side, remove valves and springs one after the other and place them in tray.

2. Unscrew end plates on other side and remove springs and valves one after the other, also placing them in tray.

3. Place cover on tray.


N o t e :

Slight scoring on valves will not cause operating
problems. They can be used again.
4.  Agitate tray with parts in cleaning fluid and
then dry with compressed air. Never use water.


A s s e m b l i n g


1.  Assembling must be done at a clean working
place. Never use fluffy rags when cleaning
and assembling.

2. Valves and springs must be installed in their
original bores of valve body.

3. First install springs and valves in one side, install
end plates, then install valves and springs of
other side and bolt end plates.


N o t e :

Coat all valves with ATF and check for free move-
ment. Valves must slide down bores by their own
weight.


Printed in Germany - I, 1982
Disassembling and Assembling Valve Body
(Type 087 N)
      38 - 45
38 A u t o m a t i c   T r a n s m i s s i o n / G e a r s ,   V a l v e   B o d y 9 4 4


38 - 50 Blank Page
9 4 4 A u t o m a t i c   T r a n s m i s s i o n / G e a r s ,   V a l v e   B o d y       38


DISASSEMBLING AND ASSEMBLING VALVE BODY
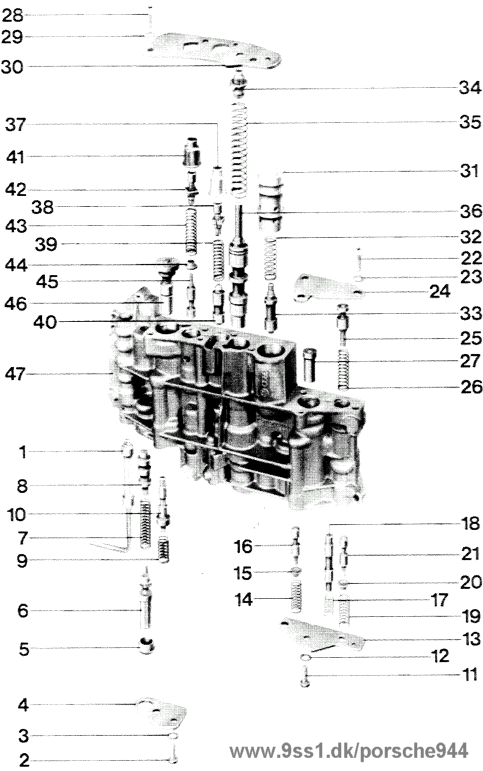


Printed in Germany - I,1982
Disassembling and Assembling Valve Body
(Type 087 N)
      38 - 51
38 A u t o m a t i c   T r a n s m i s s i o n / G e a r s ,   V a l v e   B o d y 9 4 4


 No.
Description
 Qty. Note When:
Special
Instructions

Removing

Installing
1

2


3

4

5


6

7


8


9


10

11


12

13

14


15

16


17


18

19


20

21
Manual valve

Screw


Washer

End plate

Guide sleeve for
kickdown valve

Kickdown valve

Throttle pressure
valve spring

Throttle pressure
valve

Shift valve
1 - 2 spring

Shift valve 1 - 2

Screw


Washer

End plate

Converter pressure
valve spring

Spring retainer

Converter pressure
valve

Shift valve
2 - 3 spring

Shift valve 2 - 3

3 - 2 kickdown
control valve spring

Spring retainer

3 - 2 kickdown
control valve
1

2


2

1

1


1

1


1


1


1

2


2

1

1


1

1


1


1

1


1

1
 

Torque:
3.5 Nm (2.5 ft lb)

Replace if necessary


Same size as spring for
shift valve 2 - 3, but
do not mix up


Torque:
3.5 Nm (2.5 ft lb)

Replace if necessary


Same size as spring for
shift valve 1 - 2, but
do not mix up


38 - 52 Disassembling and Assembling Valve Body
(Type 087 N)
Printed in Germany
9 4 4 A u t o m a t i c   T r a n s m i s s i o n / G e a r s ,   V a l v e   B o d y       38


 No.
Description
 Qty. Note When:
Special
Instructions

Removing

Installing
22


23

24

25

26


27

28


29

30

31

32

33


34


35


36

37

38


39


40


41
Screw


Washer

End plate

Control valve 3 - 2

Control valve 3 - 2
spring

Governor plug 2 - 3

Screw


Washer

End plate

Apply valve bushing

Apply valve spring

Apply valve 1st and
reverse gear brake

Main pressure valve
adjusting screw


Main pressure valve
spring

Main pressure valve

Sleeve

Main pressure limiting
valve adjusting screw

Main pressure limiting
valve spring

Main pressure limiting
valve

Sleeve
3


3

1

1

1


1

4


4

1

1

1

1


1


1


1

1

1


1


1


1
  Torque:
3.5 Nm (2.5 ft lb)

Replace if necessary


Torque:
3.5 Nm (2.5 ft lb)

Replace if necessary


Do not turn, can only
be adjusted on test
stand


Do not turn, can only
be adjusted on test
stand


Printed in Germany - I, 1982
Disassembling and Assembling Valve Body
(Type 087 N)
      38 - 53
38 A u t o m a t i c   T r a n s m i s s i o n / G e a r s ,   V a l v e   B o d y 9 4 4


 No.
Description
 Qty. Note When:
Special
Instructions

Removing

Installing
42


43


44

45


46

47


Throttle pressure
limiting valve
adjusting screw

Throttle pressure
limiting valve spring

Spring retainer

Throttle pressure
limiting valve

Governor plug 1 - 2

Body
1


1


1

1


1

1
  Do not turn, can only
be adjusted an test
stand


Note marks


38 - 54 Disassembling and Assembling Valve Body
(Type 087 N)
Printed in Germany
9 4 4 Automatic Transmission/Gears, Regulation       38


DISASSEMBLING AND ASSEMBLING VALVE BODY (RCD AND RCE TRANSMISSIONS)
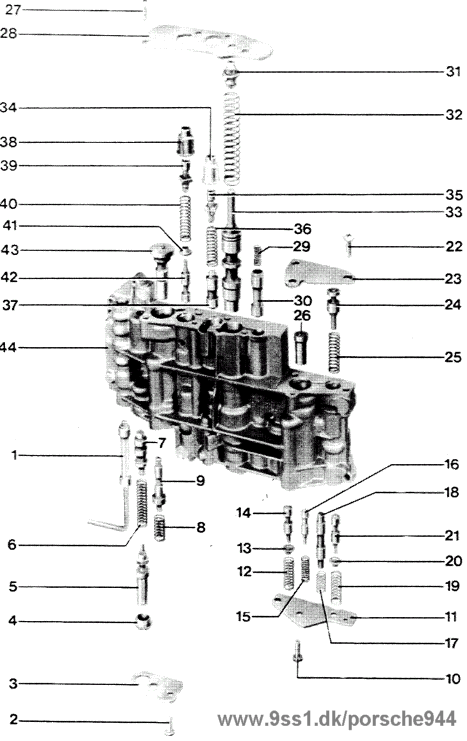


Printed in Germany - XVI, 1987
Disassembling and Assembling
Valve Body (Type 087 M)
      38 - 54a
38 Automatic Transmission/Gears, Regulation 9 4 4


 No.
Description
 Qty. Note When:

Removing

Installing
1

2

3

4


5

6


7


8


9

10

11

12


13

14


15


16


17
Manual valve

Screw

End plate

Guide sleeve for
kickdown valve

Kickdown valve

Throttle pressure
valve spring

Throttle pressure
valve

Shift valve
spring


Shift valve

Screw

End plate

Converter pressure
valve spring

Spring retainer

Converter pressure
valve

Step pressure
valve spring

Step pressure
valve

Shift valve
spring
1

2

1

1


1

1


1


1


1

2

1

1


1

1


1


1


1


1 - 2


1 - 2


2 - 3


Torque: 3.5 Nm


Same size as
spring for shift
valve 2-3, but do
not mix up


Torque: 3.5 Nm


Same size as
spring for shift
valve 1-2, but
do not mix up


38 - 54 b Disassembling and Assembling
Valve Body (Type 087 M)
Printed in Germany
9 4 4 Automatic Transmission/Gears, Regulation       38


 No.
Description
 Qty. Note When:

Removing

Installing
18

19


20

21


22

23

24


25


26


27

28

29

30


31


32


33
Shift valve

3 - 2 kick down
control valve
spring

Spring retainer

3 - 2 kickdown
control valve

Screw

End plate

Control valve
3 - 2

Control valve
3 - 2 spring

Governor plug
2 - 3

Screw

End plate

Apply valve spring

Apply valve 1st
and reverse gear
brake

Main pressure
valve adjusting
screw

Main pressure
valve spring

Main pressure
valve

1

1


1

1


3

1

1


1


1


4

1

1

1


1


1


1
2 - 3


Torque: 3-5 Nm


Torque: 3.5 Nm


Do not turn, can
only be adjusted
on test stand


Printed in Germany - XVI, 1987
Disassembling and Assembling
Valve Body (Type 087 M)
      38 - 54c
38 Automatic Transmission/Gears, Regulation 9 4 4


 No.
Description
 Qty. Note When:

Removing

Installing
34

35


36


37


38

39


40


41

42


43


44
Sleeve

Main pressure
limiting valve
adjusting screw

Main pressure
limiting valve
spring

Main pressure
limiting valve

Sleeve

Throttle pressure
limiting valve
adjusting screw

Throttle pressure
limiting valve
spring

Spring retainer

Throttle pressure
limiting valve

Governor plug
1 - 2

Body

1

1


1


1


1

1


1


1

1


1


1
 

Do not turn, can
only be adjusted
on test stand


Do not turn, can
only be adjusted
on test stand


Note marks


38 - 54 d Disassembling and Assembling
Valve Body (Type 087 M)
Printed in Germany
9 4 4 A u t o m a t i c   T r a n s m i s s i o n / G e a r s ,   V a l v e   B o d y       38


 No.
Description
 Qty. Note When:
Special
Instructions

Removing

Installing
1

2

3

4

5


6

7


8

9

10

11
Cover

Seal

Return spring

Seal

Seal


Circlip

Modulator piston


Shim

Accumulator spring

Spring retainer

Piston rod

1

2

1

1

1


1

1


X

1

1

1
 

Replace


Sealing lip faces cover

Sealing lip faces
piston rod


Only pre-assembled and
adjusted replacement
parts available (con-
sists of parts 6 - 11)


Printed in Germany - I, 1982
Disassembling and Assembling 2nd Gear Brake
(Type 087 N)
      38 - 55
38 Automatic Transmission /Gears, Valve Body 9 4 4


ASSEMBLING 2ND GEAR BRAKE


Position oil seals correctly.
Distance "a" = 96.5 mm.


Note

Securing the piston rod to the
piston has been changed.
Previously: Circlip
Changed:         Riveted on to piston
with disk (arrow)


Piston with riveted piston rod must
only be installed with recessed
cover.


Cover is recessed (arrow). This
provides piston disk with enough
play.

Pay attention to piston rod length.


  Distance "a"
D+R clutch with 134 mm Ø
D+R clutch with 140 mm Ø
61,9 +- 0,5 mm
52,4 +- 0,5 mm


38 - 56 Disassembling and Assembling
2nd Gear Brake Transfer
(Type 087 M and 087 N)
XVII, 1988 - Printed in Germany
9 4 4 A u t o m a t i c   T r a n s m i s s i o n / G e a r s ,   V a l v e   B o d y       38


Printed in Germany - I, 1982
Disassembling and Assembling Governor
(Type 087 N)
      38 - 57
38 A u t o m a t i c   T r a n s m i s s i o n / G e a r s ,   V a l v e   B o d y 9 4 4


 No.
Description
 Qty. Note When:
Special
Instructions

Removing

Installing
1


2

3

4


5

6


7

8

9

10

11

12

13
Screw


Washer

Thrust plate

Governor shaft


Transfer plate

Balance weight


Circlip

Centrifugal weight

Pull rod

Spring retainer

Spring

Valve

Body
2


2

1

1


1

1


1

1

1

1

1

1

1
  Torque:
3.5 Nm (2.5 ft lb)

Replace if necessary

Check for wear

Can be replaced
separately

Position correctly

Balanced with governor;
do not mix up with
weight from a different
governor


38 - 58 Disassembling and Assembling Governor
(Type 087 N)
Printed in Germany
9 4 4 A u t o m a t i c   T r a n s m i s s i o n / G e a r s ,   V a l v e   B o d y       38


Printed in Germany - I, 1982
Disassembling and Assembling Parking Lock
(Type 087 N)
      38 - 59
38 A u t o m a t i c   T r a n s m i s s i o n / G e a r s ,   V a l v e   B o d y 9 4 4


 No.
Description
 Qty. Note When:
Special
Instructions

Removing

Installing
1

2


3

4

5

6

7


8

9

10

11

12

13


14

15

16


17

18


19

20

21


22
Cap

Nut


Spacer

Lever

Circlip

Thrust washer

Nut


Washer

Kickdown valve lever *

Shaft

Seal

Lock wacher

Nut


Washer

Stop washer

Ratchet


Lock washer

Engaging lever


Lock washer

Operating rod

Bolt


Washer
1

1


1

1

1

1

1


1

1

1

1

1

1


1

1

1


1

1


1

1

1


1
 

Torque:
20 Nm (14 ft lb)


Torque:
17 Nm (12 ft lb)


Position correctly


Coat with ATF


Torque:
20.5 Nm (15 ft lb)


Check detent notches
for wear


Check rollers for easy
movement


Torque:
3.5 Nm (2.5 ft lb)


38 - 60 Disassembling and Assembling Parking Lock
(Type 087 N)
Printed in Germany
9 4 4 A u t o m a t i c   T r a n s m i s s i o n / G e a r s ,   V a l v e   B o d y       38


 No.
Description
 Qty. Note When:
Special
Instructions

Removing

Installing
23

24

25


26

27

28


29

30
Lever

Seal

Bolt


Lock washer

Spring

Bolt


Pawl

Spring

1

1

1


1

1

1


1

1


Drive out with right
size punch


Coat with ATF

Torque:
20.5 Nm (15 ft lb)


Check for wear

Position correctly
 

* Operating lever for kickdown valve is flat on stop surface A as from 1983 model.
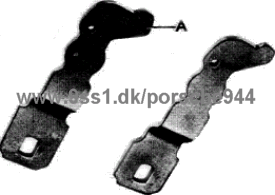


N o t e :

New operating lever can also be installed in old trans-
mission.
Old operating lever, however, may not be installed in
transmission with new kickdown valve.


Printed in Germany - I, 1982
Disassembling and Assembling Parking Lock
(Type 087 N)
      38 - 61
39 D i f f e r e n t i a l / T r a n s a x l e   S y s t e m 9 4 4


39 - 0 Blank Page
9 4 4 D i f f e r e n t i a l / T r a n s a x l e   S y s t e m       39


Printed in Germany
Removing and Installing Differential (Type 016 K)
      39 - 1
39 D i f f e r e n t i a l / T r a n s a x l e   S y s t e m 9 4 4


 No.
Description
 Qty. Note When:
Special
Instructions

Removing

Installing
1


2

3

4

5


6

7

8

9


10

11


12


13


14

15


16


17
Threaded sleeve


Gasket

Spring

Sleeve

Bolt


Washer

Cover

Gasket

Selector shaft
assembly

Dowel sleeve

Bolt


Gear carrier
assembly


Bolt


Flange shaft

Bolt with washer


Cover


Differential
1


1

1

1

3


3

1

1

1


2

12


1


2


2

9


1


1


Remove gearbox
before removing
Torque:  30 Nm
(22 ft lb)


Torque:  6 to 10 Nm
(4 to 7 ft lb)


Replace


Torque:  24 Nm
(17 ft lb)

Coat sealing surface
with original VW
sealing compound
D3

Torque:  25 Nm
(18 ft lb)


Torque:  25 Nm
(18 ft lb)

Position correctly,
magnet faces
down

Light coat of oil
for tapered roller
bearings and
pinion splines


39 - 2 Removing and Installing Differential (Type 016 K) Printed in Germany
9 4 4 D i f f e r e n t i a l / T r a n s a x l e   S y s t e m       39


 No.
Description
 Qty. Note When:
Special
Instructions

Removing

Installing
18 Case 1 If transmission
case has to be re-
placed and
deviation "r" is
not given on ring
gear, check position
of pinion shaft prior
to removing the gear
carrier (actual
distance)


Printed in Germany
Removing and Installing Differential (Type 016 K)
      39 - 3
39 D i f f e r e n t i a l / T r a n s a x l e   S y s t e m 9 4 4


REMOVING AND INSTALLING DIFFERENTIAL


R e m o v i n g


N o t e

Gear carrier must be removed first before removing
the differential.


1.  Unscrew flange shaft mounting bolt and take off
flange shaft, while holding with a mandrel.


2.  Unscrew final drive cover mounting bolts and
pry off cover with two tire irons.
I n s t a l l i n g


1.  Torque side transmission cover bolts to 25 Nm
(18 ft lb).


2. Torque flange shaft mounting bolt to 25 Nm
(18 ft lb).


39 - 4 Removing and Installing Differential (Type 016 K) Printed in Germany
9 4 4 D i f f e r e n t i a l / T r a n s a x l e   S y s t e m       39


TOOLS


No. Description Special Tool Remarks
1

2

3


Puller

Thrust pad

Pipe
US 1078

VW 295 a

VW 40 - 21
Standard, e. g. Kukko 44/2


Printed in Germany
Disassembling and Assembling Differential (Type 016 K)
      39 - 5
39 D i f f e r e n t i a l / T r a n s a x l e   S y s t e m 9 4 4


39 - 6 Disassembling and Assembling Differential
(Type 016 K)
Printed in Germany
9 4 4 D i f f e r e n t i a l / T r a n s a x l e   S y s t e m       39


 No.
Description
 Qty. Note When:
Special
Instructions

Removing

Installing
1


2


3


4


5

6


7


8

9


10


11


12
Bolt


Ring gear


Inner race for large
tapered roller
bearing

Inner race for small
tapered roller
bearing

Dowel sleeve

Shaft


Small differential
gear

Thrust washer

Large differential
gear

Nut for flange
shaft

Shim


Differential
housing
11


1


1


1


1

1


2


2

2


2


2


1


Drive in with a
suitable mandrel
Loosen, then
tighten cross-
wise to 85 . . . 100
Nm (61 to 72 ft lb)

Paired with pin ion
shaft


Drive in flush

Drive in carefully
to avoid damage
on thrust washers.
Lock with dowel
sleeve


Check for wear


Determine new
thickness

Adjust ring gear
after replacing


Printed in Germany
Disassembling and Assembling Differential
(Type 016 K)
      39 - 7
39 D i f f e r e n t i a l / T r a n s a x l e   S y s t e m 9 4 4


DISASSEMBLING AND ASSEMBLING DIFFERENTIAL


D i s a s s e m b l i n g


1.  Clamp differential in a vise fitted with soft jaws
and unscrew ring gear bolts.


2. Drive ring gear off of housing.


3.  Pull off inner races for large and small tapered
roller bearings. Use US 1078 or a standard
extractor (e. g. Kukko 44/2) and Special Tool
VW 295 a.


39 - 8 Disassembling and Assembling Differential (Type 016 K) Printed in Germany
9 4 4 D i f f e r e n t i a l / T r a n s a x l e   S y s t e m       39


A s s e m b l i n g


1.  Heat inner races for small and large tapered roller
bearings to about 100 °C (210 °F). Install on
differential and press on to correct position. Use
Special Tool VW 40 - 21.


2.  Install differential gears. Install large differential gears with correct shims. Install small differential gears with 180° offset (hold thrust washer in place with a little grease) and swing in. Align thrust washers with shaft bore. drive in shaft carefully and lock with a split pin.

3.  Heat ring gear to about 120 °C (250 °F) and
install. Align bolt holes with each other with
centering pins.


A - Centering pins


4.  Tighten ring gear with new bolts and tighten
bolts to specified torque crosswise.


ADJUSTING DIFFERENTIAL GEARS


1.  Install large differential gears with thinnest
shims (0.5 mm).


2. Install small differential gears with thrust
washers and press in shaft.


Do not mix up differential gears and thrust washers
from this point on!


Printed in Germany
Disassembling and Assembling Differential (Type 016 K)
      39 - 9
39 D i f f e r e n t i a l / T r a n s a x l e   S y s t e m 9 4 4


3.  Press out small differential gears and check play
of large differential gears by hand (arrows).


4.  Adjust play to max. 0.10 mm by installing a shim
of correct thickness.


N o t e


Adjustment is correct when no play can be felt,
but the differential gears can still be turned easily
and without hesitation.


Shims available:


Part Number Thickness (mm)
011 519 215
088 409 249
088 409 249 A
088 409 249 B
0.5
0.6
0.7
0.8


39 - 10 Disassembling and Assembling Differential
(Type 016 K)
Printed in Germany
944 Differential, Transaxle System 39


Tools


No. Description Special Tool Remarks
1
2
3
4
5
6
7
8

9
10
11
12
13
14
15
Universal gauge
Univ. dial gauge holder
Centering disk
Centering disk
Master gauge
Gauge plate
Sleeve
Dial gauge extension
9.3 mm
Gauge punger
Dial gauge
Adjustable lever
Dial gauge extension
Dial gauge
Adjusting device
Torque meter
VW 385/1
VW 387
VW 385/2
VW 385/3
VW 385/30
VW 385/17
VW 521/8
VW 385/15

VW 385/14

VW 388


VW 521/4


Standard, 3 mm measuring range

Standard, approx. 30 mm long
Standard, 5 mm measuring range

Standard, 0 to 600 Ncm


Adjusting Pinion and Ring Gear (Type 016 J and 016 K)
Printed in Germany - XVII, 1988
39 - 11
39 D i f f e r e n t i a l / T r a n s a x l e   S y s t e m 9 4 4


ADJUSTING PINION AND RING GEAR


Note

Careful adjustment of the drive pinion and ring gear is important to guarantee a long service life and quiet
running for the final drive. This is why drive pinions and ring gears are matched during production and
checked on special testing machines for the most favorable surface appearance and low noise levels in both
directions of rotation. The position of quietest running is determined by moving the drive pinion in an
axial direction, keeping the ring gear within specified backlash tolerances.

The deviation "r" from the master gaube "Ro" is measured and inscribed on the outside periphery of the
ring gear belonging to a pinion/ring gear set supplied as a spare part. Each set (drive pin ion and ring gear)
may only be replaced together.


ADJUSTMENT AND IDENTIFICATION OF PINION/RING GEAR SETS


S e r v i c e   S e t s

1 -  Code "K 935" means pinion/ring gear set with
Klingelnberg teeth and 9 : 35 ratio. Number
always has 3 digits.

2. Pair code 312 of pinion/ring gear set. Number
always has 3 digits.

3. Deviation "r" in reference to master gauge of
special testing machines used in production.
Deviation "r" is always given in 1/100 mm
and always has two digits.
For example: "25" means "r" = 0.25 mm.
Other letters or digits concern manufacturing
and material batches.

Ro -  Length of master gauge used in special testing
machine.


S t a n d a r d   S e t s

I m p o r t a n t !

In production the location of the drive pinion is
given by distance Po (center of ring gear to back
of pinion head). Deviation "r" on the ring gear
and the pair code are omitted. Because deviation
"r" is not given, the installed position of the drive
pinion must be measured before removing same,
when replacing parts which have direct influence
on the installed position of the drive pinion.


x - This data not required in production.
E -  Actual distance between ring gear shaft and
face of pinion at point of quietest running
for this set.
Vo - Hypoid displacement = 12 mm.


39 - 12 Adjusting Pinion and Ring Gear (Type 016 K) Printed in Germany - XVII, 1988
9 4 4 D i f f e r e n t i a l / T r a n s a x l e   S y s t e m       39


Recommended Sequence of Adjusting Pin ion and Ring Gear
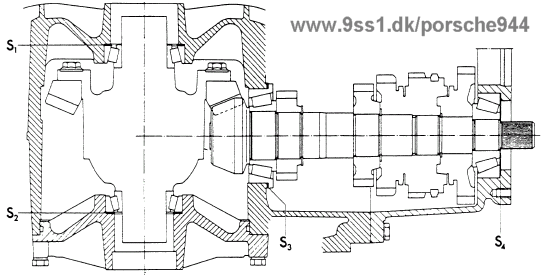


S1 = Shim for ring gear
S2 = Shim for ring gear
S3 = Shim for pinion
S4 = Shim for pinion


When it becomes necessary to adjust the pinion and
ring gear, it would be in the interest of economical
procedures to keep to the following sequence.

1 -  Determine the total shim thickness "Stot"
(S1 plus S2) for the specified pre-load of
tapered roller bearing/differential.

2 - Determine the total shim thickness "Stot"
(S3 plus S4) for the specified pre-load of
tapered roller bearing/drive pinion.

3 - Divide total shim thickness "Stot" in S3 and S4
that the distance from center of ring gear to face
of drive pinion is equal to distance "E"
determined during production.

4 - Divide total shim thickness "Stot" in S1 and S2
so that there is the specified amount of backlash
between the ring gear and pinion.
The goal of adjustments is to relocate the point
of optimal quiet running as was determined in
the special testing machine during production.

Perfect results require absolute care and cleanliness
during all assembly and measuring operations.


Printed in Germany - XVII, 1988
Adjusting Pinion and Ring Gear (Type 016 K)
      39 - 13
39 D i f f e r e n t i a l / T r a n s a x l e   S y s t e m 9 4 4


A d j u s t m e n t   S u r v e y


The pinion and ring gear only have to be adjusted when repairs on the final drive require the replacement
of parts having direct influence on the adjustment. Refer to the following table to avoid unnecessary
adjustments!


Replaced Part Ring Gear
(S1 + S2)
Pinion
Deviation
Pinion
"Actual"
distance
Pinion
only shim
"S4"
Transmission case X   X  
Gear carrier housing       X
Differential housing X      
Tapered roller bearing
for pinion
    X  
Tapered roller bearing
for differential
X      
Pinion/ring gear X X    
Final drive cover X      


D e t e r m i n i n g   I n s t a l l e d   P o s i t i o n  o f
D r i v e   P i n i o n (Actual Distance)

This operation is only necessary when deviation "r"
is not given on the ring gear and parts have to be
replaced, which have direct influence on the drive
pinion position. These would be both tapered roller
bearings for drive pinion and transmission case.


R e m o v i n g   D i f f e r e n t i a l

Complete universal gauge as show n in the list of
tools, insert in transmission case and measure
difference to "Ro" (max. deflection/point of reversal).
Measured value will be equal to deviation "r".

Adjust drive pinion as described after replacing parts.
Use the deviation "r" used for determination of shim
thickness "S3".


39 - 14 Adjusting Pinion and Ring Gear (Type 016 K) Printed in Germany
9 4 4 D i f f e r e n t i a l / T r a n s a x l e   S y s t e m       39


A d j u s t i n g   D r i v e   P i n i o n

Adjustment of the pinion/ring gear according to the
following instructions will only be necessary when
replacing the pinion/ring gear. Make adjustments with
help of the previously determined installed position
(actual distance), if other parts with influence on
the drive pinion are being replaced.


D e t e r m i n i n g   T o t a l   S h i m   T h i c k -
n e s s   S t o t   (S3 plus S4)


1.  Install tapered roller bearing outer race without
shims in transmission case or gear carrier.

2. Install completely assembled drive pin ion. Mount gear carrier and tighten bolts to torque of 25 Nm (18 ft lb).

3. Turn drive pinion about 20 full revolutions by hand so that both tapered roller bearings are preloaded, while lifting and lowering drive pinion.


4.  Mount gauges.
Set dial gauge (3 mm range) to 0 with 1 mm
preload. Dial gauge extension length approx.
30mm.

5. Move drive pinion up and down. Read play on
dial gauge and note the value. Do not turn drive
pinion during this step to avoid wrong readings.
Example: 1.30 mm.

6. Take off gear carrier again.


D e t e r m i n i n g   T o t a l   S h i m   T h i c k -
n e s s   " S t o t "   (S3 plus S4)

Stot

Pre-load

Measured value

Stot
=

=

=
measured value + pre-load

0.30 mm (constant value)

1.30 mm (example)

1.60 mm


D e t e r m i n i n g   D e v i a t i o n   " r "

1.  Install shim of determined thickness (1.60 mm
in the example) behind tapered roller bearing
outer race in gear carrier (S4 side). Mount gear
carrier again, bolt and turn drive pinion in both
directions about 20 revolutions each.

2. Adjust set ring of gauge VW 385/1 to distance
"a".


a = approx. 50 mm


Printed in Germany
Adjusting Pinion and Ring Gear (Type 016 K)
      39 - 15
39 Differential, Transaxle System 944


3. Complete universal gauge as shown.


4.  Use dial gauge extension VW 385/15 with
length = 9.3 mm.

5. Set the master gauge to

Ro = 59.65 mm (016 J/K up to Mod. '88)
Ro = 58.15 mm (016 J as from Mod. '89)
and mount on the universal gauge. Set the
dial guage (3 mm range) to zero with 1 mm
pre-load.

6.  Move the adjustable set ring back against
the stop.

7. Place gauge plate VW 385/17 (with magnet)
on the pinion head.

8. Remove the master gauge and insert the
universal gauge into the housing (installed
position). Centering disk VW 385/2 for final
drive cover.

9. Mount final drive cover carefully (do not
knock, risk of gauge plate slipping). Remove
the toroidal sealing ring, for practical
reasons, and tighten the cover with
4 screws.
10.  Pull the second centering disk outwards
with the adjustable set ring so that the uni-
versal gauge can still just be turned by
hand.


11.  Turn the universal gauge until the dial
gauge probe makes contact with the
gauge plate on the pinion head and the
dial indicates max. deflection (reversing
point). The measured value is dimension
"e" (black number scale).
For example: 0.46 mm.


39 - 16 Adjusting Pinion and Ring Gear (Type 016 J / K)
Printed in Germany - XVII, 1988
944 Differential, Transaxle System 39


Determining the thickness of shim "S3"


S3 = e + r

e =  Determined value
(max. dial gauge deflection)

r = Deviation (given on the ring gear in
1/100 mm or determined by measuring
the actual distance)


Example:

Value indicated
on the dial gauge "e"
Deviation value
given on the ring gear "r"

Shim thickness "S3"
0.46 mm

+ 0.18 mm
---------
0.64 mm


S3 shims available as spare parts:


Thickness (mm)

0.20

0.25

0.30

0.35

0.40

0.65

0.90

1.15


Adjusting Pinion and Ring Gear (Type 016 J / K)
Printed in Germany - XVII, 1988
39 - 16a
39 D i f f e r e n t i a l / T r a n s a x l e   S y s t e m 9 4 4


39 - 16b Blank Page
9 4 4 D i f f e r e n t i a l / T r a n s a x l e   S y s t e m       39


N o t e


Any thickness for "S3" is possible due to the
tolerances of the shims. Measure shim thickness at
many different points with a micrometer. Also
check shims for burrs or damage.
Only install shims in perfect condition.


D e t e r m i n i n g   T h i c k n e s s   o f   S h i m
" S 4 "


S4 = Stot - S3


Example:
Total shim thickness
Shim thickness S3
Shim thickness S4
1.60 mm
- 0.64 mm
0.96 mm


Available shims S4

Thickness (mm)

0.24
0.27
0.30
0.33
0.36
0.39
0.42
0.45
0.69
0.93
1.17
1.41


Measure thickness of shims at many different points
with a micrometer. Also check shims for burrs
or damage. Only install shims in perfect condition.
C h e c k i n g   D i s t a n c e   " E "


1.  Install drive pinion with measured shims S3
and S4. Bolt gear carrier and turn drive pinion
in both directions about 20 full revolutions by
hand so that the tapered roller bearings will be
loaded by the rotation and can settle.


2. Apply universal gauge and check distance.


3. When shims have been selected correctly, the
dial gauge (read counter clockwise - red number
range) should display the value of deviation
"r" inscribed on the ring gear with a tolerance
of +- 0.04 mm.


C h e c k i n g   P r e - l o a d   o f   T a p e r e d
R o l l e r   B e a r i n g   o n   D r i v e   P i n i o n


Screw bolt in drive pin ion. Apply torque meter
and read friction torque.

For new bearings it should be 200 to 400 Ncm
or 30 to 60 Ncm for used bearings.


N o t e

Lubricate bearings with hypoid gear lube.


Printed in Germany - XVII, 1988
Adjusting Pinion and Ring Gear (Type 016 K)
      39 - 17
39 D i f f e r e n t i a l / T r a n s a x l e   S y s t e m 9 4 4


A - Torque meter, standard, 0 . . . 600 Ncm


A d j u s t i n g   R i n g   G e a r


N o t e

The ring gear has to be adjusted, if

     transmission case,
final drive cover,
tapered roller bearings for differential
and/or pinion/ring gear set

are replaced (also refer to "necessary adjustments").
D e t e r m i n i n g   T o t a l   S h i m
T h i c k n e s s   " S t o t " (S1 plus S2)

(For determination of pre-load for tapered roller
bearings on differential)

1. 

2.

3.


4.


5.


6.


7.
Remove drive pinion.

Remove seals for shaft flanges.

Remove outer races of tapered roller bearings for
differential. Take out shims.

Drive in tapered roller bearing outer races without
shims against stop.

Place differential in case. Installed position: ring
gear facing cover.

Install cover and tighten bolts crosswise to 25 Nm
(18 ft lb).

Clamp transmission in assembly stand with cover
facing up.


A - Dial gauge extension approx. 30 mm


8.  Place gauge plate VW 385/17 on collar of
differential.


39 - 18 Adjusting Pinion and Ring Gear (Type 016 K) Printed in Germany
9 4 4 D i f f e r e n t i a l / T r a n s a x l e   S y s t e m       39


9.  Mount universal dial gauge holder VW 387 with dial gauge and extension on case and set dial gauge to zero with 1 mm pre-load.

10.  Move differential up and down, read play on dial
gauge and note value (e. g. 1.42 mm).


A - Dial gauge extension approx. 30 mm


N o t e

Do not turn differential while measuring play,
since this would cause wrong results.

"Stot" = measured value + pre-load


Example:
Measured value (example)
Pre-load (constant value)
Stot
1,42 mm
+ 0.50 mm
1.92 mm
11.  Install shims with determined total shim thickness
"Stot" (1.92 mm in example) behind tapered
roller bearing outer race in cover (S2 side).
Lubricate both tapered roller bearings with
hypoid oil.

12. Mount cover again.

13. Guide adjusting device VW 521/4 with sleeve
VW 521/8 into neck of differential and clamp.


A - Torque meter, standard, 0 . . .600 Ncm


14.  Place 0 to 600 Ncm torque meter on adjusting device and turn slowly and uniformly. The friction torque of new tapered roller bearings must be at least 250 Ncm.


Friction torque of used tapered roller bearings
need not be measured.


N o t e

When adjusting the pinion/ring gear set, now
check the drive pinion adjustment.


Printed in Germany
Adjusting Pinion and Ring Gear (Type 016 K)
      39 - 19
39 D i f f e r e n t i a l / T r a n s a x l e   S y s t e m 9 4 4


A d j u s t i n g   B a c k l a s h


Requirement: drive pinion adjusted and installed
with S3 and S4.
Turn differential several times to pre-load and settle
tapered roller bearings.


1.  Place adjustable lever VW 388 on adjusting device
VW 521/4. Lever length via large hexagon surface
79 mm to upper edge of ball.

2. Apply universal dial gauge holder with dial gauge
and extension so that there is a right angle
between the dial gauge axis and lever.


a - 79 mm

3.  Turn differential counter clockwise with adjusting
device VW 521/4 carefully until ring gear rests on
the drive pinion.

4. Now set dial gauge to zero with 2 mm pre-load.

5. Turn differential clockwise until ring gear makes
contact with the opposite flank of the next drive
pinion tooth. Read backlash and note value.

6. Repeat measurement three times, turning the ring
gear 90° further each time.

7. Add the four measured values and calculate the
mean backlash value.
D e t e r m i n i n g   M e a n   B a c k l a s h


Example:
1st measurement
2nd measurement
3rd measurement
4th measurement
Sum
0.84 mm
0.85 mm
0.84 mm
0.83 mm
3.36 mm


Mean backlash = 3.36 mm divided by 4 = 0.84 mm


N o t e

If the measured values deviate from each other by
more than 0.06 mm, installation of the ring gear or
pinion/ring gear set is not correct. Check installation,
replacing pinion/ring gear if necessary.


D e t e r m i n i n g   S h i m   T h i c k n e s s   S 2
(Opposite Ring Gear)

S2 = Stot

+   Lift (axial displacement of ring gear from mesh
free of play to attain backlash)

- Measured mean backlash


Stot = total shim thickness S1 + S2

Lift = 0.15 mm (constant value)


Example:
Stot
Lift
Mean backlash
S2
1.92 mm
+ 0.15 mm
- 0.84 mm
1.23 mm


39 - 20 Adjusting Pinion and Ring Gear (Type 016 K) Printed in Germany
9 4 4 D i f f e r e n t i a l / T r a n s a x l e   S y s t e m       39


Shims Available:


Part Number Thickness (mm)
113 517 201
113 517 202 A
113 517 203 A
113 517 204 A
113 517 205 A
113 517 206 A
113 517 207 A
113 517 208 A
113 517 209 A
113 517 210 A
113 517 211 A
0.15
0.20
0.30
0.40
0.50
0.60
0.70
0.80
0.90
1.00
1.20

It is possible to have exact shim thicknesses
due to the different tolerances.


D e t e r m i n i n g   S h i m   T h i c k n e s s   S 1
(Ring Gear Side)

S1 = Stot - S2


Example:

Stot
S2
S1
1.92 mm
- 1.23 mm
0.69 mm


Shims Available:


Part Number Thickness (mm)
018 409 381
018 409 383
018 409 385
018 409 387
018 409 389
018 409 391
018 409 393
0.15
0.20
0.25
0.50
0.80
1.00
1.50
It is possible to have exact shim thicknesses due to
the different tolerances.

Measure thickness of shims at many different points
with a micrometer. Also check shims for burrs and
damage.

Only install shims in perfect condition.

Install determined shims S1 and S2.

Checking:
Measure backlash on periphery four times.
It should be:

0.10 to 0.20 mm.


N o t e

Measurements must not deviate from each other by
more than 0.05 mm.


Printed in Germany
Adjusting Pinion and Ring Gear (Type 016 K)
      39 - 21
39 D i f f e r e n t i a l / T r a n s a x l e   S y s t e m 9 4 4


39 - 50 Blank Page
9 4 4 A u t o m a t i c   T r a n s m i s s i o n / C o n t r o l s ,   C a s e       39


CHECKING FINAL DRIVE OIL LEVEL (AUTOMATIC TRANSMISSION)


Amount: approx. 1 liter (1.06 US qt) of hypoid
gear lube SAE 90 according to API Classification
GL 5 (or MIL-L 2105 B).


1. Clean outside of filler plug and unscrew.


2.  Oil level of car parked on level surface should
reach lower edge of filler opening.


3. Clean filler plug, install and tighten to 20 Nm
(14 ft lb).


Printed in Germany
Checking Final Drive Oil level
      39 - 51
39 D i f f e r e n t i a l   -   A u t o m a t i c   T r a n s m i s s i o n 9 4 4


39 - 100 Blank Page
9 4 4 D i f f e r e n t i a l   -   A u t o m a t i c   T r a n s m i s s i o n       39


CENTRAL TUBE TORQUE SPECIFICATIONS


Location Description Threads Material Torque
Nm (ft lb)
Converter bearing to rear
bell housing

Drive shaft to flanged shaft


Central tube flange to
clutch bell housing

Central tube housing to
transmission case

Central tube housing to
transmission case

Converter to drive plate


Drive shaft and damper


Damper to flywheel


Cover to clutch bell
housing

Support to transmission


Hook to central tube
Bolt


Bolt


Bolt


Bolt


Bolt


Bolt


Bolt


Bolt


Bolt


Bolt


Nut
M 8 x 25


M 10 x 46


M 10 x 35


M 12 x 80


M 10 x 50


M 8 x 11


M 10 x 46


M 8 x 40


M 10 x 25


M 10 x 30


M 8
8.8


12.9


8.8


10.9


8.8


12.9


12.9


8.8


8.8


8.8


8
21
(15)

80
(58)

42
(30)

85
(61)

42
(30)

40
(29)

80
(58)

21
(15)

42
(30)

42
(30)

20
(14)


Printed in Germany - I, 1982
Torque Specifications (Type 087 N)
      39 - 101
39 D i f f e r e n t i a l   -   A u t o m a t i c   T r a n s m i s s i o n 9 4 4


FINAL DRIVE TORQUE SPECIFICATIONS
(AUTOMATIC TRANSMISSION)


Location Description Threads Material Torque
Nm (ft lb)
Flanged shaft to
differential

Lockplate to adjusting ring


Pinion shaft cover to final
drive case

Final drive cover to case


Ring gear to differential


Automatic transmission to
final drive

Drive shaft to trans-
mission flange


Bolt


Bolt


Bolt


Bolt


Bolt


Nut


Bolt
M 8 x 1.25


M 6 x 1


M 10 x 1.5


M 8 x 1.25


M 10 x 1


M 8 x 1.25


M8
8.8


8.8


10.9


10.9


12.9


12.9


12.9
25
(18)

8
(6)

42
(30)

25
(18)

78-93
(56 - 67)

29
(21)

42
(30)


39 - 102 Torque Specifications (Type 087 N) Printed in Germany
9 4 4 D i f f e r e n t i a l   -   A u t o m a t i c   T r a n s m i s s i o n       39


CHECKING OIL LEVEL IN FINAL DRIVE
(AUTOMATIC TRANSMISSION)


Capacity: approx. 1 liter (US qt) of hypoid gear tube
SAE 90 acc. API Classification GL 5 (or MIL-L 2105 B).


1. Clean outside of filler plug and unscrew.
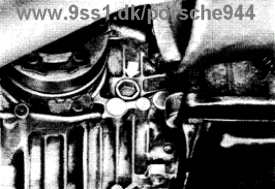


2.  Oil level of car parked on level ground should
reach lower edge of filler opening.


3. Clean and screw in filler bolt (tightening torque:
20 Nm -14 ft lb).


Printed in Germany - I, 1982
Checking Oil level in Final Drive (Type 087 N)
      39 - 103
39 D i f f e r e n t i a l / T r a n s a x l e   S y s t e m 9 4 4


39 - 104 Blank Page
9 4 4 D i f f e r e n t i a l   -   A u t o m a t i c   T r a n s m i s s i o n       39


TOOLS


No. Description Special Tool Remarks
1

2

3

4

5

6

7

8

Slide hammer

Drift

Driving mandrel

Sleeve

Transmission support

Separator

Internal puller

Internal puller
VW 771

VW 295

2056

30 - 21

VW 353

US 1103

US 1108

US 1137


Printed in Germany - I, 1982
Disassembling and Assembling Final Drive (Type 087 N)
      39 - 105
39 D i f f e r e n t i a l   -   A u t o m a t i c   T r a n s m i s s i o n 9 4 4


No. Description Special Tool Remarks
 9

10

11

12

13

14

15

16

17

18


19

20

21

22

23

24
Spanner wrench

Mandrel guide pin

Mounting plate

Thrust plate

Thrust plate

Spacer

Tube

Thrust rings

Sleeve

Drive sleeve


Drive sleeve

Thrust tube

Thrust pad

Driver

Thrust pad

Thrust pad
VW 544

VW 439

-

VW 402

VW 401

VW 545/2

VW 516

VW 470

2055

VW 192 or
US 4450

VW 551

VW 454

VW 412

VW 195

30 - 205

VW 510


Made locally


Locally made plate - 10 mm thick (item 11)


39 - 106 Disassembling and Assembling Final Drive (Type 087 N) Printed in Germany
9 4 4 D i f f e r e n t i a l   -   A u t o m a t i c   T r a n s m i s s i o n       39


Printed in Germany - I, 1982
Disassembling and Assembling Final Drive
(Type 087 N)
      39 - 107
39 D i f f e r e n t i a l   -   A u t o m a t i c   T r a n s m i s s i o n 9 4 4


 No.
Description
 Qty. Note When:
Special
Instructions

Removing

Installing
1


2

3


4

5


6

7

8

9

10

11


12


13


14

15


16


17
Bolt


Flanged shaft

Bolt


Flanged shaft

Bolt


Washer

Washer

Governor cover

Seal

Governor

Seal


Needle bearing


Bolt


Lock washer

Cover


Seal


Seal
1


1

1


1

1


1

1

1

1

1

1


1


11


11

1


2


1
Hold flange with
mandrel


Hold flange with
mandrel


Pull out with
US 1088


Pull out with
US 1088


Drive off with chisel
Torque:
25 Nm (18 ft lb)


Torque:
25 Nm (18 ft lb)


Torque:
9 Nm (7 ft lb)


Replace


Drive in against stop
with VW 295 and
VW 545/2

Drive in against stop
with VW 295

Torque:
25 Nm (18 ft lb)

Replace if necessary

Coat sealing surface
with D 3 sealer

Replace, do not forget
when assembling

Drive on with VW 192
or US 4450


39 - 108 Disassembling and Assembling Final Drive
(Type 087 N)
Printed in Germany
9 4 4 D i f f e r e n t i a l   -   A u t o m a t i c   T r a n s m i s s i o n       39


 No.
Description
 Qty. Note When:
Special
Instructions

Removing

Installing
18


19

20

21


22

23


24


25


26


27

28

29


30

31


32


33
Bolt


Lock washer

cover

Seal


Seal

Seal


Seal


Tapered roller
bearing outer race

Bolt


Washer

Lockplate

Adjusting ring


Seal

Seal


Tapered roller
bearing outer race

Adjusting ring
5


5

1

1


1

1


1


1


2


2

2

1


2

2


2


1


Drive out with
screwdriver

Drive out with
screwdriver

Drive out with
suitable drift


When used rings are
reinstalled, mark
position before
removing


Can also be replaced
without removing
transmission


When used rings are
reinstalled, mark
position before
removing


Torque:
42 Nm (30 ft lb)

Replace if necessary


Replace. do not forget
when assembling


Drive in flush with
VW 295 and 30 - 205

Drive in against stop
with VW 551

Press in with 30 - 205


Torque:
8 Nm (6 ft lb)


Adjust when new or
turn to marked
position


Before installing fill
space between sealing
lips with all-purpose
grease. Drive in against
stop with VW 195

Press in with VW 295
and 30 - 205

Adjust when new or
turn to marked
position


Printed in Germany - I, 1982
Disassembling and Assembling Final Drive
(Type 087 N)
      39 - 109
39 D i f f e r e n t i a l   -   A u t o m a t i c   T r a n s m i s s i o n 9 4 4


 No.
Description
 Qty. Note When:
Special
Instructions

Removing

Installing
34


35


36


37


38

39


40

41

42


43


44


45

46


47

Differential


Pinion


Sleeve


Tapered roller
bearing


Shim

Tapered roller
bearing


Shim S 4

Case

Outer race, tapered


Seal


Adapter


Seal

Adapter


Seal
1


1


1


1


X

1


X

1

1


2


1


1

1


1


Press off


Press off


Press off


Press off with
US 1108

Press off with
US 1037
Adjust ring gear when
installing new case

Note pair number,
adjust if necessary

Heat to approx.
100 °C/212 °F and
press on

Heat to approx.
100 °C/212 °F and
press on. Adjust if
replacing pinion

Determine thickness

Heat to approx.
100 °C/212 °F and
press on. Adjust if
replacing pinion

Determine thickness


Press in with VW 510


Position correctly,
drive on with 2056

Torque:
80 Nm (58 ft lb)

Replace

Torque:
80 Nm (58 ft lb)

Replace


39 - 110 Disassembling and Assembling Final Drive
(Type 087 N)
Printed in Germany
9 4 4 D i f f e r e n t i a l   -   A u t o m a t i c   T r a n s m i s s i o n       39


DISASSEMBLING AND ASSEMBLING FINAL DRIVE


D i s a s s e m b l i n g


N o t e :

If pinion/ring gear and bearings can be reused,
determine backlash and turning torque of pinion
before disassembling final drive, note these figures
and install them again as accurately as possible.


1.  Mount final drive on assembly stand with VW 353
and locally made plate.


2. Unscrew adjusting ring with VW 544.


3.  Remove differential and pinion by removing
both covers, unscrewing adjusting rings and
pulling pinion out a little way through large
opening. Tilt differential aside carefully and
remove pinion.


4.  Pull out seal and needle bearing for governor
together.

A - US 1088


Printed in Germany - I, 1982
Disassembling and Assembling Final Drive (Type 087 N)
      39 - 111
39 D i f f e r e n t i a l   -   A u t o m a t i c   T r a n s m i s s i o n 9 4 4


A s s e m b l i n g


1. Drive in needle bearing for governor against stop


2. Drive in governor seal against stop.


3.  Install drive pinion cover. Insert oil bore seal
(arrow).
Always use sleeve 2055; otherwise seals would be
damaged.


4.  Drive flanged shaft seal into adjusting ring
against stop.


5.  Press outer race for tapered roller bearing into
adjusting ring.


39 - 112 Disassembling and Assembling Final Drive (Type 087 N) Printed in Germany
9 4 4 D i f f e r e n t i a l   -   A u t o m a t i c   T r a n s m i s s i o n       39


DISASSEMBLING AND ASSEMBLING FINAL DRIVE CASE COVER


D i s a s s e m b l i n g


1. Remove torque converter seal.


2.  Press seals out of cover.

A - US 1108

3.  Press out outer race for tape red roller bearing.

A - US 1037


A s s e m b l i n g


1. Press in outer race for tapered roller bearing.


Printed in Germany - I, 1982
Disassembling and Assembling Final Drive (Type 087 N)
      39 - 113
39 D i f f e r e n t i a l   -   A u t o m a t i c   T r a n s m i s s i o n 9 4 4


2.  Drive first seal into cover against stop. Open end
of seal faces converter. Small shoulder on mandrel
faces down.


3.  Drive second seal into cover until flush. Open end
of seal faces transmission. Large shoulder on
mandrel serves as stop.


4. Drive in torque converter seal.


39 - 114 Disassembling and Assembling Final Drive (Type 087 N) Printed in Germany
9 4 4 D i f f e r e n t i a l   -   A u t o m a t i c   T r a n s m i s s i o n       39


Blank Page 39 - 115
39 D i f f e r e n t i a l   -   A u t o m a t i c   T r a n s m i s s i o n 9 4 4


3.  Drive in second seal until flush.
Open end of seal faces automatic transmission
assembly.


4. Position seals correctly.


A - Seal - final drive
B - Seal - automatic transmission assembly


39 - 116 Disassembling and Assembling Final Drive (Type 087 N) Printed in Germany
9 4 4 D i f f e r e n t i a l   -   A u t o m a t i c   T r a n s m i s s i o n       39


DISASSEMBLING AND ASSEMBLING PINION


D i s a s s e m b l i n g

1. Press off tapered roller bearing (small bearing).


2.  Press off sleeve for seals.
A - US 1103

3.  Press off tapered roller bearing (large bearing).
A - US 1103


A s s e m b l i n g

1.  Heat large tape red roller bearing to approx.
100 °C/212 °F and install. Then press on tight.


Printed in Germany - I, 1982
Disassembling and Assembling Final Drive (Type 087 N)
      39 - 117
39 D i f f e r e n t i a l   -   A u t o m a t i c   T r a n s m i s s i o n 9 4 4


2.  Heat sleeve for seals to approx. 100 °C/212 °F
and install. Then press on tight.


3.  Heat small tapered roller bearing to approx.
100 °C/212 °F and install. Then press on tight.


39 - 118 Disassembling and Assembling Final Drive (Type 087 N) Printed in Germany
9 4 4 Differential, Transaxial System       39


Modifications:

Removing and installing flat
governor


1 - Flat governor

2 - Sealing ring (always renew)

3 - Governor cover

4 - Screw

Removing and installing speedometer
drive

1 - Screw

2 - Retaining plate

3 - Drive

Disassemble speedometer drive.


1 - Lock

2 - Pinion

3 - Bearing

4 - Sealing ring (always renew)

Lift lock (1) of pinion (2) using
two screwdrivers. Remove pinion
from bearing (3).


Printed in Germany - XVI, 1987
Disassembling and Assembling
Final Drive (Type 087 M and 087 N)
      39 - 118a
39 D i f f e r e n t i a l   -   A u t o m a t i c   T r a n s m i s s i o n 9 4 4


39 - 118b Blank Page
9 4 4 D i f f e r e n t i a l   -   A u t o m a t i c   T r a n s m i s s i o n       39


TOOLS


No. Description Special Tool Remarks
1

2

3

4

5


Thrust plate

Thrust pad

Drive sleeve

Puller

Adapter
VW 402

VW 412

40 - 21

US 1078

VW 295 a


Printed in Germany - I, 1982
Disassembling and Assembling Differential (Type 087 N)
      39 - 119
39 D i f f e r e n t i a l   -   A u t o m a t i c   T r a n s m i s s i o n 9 4 4


39 - 120 Disassembling and Assembling Differential (Type 087 N) Printed in Germany
9 4 4 D i f f e r e n t i a l   -   A u t o m a t i c   T r a n s m i s s i o n       39


 No.
Description
 Qty. Note When:
Special
Instructions

Removing

Installing
1


2


3


4


5

6

7


8


9


10


11


12


13


14

15
Tapered roller
bearing


Tapered roller
bearing


Bolt


Ring gear


Cover

Thrust washer

Large differential
gear

Connector, flanged
shaft

Shaft


Small differential
gear

Thrust washer


Connector, flanged
shaft

Large differential
gear

Thrust washer

Housing
1


1


10


1


1

1

1


1


1


2


2


1


1


1

1
Pull off with
VW 295 a and
US 1078


Pull off with
VW 295 a and
US 1078


Drive out with
suitable drift
Heat to approx.
100 °C/212 °F. Then
press on tight. Adjust
ring gear if replacing

Heat to approx.
100 °C/212 °F. Then
press on tight. Adjust
ring gear if replacing

Torque 78 . . . 93 Nm
(56 . . . 67 ft lb)

Matched with pinion.
Only replace in pairs.
Heat to approx. 100 °C/
212 °F. Use centering
pins. Adjust if necessary


Drive in with suitable
drift. Do not damage
thrust washer


Check for cracks and
breaks


Adjust ring gear after
replacement


Printed in Germany - I, 1982
Disassembling and Assembling Differential
(Type 087 N)
      39 - 121
39 D i f f e r e n t i a l   -   A u t o m a t i c   T r a n s m i s s i o n 9 4 4


D I S A S S E M B L I N G   A N D   A S S E M B L I N G   D I F F E R E N T I A L


D i s a s s e m b l i n g

1.  Pull off tapered roller bearing.
A - US 1078


2.  Clamp differential in a vise, pull off second
tapered roller bearing and unscrew ring gear bolts.

A s s e m b l i n g

1.  Heat ring gear to approx. 100 °C/212 °F and
install. Use centering pins (made locally) to
facilitate installation.


N o t e :

Clean mating surfaces are important to locate ring
gear, differential case and cover correctly. Smooth
down burrs or high spots with an oil stone.


2.  Heat tapered roller bearing to approx. 100 °C/
212 °F and install. Then press on tight.


39 - 122 Disassembling and Assembling Differential (Type 087 N) Printed in Germany
9 4 4 D i f f e r e n t i a l ,   T r a n s a x l e   S y s t e m       39


Tools


No. Description Special Tool Remarks
  Connector - - - - Made locally. The joint
flange connector may be
made of 6 x 18 mm flat
steel bar.


Printed in Germany - V, 1985
Disassembling and Assembling
Limited Slip Differential (40% Lock)
      39 - 122a
39 D i f f e r e n t i a l ,   T r a n s a x l e   S y s t e m 9 4 4


39 - 122b Disassembling and Assembling Limited Slip Differential
(40% Lock)
Printed in Germany
9 4 4 D i f f e r e n t i a l ,   T r a n s a x l e   S y s t e m       39


 No.
Description
 Qty. Note When:
Special
Instructions

Removing

Installing
1


2

3


4


5

6


7

8

9


10

11

12

Bolt


Case cover

Thrust washer


Diaphragm spring


Outer plate

Inner plate
(molybdenum coated)

Pressure ring

Differential gear

Threaded ring


Differential pinion

Differential shaft

Differential case
8


1

2


2


2

2


2

2

2


4

2

1


Press out of differ-
ential gear.
Coat with Loc-
tite 262 and
torque to 38 Nm


Position correct-
ly

Position correct-
ly


Press in to cor-
rect position.


Printed in Germany - V, 1985
Disassembling and Assembling
Limited Slip Differential (40% Lock)
      39 - 122c
39 D i f f e r e n t i a l ,   T r a n s a x l e   S y s t e m 9 4 4


DISASSEMBLING AND ASSEMBLING LIMITED SLIP DIFFERENTIAL (40 % LOCK)


D i s a s s e m b l i n g

1.  Unscrew socket head bolts on case
cover and take off cover.


2. Take out all parts inside of case.


A s s e m b l i n g

1.  Inspect all parts for wear or damage,
replacing if necessary.

a) Differential Case:
Check guide grooves for outer plates
and pressure rings for wear.
b)  Pressure Rings:
Guide tabs and bearing surfaces must
not be worn or scored excessively.
They must also slide easily in the
differential case.

c) Differential Gears:
Bearing surfaces for thrust washers must
not be worn and inner plates must slide
easily on splines of gears.

d) Plates:
Check inner and outer plates for wear.
Guide tabs of outer plates and teeth of
inner plates must not be worn.

2. Lubricate all sliding surfaces an plates,
pressure rings and differential shafts
with SAE 80 hypoid gear lube prior to
installation.

3. Install thrust washers that retainers
engage in bores of case or cover. It is
recommended to hold washers in
position with grease to make assembly
work easier.


39 - 122d Disassembling and Assembling Limited Slip Differential
(40% Lock)
Printed in Germany
9 4 4 D i f f e r e n t i a l ,   T r a n s a x l e   S y s t e m       39


4.  Install remaining parts as shown in the
assembly drawing.


N o t e

Diaphragm springs must be installed that
curved surfaces face out toward the joint
flange.


1 - Pressure ring

2 - Inner plate

3 - Outer plate

4 - Diaphragm spring


Determining Thickness of Plate Assembly:
It new parts are used, the thickness ot the
plate assembly has to be determined again.
1.  Measure case depth "a" with a depth gage.
Example: a = 77.50 mm.


2.  Determine thickness "b" of plate
assembly (with 2.0 mm thick outer
plates, but without diaphragm springs).
Clamp plate assembly in a vise lightly
and measure distance "b" with a sliding
calipers.
Example: b = 73.20 mm.


Printed in Germany - V, 1985
Disassembling and Assembling
Limited Slip Differential (40% Lock)
      39 - 122e
39 D i f f e r e n t i a l ,   T r a n s a x l e   S y s t e m 9 4 4


3. Figure out distance "e" (must be 4.2 mm).
e = a - b

Example:
a = 77.50 mm
b = 73.30 mm
c =  4.20 mm
==========


e2 + e2 = 4.2 mm


N o t e

If determined distance is more or less
than specified distance "e", install thicker
or thinner outer plates.


"e" below 4.2 mm = use thinner plates.

"e" above 4.2 mm = use thicker plates.

Outer plates are available in thicknesses
of 1.9 mm, 2.0 mm and 2.1 mm.
4.  After assembling, check slip torque with
one differential gear held tight and one
driven. This is done by clamping a
flange with two bolts in a vise and
placing the differential on it. Insert
second flange with a locally made
connector and turn differential with
a torque wrench.
A torque of 10 to 35 Nm must be
reached.


A = Connector (made locally)


N o t e

Plates are worn and have to be replaced, if
the specified torque is not reached with
the thickest outer plates.


39 - 122f Disassembling and Assembling Limited Slip Differential
(40% Lock)
Printed in Germany
9 4 4 D i f f e r e n t i a l   -   A u t o m a t i c   T r a n s m i s s i o n       39


TOOLS


No. Description Special Tool Remarks
1

2

3

4

5


6

7

8

9

10

Universal gauge

Centering disc

Master gauge

Gauge plunger

Dial gauge extension
(9.3 mm long)

Dial gauge extension

Master gauge plate

Dial gauge

Adjusting device

Measuring lever
VW 385

VW 385/2

VW 385/26 or VW 385/30

VW 385/13

VW 385/15


VW 382/10

VW 385/17

US 1026 or US 1027

VW 521/4

VW 388


Printed in Germany - I, 1982
Adjusting Pinion/Ring Gear (Type 087 N)
      39 - 123
39 D i f f e r e n t i a l   -   A u t o m a t i c   T r a n s m i s s i o n 9 4 4


No. Description Special Tool Remarks
11

12

13


14

15

16


Clamp

Sleeve

Clamp


Dial gauge holder

End gauge

Torque gauge
3022

VW 521/8

VW 386 a


VW 387

VW 385/28

US 1064


Open up mounting bore to 10.5 mm
diameter


39 - 124 Adjusting Pinion/Ring Gear (Type 087 N) Printed in Germany
9 4 4 D i f f e r e n t i a l   -   A u t o m a t i c   T r a n s m i s s i o n       39


A d j u s t i n g   P i n i o n / R i n g   G e a r   -   G e n e r a l   I n f o r m a t i o n

Accurate adjustments of the pinion and ring gear are immensely important for the service life and
smooth running of the final drive. This is why pinions and ring gears are paired during manufacture and
checked in special machines for tooth pattern and quietness in both directions of rotation. The position
of smoothest running is determined by moving the pinion in an axial direction, whereby the ring gear is
lifted out of the no-play meshing position far enough so that the backlash will be kept within specified
tolerances.

Deviation "r", in reference to master gage "Ro ", of the special testing machine used in manufacturing is
measured and recorded on the outer periphery of the ring gear. Pinion and ring gear must always be
replaced together.
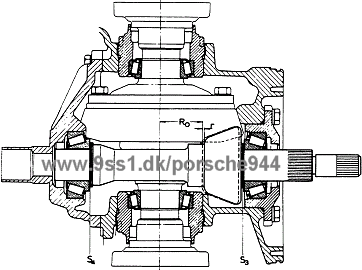

L o c a t i o n   o f   S h i m s

Ro -    Length of master gage used in special testing machine
"Ro" = 46.60 mm.

r - Deviation from master gage used in special testing machine
in manufacturing. "r" is always given in 1/100 mm.
Example: "32" means r = 0.32 mm.

S3 - Shim behind head of pinion.

S4   - Shim opposite head of pinion.

    Objective of adjustments must be to regain the maximum degree
of quiet running, as had been determined by the special testing
machine in manufacturing.

1 - Mark "G 1237" means Gleason pinion/ring gear, ratio 12 : 37.

2 - Matching pair number of pinion/ring gear set.

3 - Deviation "r".


Printed in Germany - I, 1982
Adjusting Pinion/Ring Gear (Type 087 N)
      39 - 125
39 D i f f e r e n t i a l   -   A u t o m a t i c   T r a n s m i s s i o n 9 4 4


A d j u s t i n g   P i n i o n


1.  Heat pinion bearing inner race (large bearing) to about 100 °C/212 °F, install on pinion without shim and press on with a force of about 3 tons.
2. Heat pinion bearing inner race (small bearing) to about 100 °C/212 °F, install on pinion with 1.1 mm thick shim (arrow) and press on with force of about 3 tons.


N o t e :

Pinion would hit housing while measuring and cause
incorrect readings, if shim is omitted.


3.  Install final drive housing cover without seals.
Tighten all bolts to specified torque.
4.  Install pinion and pinion cover. Tighten all bolts
to specified torque.


5. Place VW 387 on housing and VW 385/17 on
pinion. Install dial gage and adjust to zero.


6.  Move pinion up and down without turning it
several times and note dial gage reading.


N o t e :

Readings would be wrong if pinion is turned.


7.  Add 1.1 mm for installed shims, 0.15 mm for
bearing preload and 0.10 mm for bearing settling
to dial gage reading.
This results in Stot.


Example:
Dial gage reading
Installed shim
Bearing preload
Bearing settling
Total shim thickness
1.81 mm
+ 1.10 mm
+ 0.15 mm
+ 0.10 mm
= 3.16 mm
========


39 - 126 Adjusting Pinion/Ring Gear (Type 087 N) Printed in Germany
9 4 4 D i f f e r e n t i a l   -   A u t o m a t i c   T r a n s m i s s i o n       39


 8. Remove pinion. Take out installed shim (1.1. mm) and install shims of total thickness (3.16 mm in example) at small bearing.


 9. Install pinion again and check deviation "e". Deviation "e" is the difference between the actual measurement R and the design measurement Ro.


10.  Turn pinion in both directions several times.


11. Place VW 385/28 on pinion.


12.  Set adjusting ring of VW 385/1 at distance a.
a = approx. 82 mm.


13.  Assemble VW 385/1 according to figure (dial gage
extension VW 385/15 = 9.3 mm). Install VW
385/30 and set dial gauge at zero with 3 mm
preload.


14.  Screw adjusting ring (opposite ring gear) into
case far enough so that it is flush with
housing.


15. Insert universal gage in housing and screw in
adjusting ring (behind ring gear). Do not place
dial gage pin on end gage.


16.  Pull 2nd centering disc outward with movable
adjusting ring until universal gage can just
barely be turned by hand.


17. Turn universal gage until dial gage pin touches
end gage and shows maximum deflection
(return point). Take dial gage reading.


18. Note measured distance "e" (example:
1.88 mm) and determine thickness of shims
S3 and S4.


Printed in Germany - I, 1982
Adjusting Pinion/Ring Gear (Type 087 N)
      39 - 127
39 D i f f e r e n t i a l   -   A u t o m a t i c   T r a n s m i s s i o n 9 4 4


A r r a n g e m e n t   o f   G a g e s   t o   D e t e r m i n e   D e v i a t i o n e
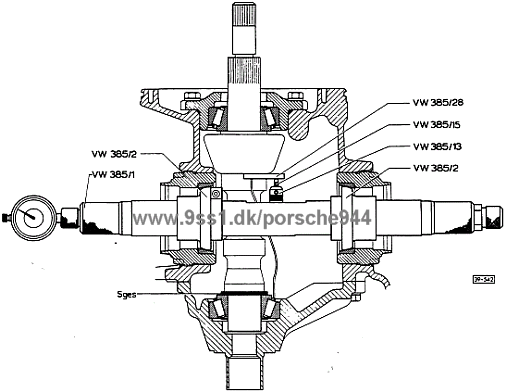


39 - 128 Adjusting Pinion/Ring Gear (Type 087 N) Printed in Germany
9 4 4 D i f f e r e n t i a l   -   A u t o m a t i c   T r a n s m i s s i o n       39


19.  Determine thickness of shim "S3".
"S3" = e - r

Example:
Dial gage reading "e"
Ring gear value "r"
Thickness of shim "S3"
1.88 mm
- 0.32 mm
1.56 mm
=======

20. Select shims from table.

Shim Shim to
Range be
installed
Part Number
1.050 - 1.100
1.105 - 1.125
1.130 - 1.150
1.155 - 1.175
1.180 - 1.200
1.205 - 1.225
1.230 - 1.250
1.255 - 1.275
1.280 - 1.300
1.305 - 1.325
1.330 - 1.350
1.355 - 1.375
1.380 - 1.400
1.405 - 1.425
1.430 - 1.450
1.455 - 1.475
1.480 - 1.500
1.505 - 1.525
1.530 - 1.550
1.555 - 1.575
1.580 - 1.600
1.605 - 1.625
1.630 - 1.650
1.655 - 1.675
1.680 - 1.700
1.705 - 1.725
1.730 - 1.750
1.755 - 1.775
1.780 - 1.800
1.805 - 1.825
1.830 - 1.850
1.855 - 1.875
1.880 - 1.900
1.100
1.125
1.150
1.175
1.200
1.225
1.250
1.275
1.300
1.325
1.350
1.375
1.400
1.425
1.450
1.475
1.500
1.525
1.550
1.575
1.600
1.625
1.650
1.675
1.700
1.725
1.750
1.775
1.800
1.825
1.850
1.875
1.900
087 409 641 D
087 409 641 E
087 409 641 F
087 409 641 G
087 409 641 H
087 409 641 J
087 409 641 K
087 409 641 L
087 409 641 M
087 409 641 N
087 409 641 P
087 409 641 O
087 409 641 R
087 409 641 S
087 409 641 T
087 409 641 AA
087 409 641 AB
087 409 641 AC
087 409 641 AD
087 409 641 AE
087 409 641 AF
087 409 641 AG
087 409 641 AH
087 409 641 AJ
087 409 641 AK
087 409 641 AL
087 409 641 AM
087 409 641 AN
087 409 641 AP
087 409 641 AO
087 409 641 AR
087 409 641 AS
087 409 641 AT
21.  Determine thickness of shim "S4".
"S4" = "Stot." - "S3"

Example:
Total shim thickness
Shim thickness "S3"
Shim thickness "S4"
3.16 mm
- 1,56 mm
1.60 mm
=======

22. Select shims from table.

Shim Shim to
Range be
installed
Part Number
1.050 - 1.100
1.105 - 1.125
1.130 - 1.150
1.155 - 1.175
1.180 - 1.200
1.205 - 1.225
1.230 - 1.250
1.255 - 1.275
1.280 - 1.300
1.305 - 1.325
1.330 - 1.350
1.355 - 1.375
1.380 - 1.400
1.405 - 1.425
1.430 - 1.450
1.455 - 1.475
1.480 - 1.500
1.505 - 1.525
1.530 - 1.550
1.555 - 1.575
1.580 - 1.600
1.605 - 1.625
1.630 - 1.650
1.655 - 1.675
1.680 - 1.700
1.705 - 1.725
1.730 - 1.750
1.755 - 1.775
1.780 - 1.800
1.805 - 1.825
1.830 - 1.850
1.855 - 1.875
1.880 - 1.900
1.100
1.125
1.150
1.175
1.200
1.225
1.250
1.275
1.300
1.325
1.350
1.375
1.400
1.425
1.450
1.475
1.500
1.525
1.550
1.575
1.600
1.625
1.650
1.675
1.700
1.725
1.750
1.775
1.800
1.825
1.850
1.875
1.900
082 519 141 AE
082 519 141 AF
082 519 141 AG
082 519 141 AH
082 519 141 AJ
082 519 141 AK
082 519 141 AL
082 519 141 AM
082 519 141 AN
082 519 141 AP
082 519 141 AO
082 519 141 AR
082 519 141 AS
082 519 141 AT
082 519 141 BA
082 519 141 BB
082 519 141 BC
082 519 141 BD
082 519 141 BE
082 519 141 BF
082 519 141 BG
082 519 141 BH
082 519 141 BJ
082 519 141 BK
082 519 141 BL
082 519 141 BM
082 519 141 BN
082 519 141 BP
082 519 141 BO
082 519 141 BR
082 519 141 BS
082 519 141 BT
082 519 141 CA


Printed in Germany - I, 1982
Adjusting Pinion/Ring Gear (Type 087 N)
      39 - 129
39 D i f f e r e n t i a l   -   A u t o m a t i c   T r a n s m i s s i o n 9 4 4


23.  Check shim thickness at several positions with a
micrometer. Check shims for burrs and damage.
Only install perfect shims.


24. Install selected shims.
"S3" behind pinion.
"S4" opposite pinion.


25. Install pinion and lubricate bearings with hypoid
gear oil.


26. Check measurements.
Install universal gage. Set diaI gage at 0 with
3 mm preload. If proper shims have been
installed. dial gage reading must be specified
deviation "r" within a tolerance of +- 0.04 mm
(red gage range).

27. After installation of pinion with the selected
shims the turning torque must also be
measured. It must be 250 to 550 Ncm
(22 - 48 in. lb).
his value applies to new bearings. Measure
actual turning torque before disassembly if used
bearings are to be installed again.


A -  US 1064 torque gage
0- 600 Ncm (0 - 500 in. lb)


39 - 130 Adjusting Pinion/Ring Gear (Type 087 N) Printed in Germany
9 4 4 D i f f e r e n t i a l   -   A u t o m a t i c   T r a n s m i s s i o n       39


A d j u s t i n g   R i n g   G e a r


After adjustment of pinion, remove cover for final
drive housing and cover for pinion.


1.  Install differential and pinion. Insert seals in both
covers and install cover for final drive housing.
Coat sealing surface with D 3 sealer. Mount cover
for pinion and tighten all bolts of both covers to
specified torque.


2. Apply a light coat of multi-purpose grease to
O-rings and threads of adjusting rings. Lubricate
bearings with hypoid gear oil and tighten both
adjusting rings until the surfaces between teeth
are at same height as housing surface.


3. Continue adjusting the adjusting ring behind ring
gear carefully, until teeth of ring gear mesh with
pinion without play.


4. Tighten adjusting ring opposite ring gear as far as
possible and preload slightly so there is no play
in bearings.
5.  Turn adjusting ring behind ring gear back by
1/2 tooth (direction of arrow).


6.  Turn adjusting ring opposite ring gear by 2 teeth
(direction of arrow). This completes adjustment
of the necessary bearing preload and specified
backlash.


Printed in Germany - I, 1982
Adjusting Pinion/Ring Gear (Type 087 N)
      39 - 131
39 D i f f e r e n t i a l   -   A u t o m a t i c   T r a n s m i s s i o n 9 4 4


C h e c k i n g   B a c k l a s h


1. Turn pinion in both directions several times.


2.  Mount VW 386 a on pinion cover and hold pinion
tight with clamping bolt.


3.  Adjust VW 388 to distance a = 68 mm and install
VW 521/4.


4.  Install dial gage with square-ended extension in
VW 387.
5.  Insert VW 521/4 with VW 521/8 and mount
VW 387.


6. Check backlash on circumference at four places.
Specifications = 0.15 - 0.25 mm.


N o t e :

Separate measurements must not differ from each
other by more than 0.05 mm.
The above specification applies only to new pinion/
ring gear sets; for old sets adjust backlash to
previous value as accurately as possible.


7.  If backlash of a new pinion/ring gear set is out-
side specifications, it must be corrected by
turning both adjusting rings evenly. Do not
change bearing preload.


39 - 132 Adjusting Pinion/Ring Gear (Type 087 N) Printed in Germany
9 4 4 D i f f e r e n t i a l   -   A u t o m a t i c   T r a n s m i s s i o n       39


8.  Finally measure total turning torque on pinion
for all 4 tapered roller bearings.


Total turning torque must exceed turning torque
of pinion by at least 40 Ncm (3,5 in. lb); if
necessary increase torque by tightening both
adjusting rings accordingly.


A -  US 1064 torque gage
0 - 600 Ncm (0 - 500 in. lb)


Printed in Germany - I, 1982
Adjusting Pinion/Ring Gear (Type 087 N)
      39 - 133
39 D i f f e r e n t i a l ,   T r a n s a x l e   S y s t e m 9 4 4


39 - 134 Blank Page
9 4 4 D i f f e r e n t i a l ,   T r a n s a x l e   S y s t e m       39


A = Universal transmission jack


Printed in Germany - XXIV, 1991
Removing and Installing Central Tube
(Type 087 M and 087 N)
      39 - 135
39 D i f f e r e n t i a l   -   A u t o m a t i c   T r a n s m i s s i o n 9 4 4


REMOVING AND INSTALLING CENTRAL TUBE


R e m o v i n g


Note
When performing operations on the transaxle system
that involve rotating or shifting the transaxle tube,
always wear leather gloves to avoid injuries


1.  Take off rear wheels.


2. Disconnect battery ground lead.


3. Disconnect parking brake cable on parking brake
lever and pull back out of guide.


4. Loosen control cable on bracket and disconnect
on accelerator pedal.


5.  Press control cable out of rubber guide in
firewall and pull out cable forward.
Disconnect suspension clamps on engine and
front bell housing.


6.  Remove splash shield.


7. Remove entire exhaust assembly.


8. Disconnect axle shafts on transmission end and
remove rear axle.


9. Disconnect selector lever cable on transmission
after removing lockpin for ball socket.


10.  Loosen mounting clamps for starter wires on
front bell housing and remove starter.


39 - 136 Removing and Installing Central Tube
(Type 087 M and 087 N)
Printed in Germany - XXIV, 1991
9 4 4 D i f f e r e n t i a l   -   A u t o m a t i c   T r a n s m i s s i o n       39


N o t e :

Suspend starter from suitable point on car so that
the wire harness is not stretched.


11.  Disconnect holder for ATF lines on camshaft
housing.


12.  Disconnect ATF lines between firewall and
engine.


13. Remove ground wire on clutch bell housing.


Printed in Germany - I, 1982
Removing and Installing Central Tube
(Type 087 N)
      39 - 137
39 D i f f e r e n t i a l   -   A u t o m a t i c   T r a n s m i s s i o n 9 4 4


N o t e :

Since the heater valve covers up the ground point,
the coolant must be drained partially and the
valve removed.


14.  Unscrew screws for speed and reference mark
transmitters. Pull out transmitters while turning
back and forth at same time.


15. Unscrew clamp screw.


16.  Mark position of flywheel/damper for reinstalla-
tion later or turn flywheel until marks in starter
opening are visible.


17.  Unscrew damper mounting bolts (if necessary,
hold tight on pulley bolt) and press damper off
of flywheel.


18.  Position universal transmission jack underneath
transmission and mount retaining strap.


A - Wooden block


39 - 138 Removing and Installing Central Tube
(Type 087 N)
Printed in Germany
9 4 4 D i f f e r e n t i a l   -   A u t o m a t i c   T r a n s m i s s i o n       39


19.  Unscrew mounting bolts for transmission
suspension on transmission carrier.


20. Remove center and rear cross members. Hold
engine in installed position with VW 10-222.


21. Unscrew bolts on engine block/front bell
housing flange.


22. Pull back transmission with central tube.


23. Remove front cross member and lower central
tube with transmission carefully without
stretching or bending the control cable.


N o t e :

This step requires an extra person on the front bell
housing to balance the weight of the central tube
for safety's sake.


I n s t a l l i n g


N o t e :

Installation marks (not TDC mark) on flywheel and
damper must be aligned. Before installing the central
tube, turn flywheel and damper until installation
marks face down at an angle (toward starter opening).


1.  Wrap pieces of adhesive tape around insulation
sheet and coat mating surfaces for body with
an assembly paste (e. g. rubber lubricant) to
facilitate installation.


A - Adhesive tape


Printed in Germany - I, 1982
Removing and Installing Central Tube
(Type 087 N)
      39 - 139
39 D i f f e r e n t i a l   -   A u t o m a t i c   T r a n s m i s s i o n 9 4 4


2. Install speed and reference mark transmitters.


N o t e :

Transmitters have permanent magnets. Make sure
metal particles are not stuck on the transmitters
before installing.
Note marks of transmitters. Never use force to
install them.


Tighten transmitters mounting screws to 8 Nm
(6 ft lb) torque.
3.  Install rubber grommet between selector lever
cable and suspension console.


4.  Adjust selector lever and control cables
(see pages 37 - 7 and 37 - 11).


39 - 140 Removing and Installing Central Tube (Type 087 N) Printed in Germany
9 4 4 D i f f e r e n t i a l ,   T r a n s a x l e   S y s t e m       39


Printed in Germany - I, 1982
Disassembling and Assembling Central Tube
(Type 087 M and 087 N)
      39 - 141
39 D i f f e r e n t i a l   -   A u t o m a t i c   T r a n s m i s s i o n 9 4 4


 No.
Description
 Qty. Note When:
Special
Instructions

Removing

Installing
1

2


3


4

5

6

7

8


9

10


11

12


13

14

15


16
Cap

Bolt


Bolt


Washer

Bearing flange

Clamp

Cap

Bolt


Circlip

Spacer


Damper

Bolt


Washer

Housing

Insulation sheet


Central tube
1

1


4


4

1

1

2

1


1

X


1

4


4

1

1


1
 

Torque:
80 Nm (58 ft Ib)

Torque:
21 Nm(15 ft lb)


Torque:
80 Nm (58 ft lb)


Determine thickness if
necessary

Check installed distance

Torque:
42 Nm (30 ft lb)


Position correctly.
Coat mating surfaces
for body with assembly
paste (e. g. rubber
lubricant)

Check, replacing
complete if necessary


Note

When performing operations on the transaxle system that involve rotating or shifting the transaxle
tube, always wear leather gloves to avoid injuries.


39 - 142 Disassembling and Assembling Central Tube
(Type 087 M and 087 N)
Printed in Germany - XXIV, 1991
9 4 4 D i f f e r e n t i a l   -   A u t o m a t i c   T r a n s m i s s i o n       39


DISASSEMBLING AND ASSEMBLING CENTRAL TUBE


D i s a s s e m b l i n g

1.
Detach transmission and prevent converter from
falling out (see "Removing and Installing Trans-
mission" on page 37 -19).
2. Remove bearing flange.
3. Remove damper by sliding back damper with spacer
against stop and taking out circlip.
4. Remove front bell housing.
5. Remove insulation sheet, ATF lines, control cable
and suspension for exhaust assembly.
      
A s s e m b l i n g

1. Install ATF lines, control cable, suspension for exhaust assembly and insulation sheet.
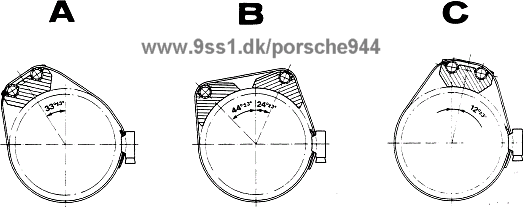


Printed in Germany - I, 1982
Disassembling and Assembling Central Tube
(Type 087 N)
      39 - 143
39 D i f f e r e n t i a l   -   A u t o m a t i c   T r a n s m i s s i o n 9 4 4


2.  Apply a light coat of MoS2 paste on splines of
drive shaft with a brush.


3. Adjust damper (see page 39 - 146).


39 - 144 Disassembling and Assembling Central Tube
(Type 087 N)
Printed in Germany
9 4 4 D i f f e r e n t i a l   -   A u t o m a t i c   T r a n s m i s s i o n       39


C h e c k i n g   C e n t r a l   T u b e


N o t e :

The complete central tube with shaft and bearings
must be replaced, if the bearings or shaft are da-
maged. The replacement of separate parts is not
possible.


1.  Check easy movement of central tube bearings by
turning the drive shaft by hand. The shaft must
turn easily and without points of hesitation.


2. Check out-of-round deviation of drive shaft.
Max. permissible deviation on engine end
= 1.5 mm, on transmission end = 0.5 mm.


3. The position of the drive shaft to the rear flanged
shaft is important for perfect function.
Displacement of drive shaft to rear flange surface
must be 49 +- 0.5 mm.


4.  The displacement can be corrected slightly by
tapping with a plastic hammer on face of drive
shaft.


Printed in Germany - I, 1982
Checking Central Tube (Type 087 N)
      39 - 145
39 D i f f e r e n t i a l   -   A u t o m a t i c   T r a n s m i s s i o n 9 4 4


A d j u s t i n g   D a m p e r


N o t e :

The damper is adjusted to an installed distance of
18 + 1.2mm by using spacers.
Make measurement according to following procedures.


1.  Install damper with a 4 mm thick spacer and
insert circlip.


2. Push damper forward until it rests on circlip and
tighten mounting bolt for clamping sleeve.


3. Place straight-edge on front bell housing and
measure distance to drive dog.


Example:

Measured distance from bell housing
edge to damper hub
Thickness of straight-edge
Measured result
Specified value
Deviation from specified value

25.00 mm
 - 5.00 mm
20.00 mm
- 18.00 mm
2.00 mm


Remove 4 mm thick spacer and install a 6 mm
thick spacer instead.
Recheck.


N o t e :

If measured result is less than specified value of
18 mm, a thinner spacer must be installed.


Spacers are available as replacement parts in
thicknesses from 1 mm to 8 mm.


4.  Loosen clamping sleeve bolt and tighten again
only after damper is mounted on flywheel.


39 - 146 Adjusting Damper (Type 087 N) Printed in Germany